Kyocera 1010N Operation Guide - Page 151
Either an 8 MB, 16 MB, 32 MB, 64 MB, or 128 MB DIMM can be used for, DIMM to be used
 |
UPC - 632983001004
View all Kyocera 1010N manuals
Add to My Manuals
Save this manual to your list of manuals |
Page 151 highlights
Expansion Memory Installation DIMM to be used Contact your Kyocera Mita dealer for information on purchasing the DIMM that are best suited for use with this printer. Either an 8 MB, 16 MB, 32 MB, 64 MB, or 128 MB DIMM can be used for memory expansion. Installing the DIMM Insert the DIMM into the socket as follows: 1 Turn the printer's power off, then unplug the printer's power cable and disconnect the printer from the host computer. 2 Remove the screw from the rear of the printer. 3 Remove the side cover as shown in the figure. Side Cover B-4
-
 1
1 -
2
-
3
-
4
-
5
-
6
-
7
-
8
-
9
-
10
-
11
-
12
-
13
-
14
-
15
-
16
-
17
-
18
-
19
-
20
-
21
-
22
-
23
-
24
-
25
-
26
-
27
-
28
-
29
-
30
-
31
-
32
-
33
-
34
-
35
-
36
-
37
-
38
-
39
-
40
-
41
-
42
-
43
-
44
-
45
-
46
-
47
-
48
-
49
-
50
-
51
-
52
-
53
-
54
-
55
-
56
-
57
-
58
-
59
-
60
-
61
-
62
-
63
-
64
-
65
-
66
-
67
-
68
-
69
-
70
-
71
-
72
-
73
-
74
-
75
-
76
-
77
-
78
-
79
-
80
-
81
-
82
-
83
-
84
-
85
-
86
-
87
-
88
-
89
-
90
-
91
-
92
-
93
-
94
-
95
-
96
-
97
-
98
-
99
-
100
-
101
-
102
-
103
-
104
-
105
-
106
-
107
-
108
-
109
-
110
-
111
-
112
-
113
-
114
-
115
-
116
-
117
-
118
-
119
-
120
-
121
-
122
-
123
-
124
-
125
-
126
-
127
-
128
-
129
-
130
-
131
-
132
-
133
-
134
-
135
-
136
-
137
-
138
-
139
-
140
-
141
-
142
-
143
-
144
-
145
-
 146
146 -
 147
147 -
 148
148 -
 149
149 -
 150
150 -
 151
151 -
 152
152 -
 153
153 -
 154
154 -
 155
155 -
 156
156 -
157
-
158
-
159
-
160
-
161
-
162
-
163
-
164
-
165
-
166
-
167
-
168
-
169
-
170
-
171
-
172
-
173
-
174
-
175
-
176
-
177
-
178
-
179
-
180
-
181
-
182
 |
 |

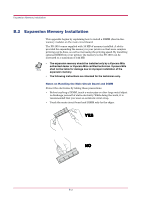
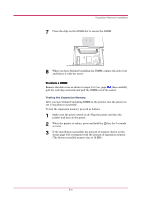
Expansion Memory Installation
B-4
DIMM to be used
Contact your Kyocera Mita dealer for information on purchasing the
DIMM that are best suited for use with this printer.
Either an 8 MB, 16 MB, 32 MB, 64 MB, or 128 MB DIMM can be used for
memory expansion.
Installing the DIMM
Insert the DIMM into the socket as follows:
1
Turn the printer°s power off, then unplug the printer°s power cable
and disconnect the printer from the host computer.
2
Remove the screw from the rear of the printer.
3
Remove the side cover as shown in the figure.
Side Cover