Kyocera KM-3050 3050/4050/5050 Operation Guide Rev-3 (Advanced) - Page 197
Function Defaults, Reset, System Menu
 |
View all Kyocera KM-3050 manuals
Add to My Manuals
Save this manual to your list of manuals |
Page 197 highlights
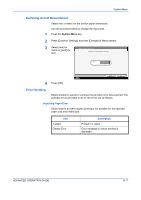
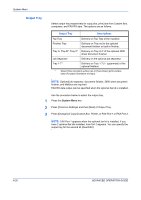
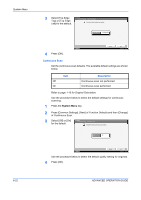
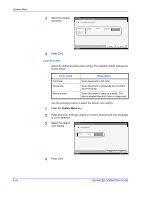
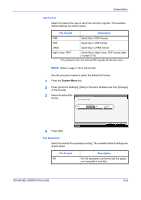
System Menu 4 Select Output Tray. For [Finisher Tray], [Tray B], [Tray C] or [Tray 1-7], select Common Settings - Copy/Custom Box Select output tray for copy jobs. [Face Up] (print surface up) or [Face Top Tray Tray A Tray B Tray C Down] (print surface down) for paper Job Separator Tray 1 Tray Tray 2 Tray 3 orientation at output. Tray 4 Tray 5 Tray 6 Tray 7 Output Face Face Up Face Down Status 5 Press [OK]. Cancel OK 10/5/2006 10:10 Function Defaults Defaults are the values automatically set after the warm-up is completed or the Reset key is pressed. Set the defaults for available settings such as copying and sending. Setting the frequently-used values as defaults makes subsequent jobs easier. Original Orientation Set the original orientation defaults. The available default settings are shown below. Item Top Edge Top Top Edge Left Description Select the original's top edge at the top. Select the original's top edge at the left. Refer to page 1-10 for Original Orientation. Use the procedure below to select the default orientation when originals are placed on the platen. 1 Press the System Menu key. 2 Press [Common Settings], [Next] of Function Defaults and then [Change] of Original Orientation. ADVANCED OPERATION GUIDE 6-21
-
 1
1 -
2
-
3
-
4
-
5
-
6
-
7
-
8
-
9
-
10
-
11
-
12
-
13
-
14
-
15
-
16
-
17
-
18
-
19
-
20
-
21
-
22
-
23
-
24
-
25
-
26
-
27
-
28
-
29
-
30
-
31
-
32
-
33
-
34
-
35
-
36
-
37
-
38
-
39
-
40
-
41
-
42
-
43
-
44
-
45
-
46
-
47
-
48
-
49
-
50
-
51
-
52
-
53
-
54
-
55
-
56
-
57
-
58
-
59
-
60
-
61
-
62
-
63
-
64
-
65
-
66
-
67
-
68
-
69
-
70
-
71
-
72
-
73
-
74
-
75
-
76
-
77
-
78
-
79
-
80
-
81
-
82
-
83
-
84
-
85
-
86
-
87
-
88
-
89
-
90
-
91
-
92
-
93
-
94
-
95
-
96
-
97
-
98
-
99
-
100
-
101
-
102
-
103
-
104
-
105
-
106
-
107
-
108
-
109
-
110
-
111
-
112
-
113
-
114
-
115
-
116
-
117
-
118
-
119
-
120
-
121
-
122
-
123
-
124
-
125
-
126
-
127
-
128
-
129
-
130
-
131
-
132
-
133
-
134
-
135
-
136
-
137
-
138
-
139
-
140
-
141
-
142
-
143
-
144
-
145
-
146
-
147
-
148
-
149
-
150
-
151
-
152
-
153
-
154
-
155
-
156
-
157
-
158
-
159
-
160
-
161
-
162
-
163
-
164
-
165
-
166
-
167
-
168
-
169
-
170
-
171
-
172
-
173
-
174
-
175
-
176
-
177
-
178
-
179
-
180
-
181
-
182
-
183
-
184
-
185
-
186
-
187
-
188
-
189
-
190
-
191
-
 192
192 -
 193
193 -
 194
194 -
 195
195 -
 196
196 -
 197
197 -
 198
198 -
 199
199 -
 200
200 -
 201
201 -
 202
202 -
203
-
204
-
205
-
206
-
207
-
208
-
209
-
210
-
211
-
212
-
213
-
214
-
215
-
216
-
217
-
218
-
219
-
220
-
221
-
222
-
223
-
224
-
225
-
226
-
227
-
228
-
229
-
230
-
231
-
232
-
233
-
234
-
235
-
236
-
237
-
238
-
239
-
240
-
241
-
242
-
243
-
244
-
245
-
246
-
247
-
248
-
249
-
250
-
251
-
252
-
253
-
254
-
255
-
256
-
257
-
258
-
259
-
260
-
261
-
262
-
263
-
264
-
265
-
266
-
267
-
268
-
269
-
270
-
271
-
272
-
273
-
274
-
275
-
276
-
277
-
278
-
279
-
280
-
281
-
282
-
283
-
284
-
285
-
286
-
287
-
288
-
289
-
290
-
291
-
292
-
293
-
294
-
295
-
296
-
297
-
298
-
299
-
300
-
301
-
302
-
303
-
304
-
305
-
306
-
307
-
308
-
309
-
310
-
311
-
312
-
313
-
314
-
315
-
316
-
317
-
318
-
319
-
320
-
321
-
322
 |
 |
