Kyocera KM-3050 3050/4050/5050 Operation Guide Rev-3 (Advanced) - Page 243
Charger Auto Cleaning, Display Brightness, System Menu, ADVANCED OPERATION GUIDE
 |
View all Kyocera KM-3050 manuals
Add to My Manuals
Save this manual to your list of manuals |
Page 243 highlights
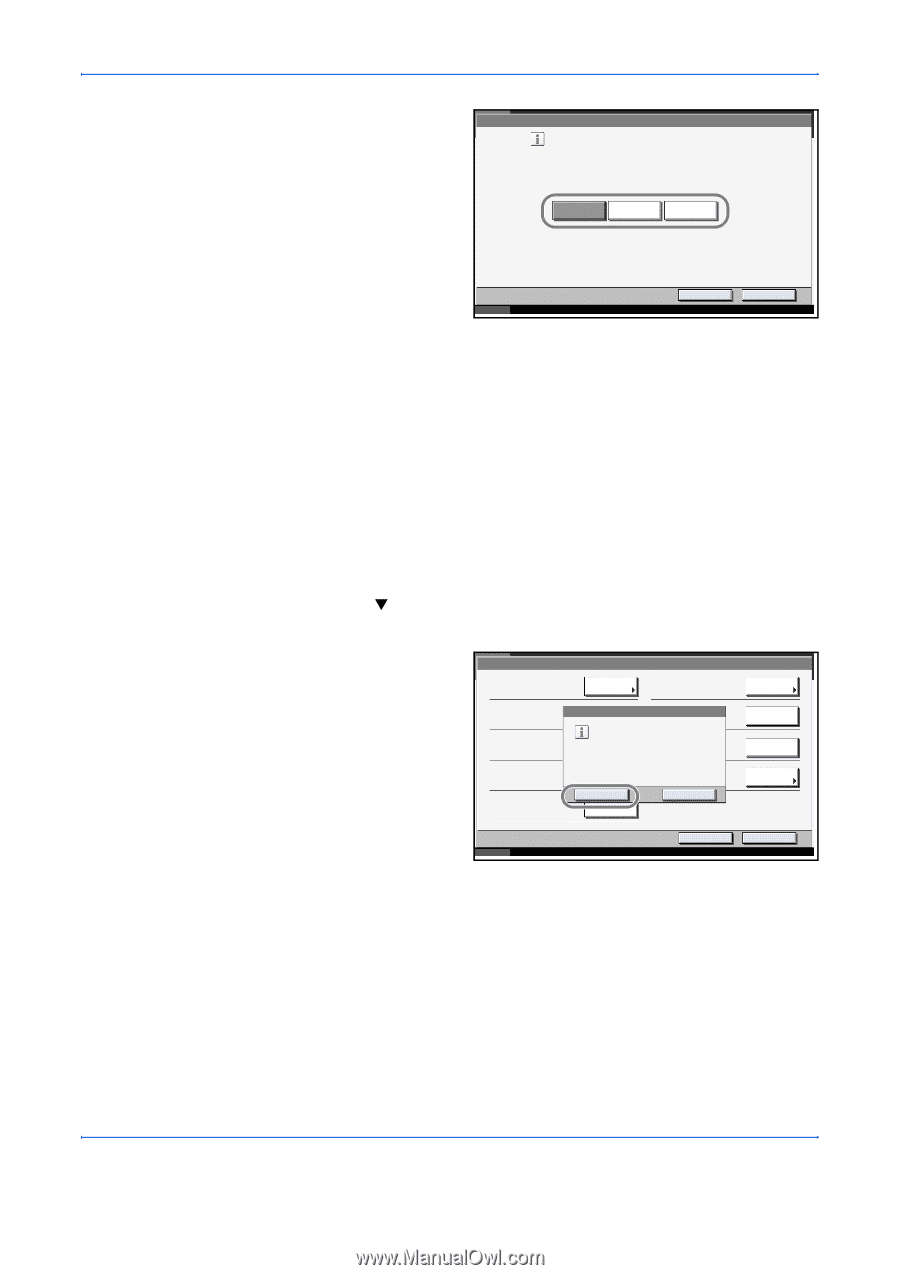
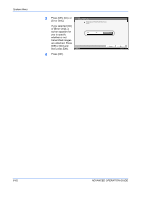
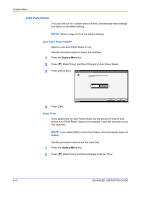
3 Press [Off], [On(Low)] or [On(High)]. System Menu Adjustment/Maintenance - Correcting Fine Black Line Reduce the visibility of fine black lines if they appear in a scanned image. *Small characters will also become less visible. Off On(Low) On(High) Status 4 Press [OK]. Cancel OK 10/5/2006 10:10 Charger Auto Cleaning If black streaks appear on the printouts or scanned data, perform automatic cleaning of the main chargers. If no black line appears at the ends of the paper (margin), refer to Correcting Fine Black Lines on page 6-66. The procedure for using Charger Auto Cleaning is explained below. 1 Press the System Menu key. 2 Press [T], [Adjustment/Maintenance] and [Execute] of Charger Auto Cleaning. 3 Press [Yes]. Automatic cleaning of the main charger starts and ends in about 45 seconds. Adjustment/Maintenance Copy Density Adjustment: Change Send/Box Density Adjust.: Change Print Density: Correcting Black Line: Display Brightness: Charger Auto Cleaning: The charger will be cleaned. Are you sure? Yes No Execute Execute Change Status Return to Top Close 10/5/200 6 10:10 4 Once the cleaning ends, return to the Adjustment/Maintenance screen. Display Brightness Set the brightness of the touch panel. Use the procedure below to adjust the display brightness. 1 Press the System Menu key. ADVANCED OPERATION GUIDE 6-67
-
 1
1 -
2
-
3
-
4
-
5
-
6
-
7
-
8
-
9
-
10
-
11
-
12
-
13
-
14
-
15
-
16
-
17
-
18
-
19
-
20
-
21
-
22
-
23
-
24
-
25
-
26
-
27
-
28
-
29
-
30
-
31
-
32
-
33
-
34
-
35
-
36
-
37
-
38
-
39
-
40
-
41
-
42
-
43
-
44
-
45
-
46
-
47
-
48
-
49
-
50
-
51
-
52
-
53
-
54
-
55
-
56
-
57
-
58
-
59
-
60
-
61
-
62
-
63
-
64
-
65
-
66
-
67
-
68
-
69
-
70
-
71
-
72
-
73
-
74
-
75
-
76
-
77
-
78
-
79
-
80
-
81
-
82
-
83
-
84
-
85
-
86
-
87
-
88
-
89
-
90
-
91
-
92
-
93
-
94
-
95
-
96
-
97
-
98
-
99
-
100
-
101
-
102
-
103
-
104
-
105
-
106
-
107
-
108
-
109
-
110
-
111
-
112
-
113
-
114
-
115
-
116
-
117
-
118
-
119
-
120
-
121
-
122
-
123
-
124
-
125
-
126
-
127
-
128
-
129
-
130
-
131
-
132
-
133
-
134
-
135
-
136
-
137
-
138
-
139
-
140
-
141
-
142
-
143
-
144
-
145
-
146
-
147
-
148
-
149
-
150
-
151
-
152
-
153
-
154
-
155
-
156
-
157
-
158
-
159
-
160
-
161
-
162
-
163
-
164
-
165
-
166
-
167
-
168
-
169
-
170
-
171
-
172
-
173
-
174
-
175
-
176
-
177
-
178
-
179
-
180
-
181
-
182
-
183
-
184
-
185
-
186
-
187
-
188
-
189
-
190
-
191
-
192
-
193
-
194
-
195
-
196
-
197
-
198
-
199
-
200
-
201
-
202
-
203
-
204
-
205
-
206
-
207
-
208
-
209
-
210
-
211
-
212
-
213
-
214
-
215
-
216
-
217
-
218
-
219
-
220
-
221
-
222
-
223
-
224
-
225
-
226
-
227
-
228
-
229
-
230
-
231
-
232
-
233
-
234
-
235
-
236
-
237
-
 238
238 -
 239
239 -
 240
240 -
 241
241 -
 242
242 -
 243
243 -
 244
244 -
 245
245 -
 246
246 -
 247
247 -
 248
248 -
249
-
250
-
251
-
252
-
253
-
254
-
255
-
256
-
257
-
258
-
259
-
260
-
261
-
262
-
263
-
264
-
265
-
266
-
267
-
268
-
269
-
270
-
271
-
272
-
273
-
274
-
275
-
276
-
277
-
278
-
279
-
280
-
281
-
282
-
283
-
284
-
285
-
286
-
287
-
288
-
289
-
290
-
291
-
292
-
293
-
294
-
295
-
296
-
297
-
298
-
299
-
300
-
301
-
302
-
303
-
304
-
305
-
306
-
307
-
308
-
309
-
310
-
311
-
312
-
313
-
314
-
315
-
316
-
317
-
318
-
319
-
320
-
321
-
322
 |
 |