Kyocera KM-3050 3050/4050/5050 Operation Guide Rev-3 (Advanced) - Page 98
Scan Resolution, Press [Color/Image] and then [Scan Resolution].
 |
View all Kyocera KM-3050 manuals
Add to My Manuals
Save this manual to your list of manuals |
Page 98 highlights
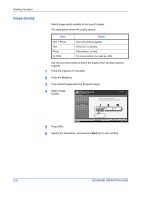
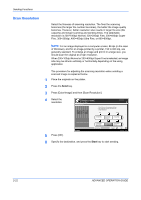
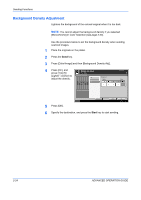
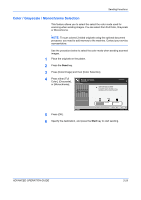
Sending Functions Scan Resolution Select the fineness of scanning resolution. The finer the scanning becomes (the larger the number becomes), the better the image quality becomes. However, better resolution also results in larger file size (file capacity) and longer scanning and sending times. The selectable resolution is 200×100dpi Normal, 200×200dpi Fine, 200×400dpi Super Fine, 300×300dpi, 400×400dpi Ultra Fine, or 600×600dpi. NOTE: For an image displayed on a computer screen, 96 dpi (in the case of Windows), and for an image printed by a printer, 150 to 600 dip, are generally standard. To enlarge an image and print it in a large size, you should scan the original at a high resolution. When 200×100dpi Normal or 200×400dpi Super Fine is selected, an image size may be shrunk vertically or horizontally depending on the using application. The procedure for adjusting the scanning resolution when sending a scanned image is explained below. 1 Place the originals on the platen. 2 Press the Send key. 3 Press [Color/Image] and then [Scan Resolution]. 4 Select the resolution. Ready to send. Place original. Scan Resolution Press [OK] to display the image. Destination 1 Select fineness of scanning resolution. The larger the number, the better the image resolution. 600x600dpi 400x400dpi Ultra Fine 300x300dpi Status 5 Press [OK]. 200x400dpi Super Fine Add Shortcut 200x200dpi Fine 200x100dpi Normal Cancel OK 10/5/2006 10:10 6 Specify the destination, and press the Start key to start sending. 2-22 ADVANCED OPERATION GUIDE
-
 1
1 -
2
-
3
-
4
-
5
-
6
-
7
-
8
-
9
-
10
-
11
-
12
-
13
-
14
-
15
-
16
-
17
-
18
-
19
-
20
-
21
-
22
-
23
-
24
-
25
-
26
-
27
-
28
-
29
-
30
-
31
-
32
-
33
-
34
-
35
-
36
-
37
-
38
-
39
-
40
-
41
-
42
-
43
-
44
-
45
-
46
-
47
-
48
-
49
-
50
-
51
-
52
-
53
-
54
-
55
-
56
-
57
-
58
-
59
-
60
-
61
-
62
-
63
-
64
-
65
-
66
-
67
-
68
-
69
-
70
-
71
-
72
-
73
-
74
-
75
-
76
-
77
-
78
-
79
-
80
-
81
-
82
-
83
-
84
-
85
-
86
-
87
-
88
-
89
-
90
-
91
-
92
-
 93
93 -
 94
94 -
 95
95 -
 96
96 -
 97
97 -
 98
98 -
 99
99 -
 100
100 -
 101
101 -
 102
102 -
 103
103 -
104
-
105
-
106
-
107
-
108
-
109
-
110
-
111
-
112
-
113
-
114
-
115
-
116
-
117
-
118
-
119
-
120
-
121
-
122
-
123
-
124
-
125
-
126
-
127
-
128
-
129
-
130
-
131
-
132
-
133
-
134
-
135
-
136
-
137
-
138
-
139
-
140
-
141
-
142
-
143
-
144
-
145
-
146
-
147
-
148
-
149
-
150
-
151
-
152
-
153
-
154
-
155
-
156
-
157
-
158
-
159
-
160
-
161
-
162
-
163
-
164
-
165
-
166
-
167
-
168
-
169
-
170
-
171
-
172
-
173
-
174
-
175
-
176
-
177
-
178
-
179
-
180
-
181
-
182
-
183
-
184
-
185
-
186
-
187
-
188
-
189
-
190
-
191
-
192
-
193
-
194
-
195
-
196
-
197
-
198
-
199
-
200
-
201
-
202
-
203
-
204
-
205
-
206
-
207
-
208
-
209
-
210
-
211
-
212
-
213
-
214
-
215
-
216
-
217
-
218
-
219
-
220
-
221
-
222
-
223
-
224
-
225
-
226
-
227
-
228
-
229
-
230
-
231
-
232
-
233
-
234
-
235
-
236
-
237
-
238
-
239
-
240
-
241
-
242
-
243
-
244
-
245
-
246
-
247
-
248
-
249
-
250
-
251
-
252
-
253
-
254
-
255
-
256
-
257
-
258
-
259
-
260
-
261
-
262
-
263
-
264
-
265
-
266
-
267
-
268
-
269
-
270
-
271
-
272
-
273
-
274
-
275
-
276
-
277
-
278
-
279
-
280
-
281
-
282
-
283
-
284
-
285
-
286
-
287
-
288
-
289
-
290
-
291
-
292
-
293
-
294
-
295
-
296
-
297
-
298
-
299
-
300
-
301
-
302
-
303
-
304
-
305
-
306
-
307
-
308
-
309
-
310
-
311
-
312
-
313
-
314
-
315
-
316
-
317
-
318
-
319
-
320
-
321
-
322
 |
 |