Kyocera KM-3050 3050/4050/5050 Operation Guide Rev-3 (Advanced) - Page 50
Edge Top] or [Top Edge Left]. Then press [OK]., sided]
 |
View all Kyocera KM-3050 manuals
Add to My Manuals
Save this manual to your list of manuals |
Page 50 highlights
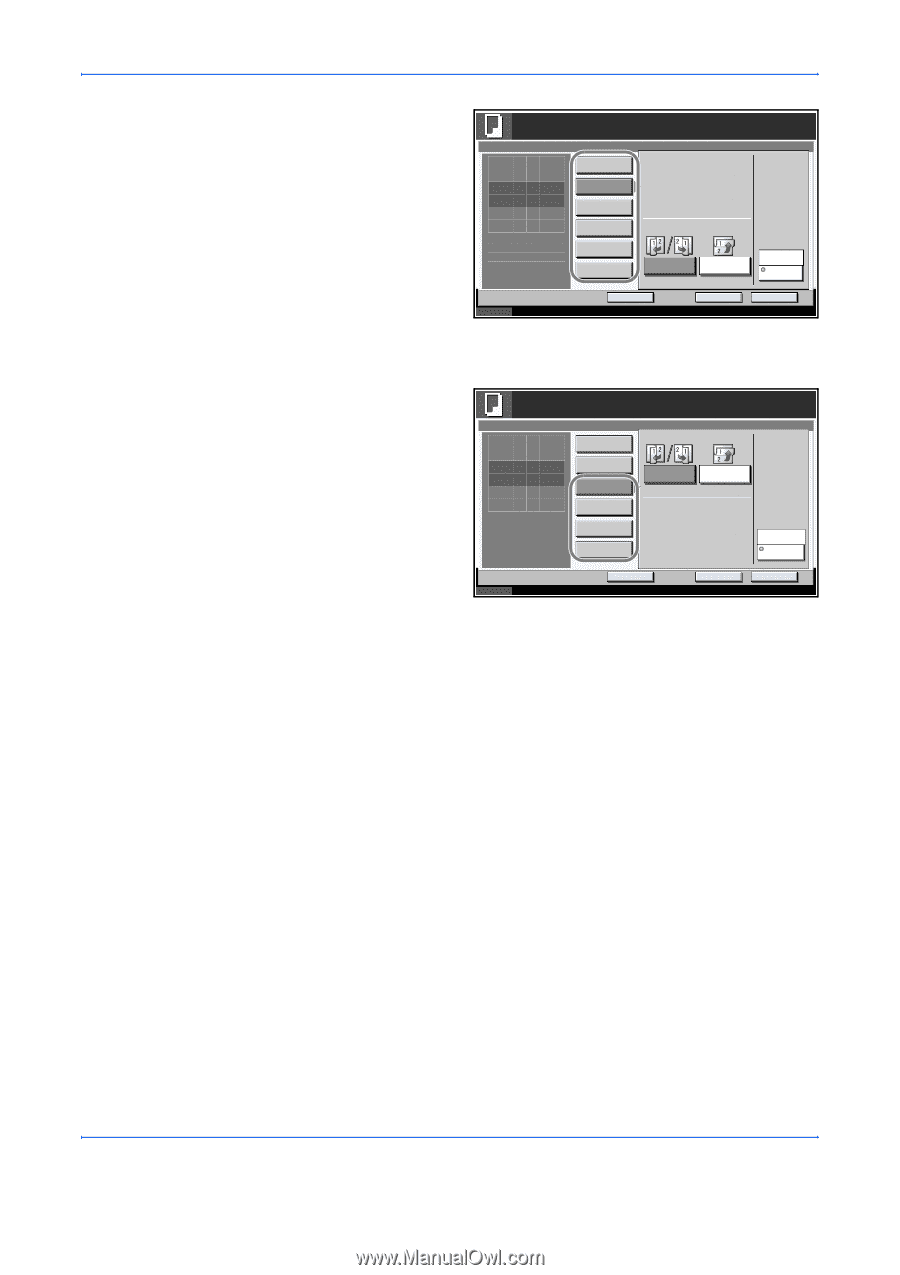
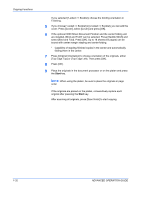
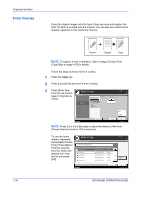
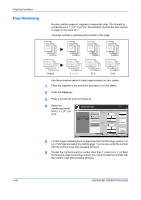
Copying Functions 3 Select the desired Duplex mode. Ready to copy. Duplex Press [OK] to display the image. 1-sided >>1-sided 1-sided >>2-sided 2-sided >>1-sided 2-sided >>2-sided Book >>1-sided Book >>2-sided Finishing Binding Left/Right Status Add Shortcut Binding Top Cancel Copies 1 Top Edge Top Original Orientation OK 10/5/2006 10:10 4 If you choose [1 sided >> 2 sided], [2 sided >> 2 sided] or [Book >> 2 sided], select the binding edge of the finished copies in Finishing. 5 If you choose [2 sided >> 2 sided], [2 Ready to copy. sided >> 1 sided], Duplex [Book >> 1 sided] or 1-sided >>1-sided [Book >> 2 sided], Press [OK] to display 1-sided >>2-sided select the binding edge of the originals in Original. the image. 2-sided >>1-sided 2-sided >>2-sided Book >>1-sided Book >>2-sided Original Binding Left/Right Binding Top Status Add Shortcut Cancel Copies 1 Top Edge Top Original Orientation OK 10/5/2006 10:10 6 Press [Original Orientation] to select orientation of the originals, either [Top Edge Top] or [Top Edge Left]. Then press [OK]. 7 Press [OK]. 8 Place the originals in the document processor or on the platen and press the Start key. If the originals are placed on the platen, consecutively replace each original after pressing the Start key. After scanning all originals, press [Scan Finish] to start copying. 1-36 ADVANCED OPERATION GUIDE
-
 1
1 -
2
-
3
-
4
-
5
-
6
-
7
-
8
-
9
-
10
-
11
-
12
-
13
-
14
-
15
-
16
-
17
-
18
-
19
-
20
-
21
-
22
-
23
-
24
-
25
-
26
-
27
-
28
-
29
-
30
-
31
-
32
-
33
-
34
-
35
-
36
-
37
-
38
-
39
-
40
-
41
-
42
-
43
-
44
-
 45
45 -
 46
46 -
 47
47 -
 48
48 -
 49
49 -
 50
50 -
 51
51 -
 52
52 -
 53
53 -
 54
54 -
 55
55 -
56
-
57
-
58
-
59
-
60
-
61
-
62
-
63
-
64
-
65
-
66
-
67
-
68
-
69
-
70
-
71
-
72
-
73
-
74
-
75
-
76
-
77
-
78
-
79
-
80
-
81
-
82
-
83
-
84
-
85
-
86
-
87
-
88
-
89
-
90
-
91
-
92
-
93
-
94
-
95
-
96
-
97
-
98
-
99
-
100
-
101
-
102
-
103
-
104
-
105
-
106
-
107
-
108
-
109
-
110
-
111
-
112
-
113
-
114
-
115
-
116
-
117
-
118
-
119
-
120
-
121
-
122
-
123
-
124
-
125
-
126
-
127
-
128
-
129
-
130
-
131
-
132
-
133
-
134
-
135
-
136
-
137
-
138
-
139
-
140
-
141
-
142
-
143
-
144
-
145
-
146
-
147
-
148
-
149
-
150
-
151
-
152
-
153
-
154
-
155
-
156
-
157
-
158
-
159
-
160
-
161
-
162
-
163
-
164
-
165
-
166
-
167
-
168
-
169
-
170
-
171
-
172
-
173
-
174
-
175
-
176
-
177
-
178
-
179
-
180
-
181
-
182
-
183
-
184
-
185
-
186
-
187
-
188
-
189
-
190
-
191
-
192
-
193
-
194
-
195
-
196
-
197
-
198
-
199
-
200
-
201
-
202
-
203
-
204
-
205
-
206
-
207
-
208
-
209
-
210
-
211
-
212
-
213
-
214
-
215
-
216
-
217
-
218
-
219
-
220
-
221
-
222
-
223
-
224
-
225
-
226
-
227
-
228
-
229
-
230
-
231
-
232
-
233
-
234
-
235
-
236
-
237
-
238
-
239
-
240
-
241
-
242
-
243
-
244
-
245
-
246
-
247
-
248
-
249
-
250
-
251
-
252
-
253
-
254
-
255
-
256
-
257
-
258
-
259
-
260
-
261
-
262
-
263
-
264
-
265
-
266
-
267
-
268
-
269
-
270
-
271
-
272
-
273
-
274
-
275
-
276
-
277
-
278
-
279
-
280
-
281
-
282
-
283
-
284
-
285
-
286
-
287
-
288
-
289
-
290
-
291
-
292
-
293
-
294
-
295
-
296
-
297
-
298
-
299
-
300
-
301
-
302
-
303
-
304
-
305
-
306
-
307
-
308
-
309
-
310
-
311
-
312
-
313
-
314
-
315
-
316
-
317
-
318
-
319
-
320
-
321
-
322
 |
 |