Kyocera KM-C2030 Fiery X3e Configuration Guide for Ver 2.0 - Page 14
Stages of installation on the network, User Software, Installation Guide, Job Management Guide
 |
View all Kyocera KM-C2030 manuals
Add to My Manuals
Save this manual to your list of manuals |
Page 14 highlights
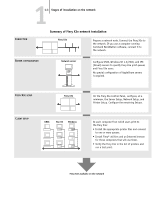
11-2 Connecting to the Network Stages of installation on the network Installation can be performed by a network or printing administrator. The stages of a successful installation are: • Physically connecting the Fiery X3e to a functioning network Prepare a network node for the Fiery X3e-obtain cable, route it to the location where the Fiery X3e will be installed, and attach the cable to the network interface. For details, see page 3-8. • Configuring the network server When network servers are required, you need to configure those servers to provide client access to the Fiery X3e as a PCL or PostScript printer. For information on configuring network servers in Windows and UNIX network environments, see Chapter 2. • Setting up the Fiery X3e Configure the Fiery X3e for your particular printing and network environment. First read Chapter 2, and then see subsequent chapters for details. • Preparing client workstations for printing Install the files needed for printing, install additional user software, and connect the client to the Fiery X3e over the network. These steps are described in the User Software Installation Guide, and some information is also provided in Chapter 2. • Administering the Fiery X3e Monitor and maintain system performance and troubleshoot problems that arise. For details, see Chapter 7 of this manual and the Job Management Guide.
-
 1
1 -
2
-
3
-
4
-
5
-
6
-
7
-
8
-
 9
9 -
 10
10 -
 11
11 -
 12
12 -
 13
13 -
 14
14 -
 15
15 -
 16
16 -
 17
17 -
 18
18 -
 19
19 -
20
-
21
-
22
-
23
-
24
-
25
-
26
-
27
-
28
-
29
-
30
-
31
-
32
-
33
-
34
-
35
-
36
-
37
-
38
-
39
-
40
-
41
-
42
-
43
-
44
-
45
-
46
-
47
-
48
-
49
-
50
-
51
-
52
-
53
-
54
-
55
-
56
-
57
-
58
-
59
-
60
-
61
-
62
-
63
-
64
-
65
-
66
-
67
-
68
-
69
-
70
-
71
-
72
-
73
-
74
-
75
-
76
-
77
-
78
-
79
-
80
-
81
-
82
-
83
-
84
-
85
-
86
-
87
-
88
-
89
-
90
-
91
-
92
-
93
-
94
-
95
-
96
-
97
-
98
-
99
-
100
-
101
-
102
-
103
-
104
-
105
-
106
-
107
-
108
-
109
-
110
-
111
-
112
-
113
-
114
-
115
-
116
-
117
-
118
-
119
-
120
-
121
-
122
-
123
-
124
-
125
-
126
-
127
-
128
-
129
-
130
-
131
-
132
-
133
-
134
-
135
-
136
-
137
-
138
-
139
-
140
-
141
-
142
-
143
-
144
-
145
-
146
-
147
-
148
-
149
-
150
-
151
-
152
-
153
-
154
-
155
-
156
-
157
-
158
-
159
-
160
-
161
-
162
-
163
-
164
-
165
-
166
-
167
-
168
-
169
-
170
-
171
-
172
-
173
-
174
 |
 |
