LG Fusic LX550 User Guide - Page 104
Selecting a Ringer, Type for an Entry
 |
View all LG Fusic LX550 manuals
Add to My Manuals
Save this manual to your list of manuals |
Page 104 highlights
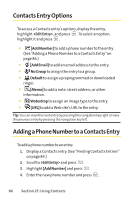
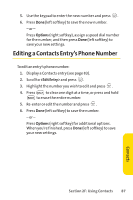
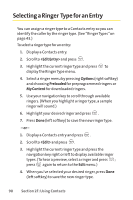
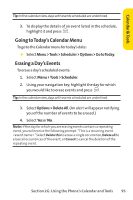
Selecting a Ringer Type for an Entry You can assign a ringer type to a Contacts entry so you can identify the caller by the ringer type. (See "Ringer Types"on page 43.) To select a ringer type for an entry: 1. Display a Contacts entry. 2. Scroll to and press . 3. Highlight the current ringer type and press to display the Ringer Type menu. 4. Select a ringer menu by pressing Options (right softkey) and choosing Preloaded for preprogrammed ringers or My Content for downloaded ringers. 5. Use your navigation key to scroll through available ringers. (When you highlight a ringer type, a sample ringer will sound.) 6. Highlight your desired ringer and press . 7. Press Done (left softkey) to save the new ringer type. - or - 1. Display a Contacts entry and press . 2. Scroll to and press . 3. Highlight the current ringer type and press the navigation key right or left to display available ringer types. (To hear a preview, select a ringer and press ; press again to return to the Edit menu.) 4. When you've selected your desired ringer, press Done (left softkey) to save the new ringer type. 90 Section 2F: Using Contacts
-
 1
1 -
2
-
3
-
4
-
5
-
6
-
7
-
8
-
9
-
10
-
11
-
12
-
13
-
14
-
15
-
16
-
17
-
18
-
19
-
20
-
21
-
22
-
23
-
24
-
25
-
26
-
27
-
28
-
29
-
30
-
31
-
32
-
33
-
34
-
35
-
36
-
37
-
38
-
39
-
40
-
41
-
42
-
43
-
44
-
45
-
46
-
47
-
48
-
49
-
50
-
51
-
52
-
53
-
54
-
55
-
56
-
57
-
58
-
59
-
60
-
61
-
62
-
63
-
64
-
65
-
66
-
67
-
68
-
69
-
70
-
71
-
72
-
73
-
74
-
75
-
76
-
77
-
78
-
79
-
80
-
81
-
82
-
83
-
84
-
85
-
86
-
87
-
88
-
89
-
90
-
91
-
92
-
93
-
94
-
95
-
96
-
97
-
98
-
 99
99 -
 100
100 -
 101
101 -
 102
102 -
 103
103 -
 104
104 -
 105
105 -
 106
106 -
 107
107 -
 108
108 -
 109
109 -
110
-
111
-
112
-
113
-
114
-
115
-
116
-
117
-
118
-
119
-
120
-
121
-
122
-
123
-
124
-
125
-
126
-
127
-
128
-
129
-
130
-
131
-
132
-
133
-
134
-
135
-
136
-
137
-
138
-
139
-
140
-
141
-
142
-
143
-
144
-
145
-
146
-
147
-
148
-
149
-
150
-
151
-
152
-
153
-
154
-
155
-
156
-
157
-
158
-
159
-
160
-
161
-
162
-
163
-
164
-
165
-
166
-
167
-
168
-
169
-
170
-
171
-
172
-
173
-
174
-
175
-
176
-
177
-
178
-
179
-
180
-
181
-
182
-
183
-
184
-
185
-
186
-
187
-
188
-
189
-
190
-
191
-
192
-
193
-
194
 |
 |