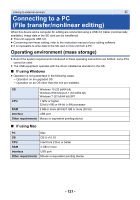
Panasonic AG-DVX200 Operating Instructions - Volume 2 - Page 122
Connecting to a PC, Set [USB MODE SELECT] to [DEVICE].
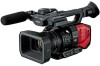 |
View all Panasonic AG-DVX200 manuals
Add to My Manuals
Save this manual to your list of manuals |
Page 122 highlights
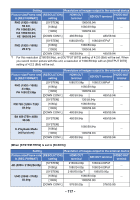
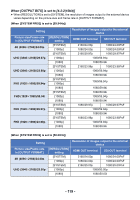
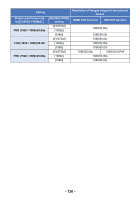
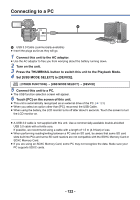
Connecting to a PC USB DEVICE A USB 3.0 Cable (commercially-available) ≥ Insert the plugs as far as they will go. 1 Connect this unit to the AC adaptor. ≥ Use the AC adaptor to free you from worrying about the battery running down. 2 Turn on the unit. 3 Press the THUMBNAIL button to switch this unit to the Playback Mode. 4 Set [USB MODE SELECT] to [DEVICE]. MENU : [OTHER FUNCTION] # [USB MODE SELECT] # [DEVICE] 5 Connect this unit to a PC. ≥ The USB function selection screen will appear. 6 Touch [PC] on the screen of this unit. ≥ This unit is automatically recognized as an external drive of the PC. (l 123) ≥ When you select an option other than [PC], reconnect the USB Cable. ≥ When using the battery, the LCD monitor turns off after about 5 seconds. Touch the screen to turn the LCD monitor on. ≥ A USB 3.0 cable is not supplied with this unit. Use a commercially-available double-shielded USB 3.0 cable with a ferrite core. If possible, we recommend using a cable with a length of 1.5 m (4.9 feet) or less. ≥ When performing reading/writing between a PC and an SD card, be aware that some SD card slots built into PCs and some SD card readers are not compatible with the SDHC Memory Card or SDXC Memory Card. ≥ If you are using an SDXC Memory Card, some PC may not recognize the data. Make sure your PC supports SDXC cards. - 122 -
-
 1
1 -
2
-
3
-
4
-
5
-
6
-
7
-
8
-
9
-
10
-
11
-
12
-
13
-
14
-
15
-
16
-
17
-
18
-
19
-
20
-
21
-
22
-
23
-
24
-
25
-
26
-
27
-
28
-
29
-
30
-
31
-
32
-
33
-
34
-
35
-
36
-
37
-
38
-
39
-
40
-
41
-
42
-
43
-
44
-
45
-
46
-
47
-
48
-
49
-
50
-
51
-
52
-
53
-
54
-
55
-
56
-
57
-
58
-
59
-
60
-
61
-
62
-
63
-
64
-
65
-
66
-
67
-
68
-
69
-
70
-
71
-
72
-
73
-
74
-
75
-
76
-
77
-
78
-
79
-
80
-
81
-
82
-
83
-
84
-
85
-
86
-
87
-
88
-
89
-
90
-
91
-
92
-
93
-
94
-
95
-
96
-
97
-
98
-
99
-
100
-
101
-
102
-
103
-
104
-
105
-
106
-
107
-
108
-
109
-
110
-
111
-
112
-
113
-
114
-
115
-
116
-
 117
117 -
 118
118 -
 119
119 -
 120
120 -
 121
121 -
 122
122 -
 123
123 -
 124
124 -
 125
125 -
 126
126 -
 127
127 -
128
-
129
-
130
-
131
-
132
-
133
-
134
-
135
-
136
-
137
-
138
-
139
-
140
-
141
-
142
-
143
-
144
-
145
-
146
-
147
-
148
-
149
-
150
-
151
-
152
-
153
-
154
-
155
-
156
-
157
-
158
-
159
-
160
-
161
-
162
-
163
-
164
-
165
-
166
-
167
-
168
-
169
-
170
-
171
-
172
-
173
-
174
-
175
-
176
-
177
-
178
-
179
-
180
-
181
-
182
-
183
-
184
-
185
-
186
-
187
-
188
-
189
-
190
-
191
-
192
-
193
-
194
-
195
-
196
-
197
-
198
-
199
-
200
-
201
-
202
-
203
 |
 |
