Panasonic AG-DVX200 Operating Instructions - Volume 2 - Page 171
Display setting, ZEBRA DETECT 1], MARKER]
 |
View all Panasonic AG-DVX200 manuals
Add to My Manuals
Save this manual to your list of manuals |
Page 171 highlights
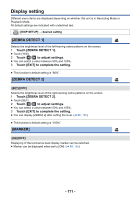
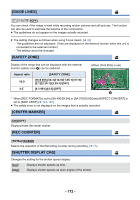
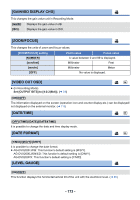
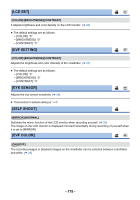
Display setting Different menu items are displayed depending on whether this unit is in Recording Mode or Playback Mode. All default settings are indicated with underlined text. MENU : [DISP SETUP] # desired setting [ZEBRA DETECT 1] Selects the brightness level of the left-leaning zebra patterns on the screen. 1 Touch [ZEBRA DETECT 1]. ≥ Touch [YES]. 2 Touch / to adjust settings. ≥ You can select a value between 50% and 105%. 3 Touch [EXIT] to complete the setting. ≥ This function's default setting is "80%". [ZEBRA DETECT 2] [SET]/[OFF] Selects the brightness level of the right-leaning zebra patterns on the screen. 1 Touch [ZEBRA DETECT 2]. ≥ Touch [SET]. 2 Touch / to adjust settings. ≥ You can select a value between 50% and 105%. 3 Touch [EXIT] to complete the setting. ≥ You can display [ZEBRA 2] after setting the level. (l 88, 155) ≥ This function's default setting is "100%". [MARKER] [ON]/[OFF] Displaying of the luminance level display marker can be switched. ≥ Marker can be displayed when set to [ON]. (l 88, 155) - 171 -
-
 1
1 -
2
-
3
-
4
-
5
-
6
-
7
-
8
-
9
-
10
-
11
-
12
-
13
-
14
-
15
-
16
-
17
-
18
-
19
-
20
-
21
-
22
-
23
-
24
-
25
-
26
-
27
-
28
-
29
-
30
-
31
-
32
-
33
-
34
-
35
-
36
-
37
-
38
-
39
-
40
-
41
-
42
-
43
-
44
-
45
-
46
-
47
-
48
-
49
-
50
-
51
-
52
-
53
-
54
-
55
-
56
-
57
-
58
-
59
-
60
-
61
-
62
-
63
-
64
-
65
-
66
-
67
-
68
-
69
-
70
-
71
-
72
-
73
-
74
-
75
-
76
-
77
-
78
-
79
-
80
-
81
-
82
-
83
-
84
-
85
-
86
-
87
-
88
-
89
-
90
-
91
-
92
-
93
-
94
-
95
-
96
-
97
-
98
-
99
-
100
-
101
-
102
-
103
-
104
-
105
-
106
-
107
-
108
-
109
-
110
-
111
-
112
-
113
-
114
-
115
-
116
-
117
-
118
-
119
-
120
-
121
-
122
-
123
-
124
-
125
-
126
-
127
-
128
-
129
-
130
-
131
-
132
-
133
-
134
-
135
-
136
-
137
-
138
-
139
-
140
-
141
-
142
-
143
-
144
-
145
-
146
-
147
-
148
-
149
-
150
-
151
-
152
-
153
-
154
-
155
-
156
-
157
-
158
-
159
-
160
-
161
-
162
-
163
-
164
-
165
-
 166
166 -
 167
167 -
 168
168 -
 169
169 -
 170
170 -
 171
171 -
 172
172 -
 173
173 -
 174
174 -
 175
175 -
 176
176 -
177
-
178
-
179
-
180
-
181
-
182
-
183
-
184
-
185
-
186
-
187
-
188
-
189
-
190
-
191
-
192
-
193
-
194
-
195
-
196
-
197
-
198
-
199
-
200
-
201
-
202
-
203
 |
 |
