Panasonic AG-DVX200 Operating Instructions - Volume 2 - Page 127
Differential copy, Formatting, Displaying media information
 |
View all Panasonic AG-DVX200 manuals
Add to My Manuals
Save this manual to your list of manuals |
Page 127 highlights
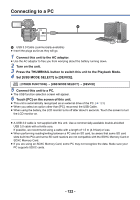
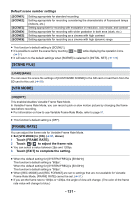
∫ Formatting This is for initializing the external media device. ≥ Please be aware that if a media is formatted then all the data recorded on the media is erased and cannot be recovered. Back up important data on a PC etc. ≥ Connect this unit to the external media device and touch [Playback from External Media]. Select the menu. MENU : [OTHER FUNCTION] # [FORMAT MEDIA] # [EXTERNAL] ≥ When formatting is complete, touch [EXIT] to exit the message screen. ≥ Connect this unit and the external media device to format. You may no longer be able to use the external media device if you format them on another device such as a PC etc. ≥ This unit formats the external media device in exFAT. ∫ Displaying media information The used space of the external media device can be checked. ≥ Connect this unit to the external media device and touch [Playback from External Media]. Select the menu. MENU : [OTHER FUNCTION] # [MEDIA STATUS] ≥ If you touch [CHANGE MEDIA], you can switch the display between the SD card 1, SD card 2, and the external media device. Differential copy 1 Connect this unit to the external media device to prepare for copying. (l 125) 2 Touch [DIFFERENTIAL COPY]. ≥ You can also access this function by selecting menu items. [COPY] # [DIFFERENTIAL COPY] 3 Touch the media you want to copy. 4 Touch [YES]. 5 Touch [EXIT] when the copy complete message is displayed. ≥ The thumbnail view of the copy destination is indicated. When you stop copying halfway: Touch [CANCEL] while copying. - 127 -
-
 1
1 -
2
-
3
-
4
-
5
-
6
-
7
-
8
-
9
-
10
-
11
-
12
-
13
-
14
-
15
-
16
-
17
-
18
-
19
-
20
-
21
-
22
-
23
-
24
-
25
-
26
-
27
-
28
-
29
-
30
-
31
-
32
-
33
-
34
-
35
-
36
-
37
-
38
-
39
-
40
-
41
-
42
-
43
-
44
-
45
-
46
-
47
-
48
-
49
-
50
-
51
-
52
-
53
-
54
-
55
-
56
-
57
-
58
-
59
-
60
-
61
-
62
-
63
-
64
-
65
-
66
-
67
-
68
-
69
-
70
-
71
-
72
-
73
-
74
-
75
-
76
-
77
-
78
-
79
-
80
-
81
-
82
-
83
-
84
-
85
-
86
-
87
-
88
-
89
-
90
-
91
-
92
-
93
-
94
-
95
-
96
-
97
-
98
-
99
-
100
-
101
-
102
-
103
-
104
-
105
-
106
-
107
-
108
-
109
-
110
-
111
-
112
-
113
-
114
-
115
-
116
-
117
-
118
-
119
-
120
-
121
-
 122
122 -
 123
123 -
 124
124 -
 125
125 -
 126
126 -
 127
127 -
 128
128 -
 129
129 -
 130
130 -
 131
131 -
 132
132 -
133
-
134
-
135
-
136
-
137
-
138
-
139
-
140
-
141
-
142
-
143
-
144
-
145
-
146
-
147
-
148
-
149
-
150
-
151
-
152
-
153
-
154
-
155
-
156
-
157
-
158
-
159
-
160
-
161
-
162
-
163
-
164
-
165
-
166
-
167
-
168
-
169
-
170
-
171
-
172
-
173
-
174
-
175
-
176
-
177
-
178
-
179
-
180
-
181
-
182
-
183
-
184
-
185
-
186
-
187
-
188
-
189
-
190
-
191
-
192
-
193
-
194
-
195
-
196
-
197
-
198
-
199
-
200
-
201
-
202
-
203
 |
 |
