Ricoh Aficio MP 5000B General Settings Guide - Page 254
To program the SEP Code, To set the International TX Mode, To select the Fax Header
 |
View all Ricoh Aficio MP 5000B manuals
Add to My Manuals
Save this manual to your list of manuals |
Page 254 highlights
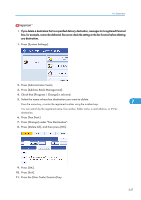
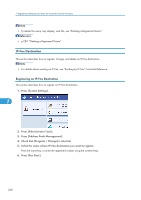
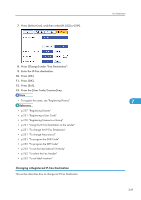
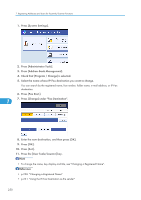
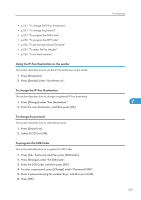
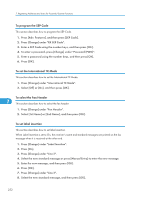
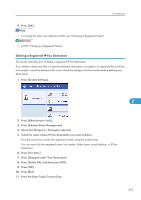
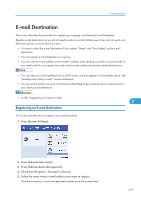
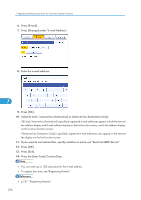
7. Registering Addresses and Users for Facsimile/Scanner Functions To program the SEP Code This section describes how to program the SEP Code. 1. Press [Adv. Features], and then press [SEP Code]. 2. Press [Change] under "RX SEP Code". 3. Enter a SEP Code using the number keys, and then press [OK]. 4. To enter a password, press [Change] under "Password (PWD)". 5. Enter a password using the number keys, and then press [OK]. 6. Press [OK]. To set the International TX Mode This section describes how to set the International TX Mode. 1. Press [Change] under "International TX Mode". 2. Select [Off] or [On], and then press [OK]. To select the Fax Header 7 This section describes how to select the fax header. 1. Press [Change] under "Fax Header". 2. Select [1st Name] or [2nd Name], and then press [OK]. To set label insertion This section describes how to set label insertion. When Label Insertion is set to On, the receiver's name and standard messages are printed on the fax message when it is received at the other end. 1. Press [Change] under "Label Insertion". 2. Press [On]. 3. Press [Change] under "Line 2". 4. Select the new standard message or press [Manual Entry] to enter the new message. 5. Enter the new message, and then press [OK]. 6. Press [OK]. 7. Press [Change] under "Line 3". 8. Select the new standard message, and then press [OK]. 252
-
 1
1 -
2
-
3
-
4
-
5
-
6
-
7
-
8
-
9
-
10
-
11
-
12
-
13
-
14
-
15
-
16
-
17
-
18
-
19
-
20
-
21
-
22
-
23
-
24
-
25
-
26
-
27
-
28
-
29
-
30
-
31
-
32
-
33
-
34
-
35
-
36
-
37
-
38
-
39
-
40
-
41
-
42
-
43
-
44
-
45
-
46
-
47
-
48
-
49
-
50
-
51
-
52
-
53
-
54
-
55
-
56
-
57
-
58
-
59
-
60
-
61
-
62
-
63
-
64
-
65
-
66
-
67
-
68
-
69
-
70
-
71
-
72
-
73
-
74
-
75
-
76
-
77
-
78
-
79
-
80
-
81
-
82
-
83
-
84
-
85
-
86
-
87
-
88
-
89
-
90
-
91
-
92
-
93
-
94
-
95
-
96
-
97
-
98
-
99
-
100
-
101
-
102
-
103
-
104
-
105
-
106
-
107
-
108
-
109
-
110
-
111
-
112
-
113
-
114
-
115
-
116
-
117
-
118
-
119
-
120
-
121
-
122
-
123
-
124
-
125
-
126
-
127
-
128
-
129
-
130
-
131
-
132
-
133
-
134
-
135
-
136
-
137
-
138
-
139
-
140
-
141
-
142
-
143
-
144
-
145
-
146
-
147
-
148
-
149
-
150
-
151
-
152
-
153
-
154
-
155
-
156
-
157
-
158
-
159
-
160
-
161
-
162
-
163
-
164
-
165
-
166
-
167
-
168
-
169
-
170
-
171
-
172
-
173
-
174
-
175
-
176
-
177
-
178
-
179
-
180
-
181
-
182
-
183
-
184
-
185
-
186
-
187
-
188
-
189
-
190
-
191
-
192
-
193
-
194
-
195
-
196
-
197
-
198
-
199
-
200
-
201
-
202
-
203
-
204
-
205
-
206
-
207
-
208
-
209
-
210
-
211
-
212
-
213
-
214
-
215
-
216
-
217
-
218
-
219
-
220
-
221
-
222
-
223
-
224
-
225
-
226
-
227
-
228
-
229
-
230
-
231
-
232
-
233
-
234
-
235
-
236
-
237
-
238
-
239
-
240
-
241
-
242
-
243
-
244
-
245
-
246
-
247
-
248
-
 249
249 -
 250
250 -
 251
251 -
 252
252 -
 253
253 -
 254
254 -
 255
255 -
 256
256 -
 257
257 -
 258
258 -
 259
259 -
260
-
261
-
262
-
263
-
264
-
265
-
266
-
267
-
268
-
269
-
270
-
271
-
272
-
273
-
274
-
275
-
276
-
277
-
278
-
279
-
280
-
281
-
282
-
283
-
284
-
285
-
286
-
287
-
288
-
289
-
290
-
291
-
292
-
293
-
294
-
295
-
296
-
297
-
298
-
299
-
300
-
301
-
302
-
303
-
304
-
305
-
306
-
307
-
308
-
309
-
310
-
311
-
312
-
313
-
314
-
315
-
316
-
317
-
318
-
319
-
320
-
321
-
322
-
323
-
324
 |
 |