Samsung CLX-3305FW User Manual Ver.1.0 (English) - Page 171
Ad hoc via USB cable, Items to prepare, Creating the ad hoc network in Windows
 |
View all Samsung CLX-3305FW manuals
Add to My Manuals
Save this manual to your list of manuals |
Page 171 highlights
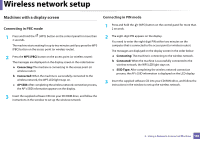
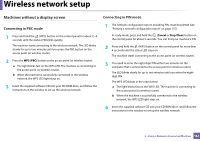
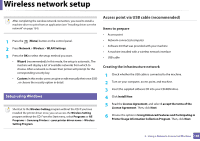
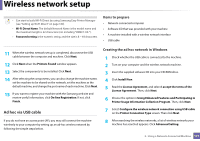
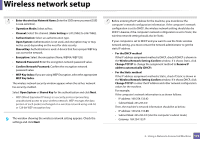
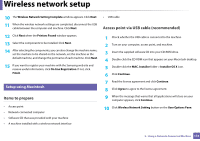
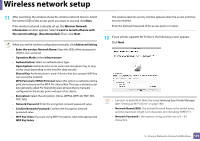
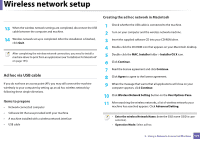
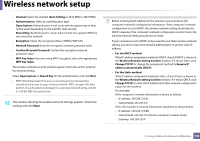
Wireless network setup • Can start to build Wi-Fi Direct by using Samsung Easy Printer Manager (see "Setting up Wi-Fi Direct" on page 180). • Wi-Fi Direct Name: The default Network Name is the model name and the maximum length is 22 characters (not including "DIRECT-XX-"). • Password setting is the numeric string, and the size is 8 ~ 64 characters. Items to prepare • Network-connected computer • Software CD that was provided with your machine • A machine installed with a wireless network interface • USB cable 11 When the wireless network set up is completed, disconnect the USB cable between the computer and machine. Click Next. 12 Click Next when the Printers Found window appears. 13 Select the components to be installed. Click Next. 14 After selecting the components, you can also change the machine name, set the machine to be shared on the network, set the machine as the default machine, and change the port name of each machine. Click Next. 15 If you want to register your machine with the Samusng web site and receive useful information, click On-line Registration. If not, click Finish. Creating the ad hoc network in Windows 1 Check whether the USB cable is connected to the machine. 2 Turn on your computer and the wireless network machine. 3 Insert the supplied software CD into your CD-ROM drive. 4 Click Install Now. 5 Read the License Agreement, and select I accept the terms of the License Agreement. Then, click Next. 6 Choose the option in Using Enhanced Features and Participating in Printer Usage Information Collection Program. Then, click Next. Ad hoc via USB cable 7 Select Configure the wireless network connection using USB cable on the Printer Connection Type screen. Then click Next. If you do not have an access point (AP), you may still connect the machine wirelessly to your computer by setting up an ad-hoc wireless network by following the simple steps below. 8 After searching the wireless networks, a list of wireless networks your machine has searched appears. Click Advanced Setting. 2. Using a Network-Connected Machine 171
-
 1
1 -
2
-
3
-
4
-
5
-
6
-
7
-
8
-
9
-
10
-
11
-
12
-
13
-
14
-
15
-
16
-
17
-
18
-
19
-
20
-
21
-
22
-
23
-
24
-
25
-
26
-
27
-
28
-
29
-
30
-
31
-
32
-
33
-
34
-
35
-
36
-
37
-
38
-
39
-
40
-
41
-
42
-
43
-
44
-
45
-
46
-
47
-
48
-
49
-
50
-
51
-
52
-
53
-
54
-
55
-
56
-
57
-
58
-
59
-
60
-
61
-
62
-
63
-
64
-
65
-
66
-
67
-
68
-
69
-
70
-
71
-
72
-
73
-
74
-
75
-
76
-
77
-
78
-
79
-
80
-
81
-
82
-
83
-
84
-
85
-
86
-
87
-
88
-
89
-
90
-
91
-
92
-
93
-
94
-
95
-
96
-
97
-
98
-
99
-
100
-
101
-
102
-
103
-
104
-
105
-
106
-
107
-
108
-
109
-
110
-
111
-
112
-
113
-
114
-
115
-
116
-
117
-
118
-
119
-
120
-
121
-
122
-
123
-
124
-
125
-
126
-
127
-
128
-
129
-
130
-
131
-
132
-
133
-
134
-
135
-
136
-
137
-
138
-
139
-
140
-
141
-
142
-
143
-
144
-
145
-
146
-
147
-
148
-
149
-
150
-
151
-
152
-
153
-
154
-
155
-
156
-
157
-
158
-
159
-
160
-
161
-
162
-
163
-
164
-
165
-
 166
166 -
 167
167 -
 168
168 -
 169
169 -
 170
170 -
 171
171 -
 172
172 -
 173
173 -
 174
174 -
 175
175 -
 176
176 -
177
-
178
-
179
-
180
-
181
-
182
-
183
-
184
-
185
-
186
-
187
-
188
-
189
-
190
-
191
-
192
-
193
-
194
-
195
-
196
-
197
-
198
-
199
-
200
-
201
-
202
-
203
-
204
-
205
-
206
-
207
-
208
-
209
-
210
-
211
-
212
-
213
-
214
-
215
-
216
-
217
-
218
-
219
-
220
-
221
-
222
-
223
-
224
-
225
-
226
-
227
-
228
-
229
-
230
-
231
-
232
-
233
-
234
-
235
-
236
-
237
-
238
-
239
-
240
-
241
-
242
-
243
-
244
-
245
-
246
-
247
-
248
-
249
-
250
-
251
-
252
-
253
-
254
-
255
-
256
-
257
-
258
-
259
-
260
-
261
-
262
-
263
-
264
-
265
-
266
-
267
-
268
-
269
-
270
-
271
-
272
-
273
-
274
-
275
-
276
-
277
-
278
-
279
-
280
-
281
-
282
-
283
-
284
-
285
-
286
-
287
-
288
-
289
-
290
-
291
-
292
-
293
-
294
-
295
-
296
-
297
-
298
-
299
-
300
-
301
-
302
-
303
-
304
-
305
-
306
-
307
-
308
-
309
-
310
-
311
-
312
-
313
-
314
 |
 |
