Samsung CLX-3305FW User Manual Ver.1.0 (English) - Page 232
Installing a WSD Printer Driver, Scanning to WSD
 |
View all Samsung CLX-3305FW manuals
Add to My Manuals
Save this manual to your list of manuals |
Page 232 highlights
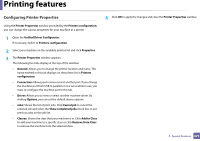
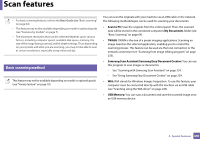
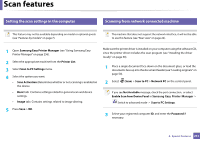
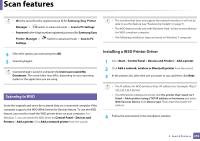
Scan features • ID is the same ID as the registered scan ID for Samsung Easy Printer Manager > Switch to advanced mode > Scan to PC Settings. • Password is the 4 digit number registered password for Samsung Easy Printer Manager > Settings. Switch to advanced mode > Scan to PC • The machine that does not support the network interface, it will not be able to use this feature (see "Features by models" on page 7). • The WSD feature works only with Windows Vista® or later version that are the WSD-compliant computer. • The following installation steps are based on Windows 7 computer. 4 Select the option you want and press OK. 5 Scanning begins. Scanned image is saved in computer's C:\Users\users name\My Documents. The saved folder may differ, depending on your operating system or the application you are using. 18 Scanning to WSD Scans the originals and saves the scanned data on a connected computer if the computer supports the WSD (Web Service for Device) feature. To use the WSD feature, you need to install the WSD printer driver on your computer. For Windows 7, you can install the WSD driver by Control Panel > Devices and Printers > Add a printer. Click Add a network printer from the wizard. Installing a WSD Printer Driver 1 SelectStart > Control Panel > Devices and Printers > Add a printer. 2 Click Add a network, wireless or Bluetooth printer from the wizard. 3 In the printers list, select the one you want to use, and then click Next. • The IP address for WSD printer is http://IP address/ws/ (example: http:// 111.111.111.111/ws/). • If no WSD printer is displayed in the list, click The printer that I want isn't listed > Add a printer using a TCP/IP address or hostname and select Web Services Device from Device type. Then enter the printer's IP address. 4 Follow the instructions in the installation window. 4. Special Features 232
-
 1
1 -
2
-
3
-
4
-
5
-
6
-
7
-
8
-
9
-
10
-
11
-
12
-
13
-
14
-
15
-
16
-
17
-
18
-
19
-
20
-
21
-
22
-
23
-
24
-
25
-
26
-
27
-
28
-
29
-
30
-
31
-
32
-
33
-
34
-
35
-
36
-
37
-
38
-
39
-
40
-
41
-
42
-
43
-
44
-
45
-
46
-
47
-
48
-
49
-
50
-
51
-
52
-
53
-
54
-
55
-
56
-
57
-
58
-
59
-
60
-
61
-
62
-
63
-
64
-
65
-
66
-
67
-
68
-
69
-
70
-
71
-
72
-
73
-
74
-
75
-
76
-
77
-
78
-
79
-
80
-
81
-
82
-
83
-
84
-
85
-
86
-
87
-
88
-
89
-
90
-
91
-
92
-
93
-
94
-
95
-
96
-
97
-
98
-
99
-
100
-
101
-
102
-
103
-
104
-
105
-
106
-
107
-
108
-
109
-
110
-
111
-
112
-
113
-
114
-
115
-
116
-
117
-
118
-
119
-
120
-
121
-
122
-
123
-
124
-
125
-
126
-
127
-
128
-
129
-
130
-
131
-
132
-
133
-
134
-
135
-
136
-
137
-
138
-
139
-
140
-
141
-
142
-
143
-
144
-
145
-
146
-
147
-
148
-
149
-
150
-
151
-
152
-
153
-
154
-
155
-
156
-
157
-
158
-
159
-
160
-
161
-
162
-
163
-
164
-
165
-
166
-
167
-
168
-
169
-
170
-
171
-
172
-
173
-
174
-
175
-
176
-
177
-
178
-
179
-
180
-
181
-
182
-
183
-
184
-
185
-
186
-
187
-
188
-
189
-
190
-
191
-
192
-
193
-
194
-
195
-
196
-
197
-
198
-
199
-
200
-
201
-
202
-
203
-
204
-
205
-
206
-
207
-
208
-
209
-
210
-
211
-
212
-
213
-
214
-
215
-
216
-
217
-
218
-
219
-
220
-
221
-
222
-
223
-
224
-
225
-
226
-
 227
227 -
 228
228 -
 229
229 -
 230
230 -
 231
231 -
 232
232 -
 233
233 -
 234
234 -
 235
235 -
 236
236 -
 237
237 -
238
-
239
-
240
-
241
-
242
-
243
-
244
-
245
-
246
-
247
-
248
-
249
-
250
-
251
-
252
-
253
-
254
-
255
-
256
-
257
-
258
-
259
-
260
-
261
-
262
-
263
-
264
-
265
-
266
-
267
-
268
-
269
-
270
-
271
-
272
-
273
-
274
-
275
-
276
-
277
-
278
-
279
-
280
-
281
-
282
-
283
-
284
-
285
-
286
-
287
-
288
-
289
-
290
-
291
-
292
-
293
-
294
-
295
-
296
-
297
-
298
-
299
-
300
-
301
-
302
-
303
-
304
-
305
-
306
-
307
-
308
-
309
-
310
-
311
-
312
-
313
-
314
 |
 |