Samsung CLX-3305FW User Manual Ver.1.0 (English) - Page 27
Arrows, Numeric keypad, Address, Redial, Pause, Clear, Power, Wakeup, Start, On Hook, Status LED - manual
 |
View all Samsung CLX-3305FW manuals
Add to My Manuals
Save this manual to your list of manuals |
Page 27 highlights
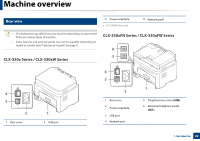
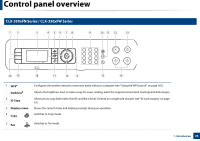
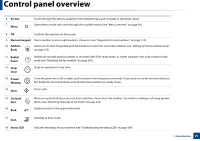
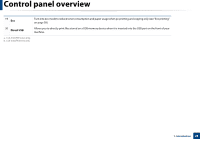
Control panel overview 6 Arrows 7 Menu Scrolls through the options available in the selected menu and increases or decreases values. Opens Menu mode and scrolls through the available menus (see "Menu overview" on page 34). 8 OK Confirms the selection on the screen. 9 Numeric keypad Dials a number or enters alphanumeric characters (see "Keypad letters and numbers" on page 214). 10 Address Book Allows you to store frequently used fax numbers or search for stored fax numbers (see "Setting up the fax address book" on page 215). 11 Redial/ Pause 12 Stop/ Clear 13 Power/ Wakeup 14 Start Redials the recently sent fax number or received caller ID in ready mode, or inserts a pause(-) into a fax number in edit mode (see "Redialing the fax number" on page 239). Stops an operations at any time. Turns the power on or off, or wakes up the machine from the power save mode. If you need to turn the machine off, press this button for more than three seconds when the machine is in ready mode. Starts a job. 15 On Hook Dial 16 Back When you press this button, you can hear a dial tone. Then enter a fax number. It is similar to making a call using speaker phone (see "Receiving manually in Tel mode" on page 245). Sends you back to the upper menu level. 17 Scan Switches to Scan mode. 18 Status LED Indicates the status of your machine (see "Understanding the status LED" on page 109). 1. Introduction 27
-
 1
1 -
2
-
3
-
4
-
5
-
6
-
7
-
8
-
9
-
10
-
11
-
12
-
13
-
14
-
15
-
16
-
17
-
18
-
19
-
20
-
21
-
 22
22 -
 23
23 -
 24
24 -
 25
25 -
 26
26 -
 27
27 -
 28
28 -
 29
29 -
 30
30 -
 31
31 -
 32
32 -
33
-
34
-
35
-
36
-
37
-
38
-
39
-
40
-
41
-
42
-
43
-
44
-
45
-
46
-
47
-
48
-
49
-
50
-
51
-
52
-
53
-
54
-
55
-
56
-
57
-
58
-
59
-
60
-
61
-
62
-
63
-
64
-
65
-
66
-
67
-
68
-
69
-
70
-
71
-
72
-
73
-
74
-
75
-
76
-
77
-
78
-
79
-
80
-
81
-
82
-
83
-
84
-
85
-
86
-
87
-
88
-
89
-
90
-
91
-
92
-
93
-
94
-
95
-
96
-
97
-
98
-
99
-
100
-
101
-
102
-
103
-
104
-
105
-
106
-
107
-
108
-
109
-
110
-
111
-
112
-
113
-
114
-
115
-
116
-
117
-
118
-
119
-
120
-
121
-
122
-
123
-
124
-
125
-
126
-
127
-
128
-
129
-
130
-
131
-
132
-
133
-
134
-
135
-
136
-
137
-
138
-
139
-
140
-
141
-
142
-
143
-
144
-
145
-
146
-
147
-
148
-
149
-
150
-
151
-
152
-
153
-
154
-
155
-
156
-
157
-
158
-
159
-
160
-
161
-
162
-
163
-
164
-
165
-
166
-
167
-
168
-
169
-
170
-
171
-
172
-
173
-
174
-
175
-
176
-
177
-
178
-
179
-
180
-
181
-
182
-
183
-
184
-
185
-
186
-
187
-
188
-
189
-
190
-
191
-
192
-
193
-
194
-
195
-
196
-
197
-
198
-
199
-
200
-
201
-
202
-
203
-
204
-
205
-
206
-
207
-
208
-
209
-
210
-
211
-
212
-
213
-
214
-
215
-
216
-
217
-
218
-
219
-
220
-
221
-
222
-
223
-
224
-
225
-
226
-
227
-
228
-
229
-
230
-
231
-
232
-
233
-
234
-
235
-
236
-
237
-
238
-
239
-
240
-
241
-
242
-
243
-
244
-
245
-
246
-
247
-
248
-
249
-
250
-
251
-
252
-
253
-
254
-
255
-
256
-
257
-
258
-
259
-
260
-
261
-
262
-
263
-
264
-
265
-
266
-
267
-
268
-
269
-
270
-
271
-
272
-
273
-
274
-
275
-
276
-
277
-
278
-
279
-
280
-
281
-
282
-
283
-
284
-
285
-
286
-
287
-
288
-
289
-
290
-
291
-
292
-
293
-
294
-
295
-
296
-
297
-
298
-
299
-
300
-
301
-
302
-
303
-
304
-
305
-
306
-
307
-
308
-
309
-
310
-
311
-
312
-
313
-
314
 |
 |