Samsung SC-D366 User Manual (ENGLISH) - Page 16
Using the Lithium Ion Battery Pack
 |
View all Samsung SC-D366 manuals
Add to My Manuals
Save this manual to your list of manuals |
Page 16 highlights
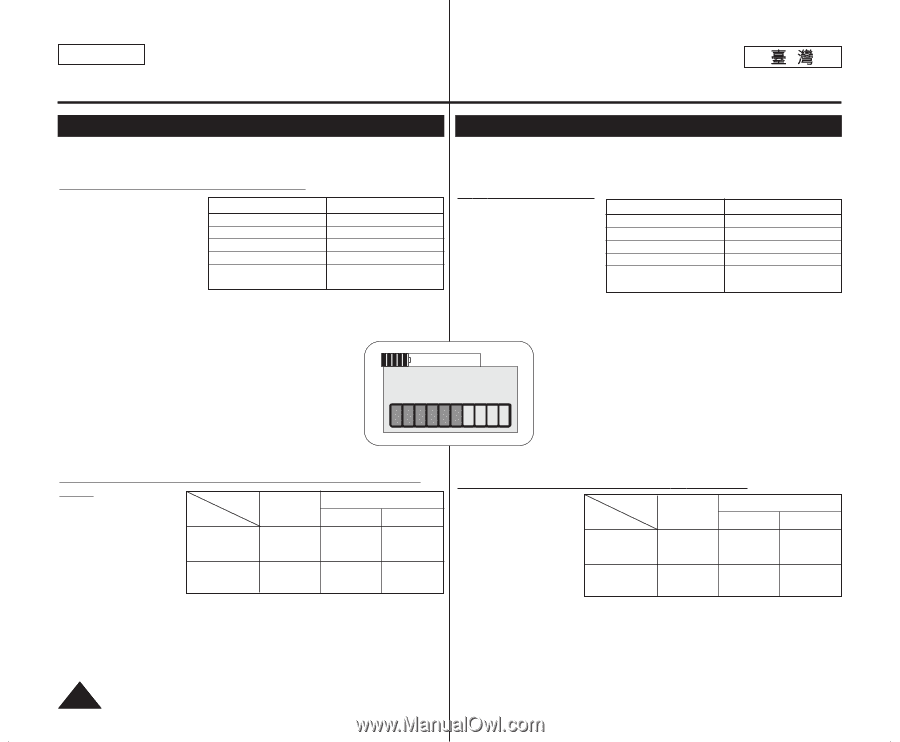
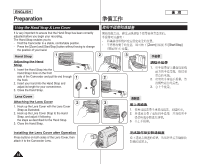
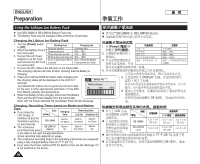
ENGLISH Preparation Using the Lithium Ion Battery Pack ✤ Use SB-LSM80 or SB-LSM160 Battery Pack only. ✤ ✤ The Battery Pack may be charged a little at the time of purchase. ✤ Charging the Lithium Ion Battery Pack 1. Turn the [Power] switch Blinking time to [Off]. 2. Attach the Battery Pack to the Camcorder. Once per second Twice per second Three times per second Charging rate Less than 50% 50% ~ 75% 75% ~ 90% 1. 2. 3. Connect the AC Power Blinking stops and stays on 90% ~ 100% Adapter to an AC Cord On for a second and off for Error - Reset the Battery 3. and connect the AC Cord a second Pack and the DC Cable to a wall socket. 4. Connect the DC cable to the DC jack on the Camcorder. The charging indicator will start to blink, showing that the Battery is 4. charging. 5. Press and hold the DISPLAY button while charging and the charging status will be displayed on the LCD for 7 Battery Info seconds. As indicated the battery level is given as reference data for the user, it is the approximate estimation. It may differ Battery charged 0% 50% from Battery capacity and temperature. 6. When the Battery is fully charged, disconnect the Battery Pack and the AC Power Adapter from the Camcorder. Even with the Power switched Off, the Battery Pack will still discharge. Charging, Recording Times based on Model and Battery Type. ✤ If you close the LCD Screen, it Time Charging Battery time Recording time ✤ LCD On Viewfinder On switches off and the Viewfinder switches SB-LSM80 Approx. 1hr 20min Approx. 1hr 20min Approx. 1hr 30min ✤ on automatically. ✤ The continuous SB-LSM160 recording times given (Option) Approx. 3hr Approx. 2hr 40min Approx. 3hr in the table to the right are approximations. Actual recording time depends on usage. ✤ ✤ The continuous recording times in the operating instructions are measured using a fully charged Battery Pack at 77 °F (25 °C). ✤ ✤ Even when the Power switched Off, the Battery Pack will still discharge if it is left attached to the device. **SB-LSM80 SB-LSM160 0 q 0 [Power] [Off] 0 0 50% 50% ~ 75% 75% ~ 90% 90% ~ 100% - 0 0 0 5. DISPLAY LCD 7 0 100% 0 0 6. 0 Off 0 / LCD LCD 0 1 1 1 SB-LSM80 20 20 30 0 SB-LSM160 3 2 3 0 40 77 °F (25 °C) 0 Off 0 16
-
 1
1 -
2
-
3
-
4
-
5
-
6
-
7
-
8
-
9
-
10
-
 11
11 -
 12
12 -
 13
13 -
 14
14 -
 15
15 -
 16
16 -
 17
17 -
 18
18 -
 19
19 -
 20
20 -
 21
21 -
22
-
23
-
24
-
25
-
26
-
27
-
28
-
29
-
30
-
31
-
32
-
33
-
34
-
35
-
36
-
37
-
38
-
39
-
40
-
41
-
42
-
43
-
44
-
45
-
46
-
47
-
48
-
49
-
50
-
51
-
52
-
53
-
54
-
55
-
56
-
57
-
58
-
59
-
60
-
61
-
62
-
63
-
64
-
65
-
66
-
67
-
68
-
69
-
70
-
71
-
72
-
73
-
74
-
75
-
76
-
77
-
78
-
79
-
80
-
81
-
82
-
83
-
84
-
85
-
86
-
87
-
88
-
89
-
90
-
91
-
92
-
93
-
94
-
95
-
96
-
97
-
98
-
99
-
100
-
101
-
102
-
103
-
104
-
105
-
106
 |
 |