Samsung SM-T230NU User Manual Generic Wireless Sm-t230nu Galaxy Tab 4 Kit Kat - Page 55
Video recorder, Settings, Camera and Video - review
 |
View all Samsung SM-T230NU manuals
Add to My Manuals
Save this manual to your list of manuals |
Page 55 highlights
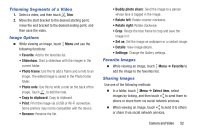
Video recorder: • Video size: Select a resolution. Use higher resolution for higher quality. Higher resolution videos take up more memory. Settings: • Location tag: Attach a GPS location tag to the photo. Note: To improve GPS signals, avoid shooting in locations where the signal may be obstructed, such as between buildings or in low-lying areas, or in poor weather conditions. Tip: Your location may appear on your photos when you upload them to the Internet. To avoid this, deactivate the GPS tag setting. • Review: Set to show photos or videos after taking them. • Volume key: Set the device to use the Volume button to control the shutter or zoom function. • Timer: Use this for delayed-time shots. • White balance: Select an appropriate white balance, so images have a true-to-life color range. The settings are designed for specific lighting situations. These settings are similar to the heat range for white-balance exposure in professional cameras. • Brightness: Change the exposure value. This determines how much light the camera's sensor receives. For low light situations, use a higher exposure. • Guidelines: Display viewfinder guides to help composition when selecting subjects. • Voice control: Set the camera to take photos with voice commands. • Contextual filename: Set the camera to display contextual tags. Activate this to use Tag Buddy in Gallery and Story Album. • Save as flipped: Invert the image to create a mirrorimage of the original scene. • Storage: Select the memory location for storage. • Reset: Reset the camera settings. • Help: Access help information for using the camera. Camera and Video 50
-
 1
1 -
2
-
3
-
4
-
5
-
6
-
7
-
8
-
9
-
10
-
11
-
12
-
13
-
14
-
15
-
16
-
17
-
18
-
19
-
20
-
21
-
22
-
23
-
24
-
25
-
26
-
27
-
28
-
29
-
30
-
31
-
32
-
33
-
34
-
35
-
36
-
37
-
38
-
39
-
40
-
41
-
42
-
43
-
44
-
45
-
46
-
47
-
48
-
49
-
 50
50 -
 51
51 -
 52
52 -
 53
53 -
 54
54 -
 55
55 -
 56
56 -
 57
57 -
 58
58 -
 59
59 -
 60
60 -
61
-
62
-
63
-
64
-
65
-
66
-
67
-
68
-
69
-
70
-
71
-
72
-
73
-
74
-
75
-
76
-
77
-
78
-
79
-
80
-
81
-
82
-
83
-
84
-
85
-
86
-
87
-
88
-
89
-
90
-
91
-
92
-
93
-
94
-
95
-
96
-
97
-
98
-
99
-
100
-
101
-
102
-
103
-
104
-
105
-
106
-
107
-
108
-
109
-
110
-
111
-
112
-
113
-
114
-
115
-
116
-
117
-
118
-
119
-
120
-
121
 |
 |