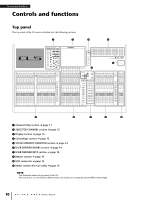
Yamaha CL3 Owner's Manual - Page 15
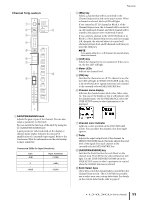
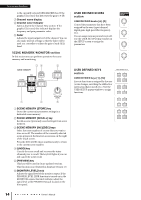
Master USB connector, Meter for CL5 only, GAIN/PAN/ASSIGN knob, SEL] key, CUE] key
 |
View all Yamaha CL3 manuals
Add to My Manuals
Save this manual to your list of manuals |
Page 15 highlights
Master section This section is similar to the Channel Strip section, and enables you to control the principal parameters of the assigned channels. When the unit is in the default state, STEREO/MONO channels are assigned. 1 GAIN/PAN/ASSIGN knob Adjusts the gain or pan of the 1 channel. You can also assign parameters to the knob. On the CL5, switch the 2 function of the knob using the [GAIN/PAN/ASSIGN] key 3 located to the left of the Master section. On the CL3 and CL1, switch the function of the knob using the [GAIN/PAN/ASSIGN] key 4 located in the upper right corner of the Block A in the Channel Strip section. 5 2 [SEL] key 6 Selects the channel you wish to control. Pressing this key will cause the channel LED to light up, and you will be able to control the channel in both the SELECTED CHANNEL 7 section and on the touch screen. If the STEREO bus has been assigned, the selected object of control will alternate between the L and R channels each time you press the [SEL] key. 3 [CUE] key Selects the channel to be cue-monitored. If cue is on, the LED will light. 4 [ON] key Switches the channel on or off. If a channel is on, the key LED will light. If MONITOR has been assigned, this key switches the monitor output on or off. 5 Channel name display 6 Channel color indicator Same as that in the Channel Strip section. 7 Fader Adjusts the output level of the channel. If MONITOR has been assigned, this fader adjusts the monitor output level. Top panel USB connector You can connect a USB flash drive to the USB connector to record or play audio files, and to save or load internal data. The Help file displayed on the unit screen is loaded from a connected USB flash drive. You can also save on a USB flash drive "User authentication key" data that determines the user level and limit the functionality to which the user has access. NOTE Operation is guaranteed only for a connection with a USB flash drive. ■ USB flash drive capacities and formats The operation of USB flash drives with capacities of up to 32 GB has been verified. (However, this does not guarantee operation of all USB flash drives.) The FAT16 and FAT32 formats are supported. ■ Prevention of accidental erasure Some USB flash drives have a write-protect setting that lets you prevent data from being erased accidentally. If your flash drive contains important data, it is a good idea to use the write-protect setting to prevent accidental erasure. On the other hand, you will need to make sure that your USB flash drive's write-protect setting is turned off before you save data onto it. NOTICE An ACCESS indicator appears in the Function Access Area while data is being accessed (saved, loaded, or deleted). During this time, do not disconnect the USB flash drive or power-off the CL unit. Doing so may damage your flash drive, or may damage the data in the CL unit or on your media device. Meter section (for CL5 only) Indicates the level of MIX/MATRIX, STEREO/MONO and CUE channels. You can select the monitoring position from PRE EQ (immediately before EQ), PRE FADER (immediately before the fader), or POST ON (immediately after the [ON] key). You can use this function on the CL3 or CL1 if you install an optional MBCL meter bridge. Owner's Manual 15
-
 1
1 -
2
-
3
-
4
-
5
-
6
-
7
-
8
-
9
-
 10
10 -
 11
11 -
 12
12 -
 13
13 -
 14
14 -
 15
15 -
 16
16 -
 17
17 -
 18
18 -
 19
19 -
 20
20 -
21
-
22
-
23
-
24
-
25
-
26
-
27
-
28
-
29
-
30
-
31
-
32
-
33
-
34
-
35
-
36
-
37
-
38
-
39
-
40
-
41
-
42
-
43
-
44
-
45
-
46
-
47
-
48
-
49
-
50
-
51
-
52
-
53
-
54
-
55
-
56
-
57
-
58
-
59
-
60
-
61
-
62
-
63
-
64
-
65
 |
 |
