Yamaha CL3 Owner's Manual - Page 38
Sending an input channel signal to the STEREO bus, Using the SELECTED CHANNEL
 |
View all Yamaha CL3 manuals
Add to My Manuals
Save this manual to your list of manuals |
Page 38 highlights
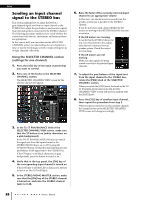
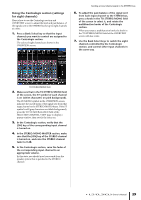
Setup Sending an input channel signal to the STEREO bus This section explains how to adjust the level of a gain-adjusted signal sent from an input channel to the STEREO bus; adjust the pan/balance; and monitor signals from external speakers connected to the STEREO channel. The following procedure enables you to check whether the connections with the mic, instrument, and main speakers are appropriate. In this case as well, you can either use the SELECTED CHANNEL section to make settings for one channel at a time, or use the Centralogic section to make settings for up to eight channels collectively. Using the SELECTED CHANNEL section (settings for one channel) 1. Press the [SEL] key of the input channel that you want to control. 2. Press one of the knobs in the SELECTED CHANNEL section. The SELECTED CHANNEL VIEW screen for the selected channel will appear. 6. Raise the fader of the currently-selected input channel to an appropriate volume. In this state, you should now hear sound from the speaker system that is patched to the STEREO channel. If you do not hear sound, check whether the LR meters are moving in the METER field of the function access area. If the LR meters are moving: It may be that the STEREO channel is not correctly patched to the output jacks that are connected to your speaker system. Check the output port patching. If the LR meters are not moving: Make sure that signals are being routed correctly to the patched input channels. 7. To adjust the pan/balance of the signal sent from the input channel to the STEREO bus, rotate the [PAN] knob of the SELECTED CHANNEL section. When you rotate the [PAN] knob, the knob in the TO ST PAN/BALANCE field of the SELECTED CHANNEL VIEW screen will move in tandem with the [PAN] knob. 8. Press the [SEL] key of another input channel, then repeat this procedure from step 2. When you press a [SEL] key to select another channel, the channel shown in the SELECTED CHANNEL VIEW screen will change accordingly. 3. In the To ST PAN/BALANCE field of the SELECTED CHANNEL VIEW screen, make sure that the ST button is on (white characters on a pink background). In the TO ST PAN/BALANCE field you can switch the signal sent from the input channel to the STEREO/MONO buses on or off by using the ST/MONO button. The knob in this field indicates the pan/balance of the signal sent to the STEREO bus. If the ST button is off (black characters on gray background), press the button to switch it on. 4. Verify that in the top panel, the [ON] key of the corresponding input channel is turned on. If the [ON] key is off (the LED is dark), press the key to turn it on (the LED will light). 5. In the STEREO/MONO MASTER section, make sure that the [ON] key of the STEREO channel is turned on, and raise the STEREO channel fader to 0 dB. 38 Owner's Manual
-
 1
1 -
2
-
3
-
4
-
5
-
6
-
7
-
8
-
9
-
10
-
11
-
12
-
13
-
14
-
15
-
16
-
17
-
18
-
19
-
20
-
21
-
22
-
23
-
24
-
25
-
26
-
27
-
28
-
29
-
30
-
31
-
32
-
 33
33 -
 34
34 -
 35
35 -
 36
36 -
 37
37 -
 38
38 -
 39
39 -
 40
40 -
 41
41 -
 42
42 -
 43
43 -
44
-
45
-
46
-
47
-
48
-
49
-
50
-
51
-
52
-
53
-
54
-
55
-
56
-
57
-
58
-
59
-
60
-
61
-
62
-
63
-
64
-
65
 |
 |
