Yamaha CL3 Owner's Manual - Page 21
Entering names, Main area
 |
View all Yamaha CL3 manuals
Add to My Manuals
Save this manual to your list of manuals |
Page 21 highlights
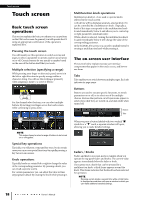
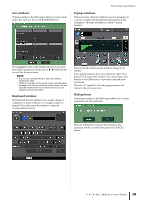
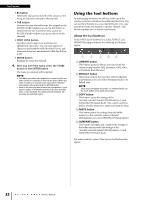
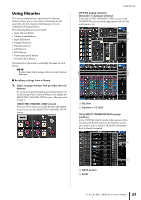
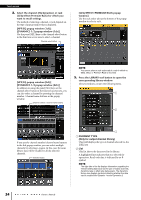
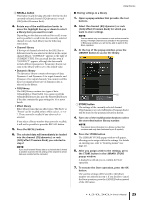
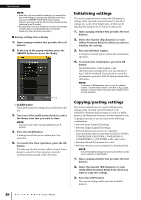
Main area The contents of the main area will change depending on the function that is currently selected. Mixing operations will involve mainly the following two types of screens. ■ SELECTED CHANNEL VIEW screen This screen shows all the mix parameters for the currently-selected channel. To access this screen, press one of the knobs of the SELECTED CHANNEL section. Entering names Entering names On the CL series, you can assign a name to each input channel, output channel, and DCA group, and assign a title to scene and library data when saving it. To assign a name, you will use the keyboard window shown in the main area. 1. Access the screen for assigning a name. The screen shot below shows how to assign a name to a channel. ■ OVERVIEW screen This screen simultaneously shows the main parameters for the (up to) eight channels currently assigned to the Centralogic section. To access this screen, press one of the BANK SELECT keys in the Centralogic section or one of the multifunction knobs. NOTE While the HELP, METER or SCENE screen is displayed in the main area, the OVERVIEW screen will not open even if you press a BANK SELECT key in the Centralogic section. To return to the OVERVIEW screen, press a user-defined key to which the OVERVIEW function is assigned. Alternatively, press the highlighted HELP, METER or SCENE field once again. The box shows the characters you have entered and a cursor that indicates the current position. 2. Use the keyboard window in the touch screen to enter the desired characters. When you press a character key in the keyboard window, the corresponding character will be entered in the box, and the cursor will move to the right. 3. Input the subsequent characters in the same way. When entering characters, you can also use the following buttons in the keyboard window. • COPY button Copies the selected (highlighted) string of characters in the text box. • CUT button Deletes and copies the selected (highlighted) string of characters in the text box. • PASTE button Inserts the string of characters copied by COPY or CUT at the cursor location (or overwrites the currently-selected range of characters). • CLEAR button Deletes all characters that have been input in the text entry box. • INS button Inserts a space (blank) at the cursor position. • DEL button Deletes the character at the right of the cursor (or the string of characters selected in the text entry box). Owner's Manual 21
-
 1
1 -
2
-
3
-
4
-
5
-
6
-
7
-
8
-
9
-
10
-
11
-
12
-
13
-
14
-
15
-
 16
16 -
 17
17 -
 18
18 -
 19
19 -
 20
20 -
 21
21 -
 22
22 -
 23
23 -
 24
24 -
 25
25 -
 26
26 -
27
-
28
-
29
-
30
-
31
-
32
-
33
-
34
-
35
-
36
-
37
-
38
-
39
-
40
-
41
-
42
-
43
-
44
-
45
-
46
-
47
-
48
-
49
-
50
-
51
-
52
-
53
-
54
-
55
-
56
-
57
-
58
-
59
-
60
-
61
-
62
-
63
-
64
-
65
 |
 |
