Yamaha CL3 Owner's Manual - Page 29
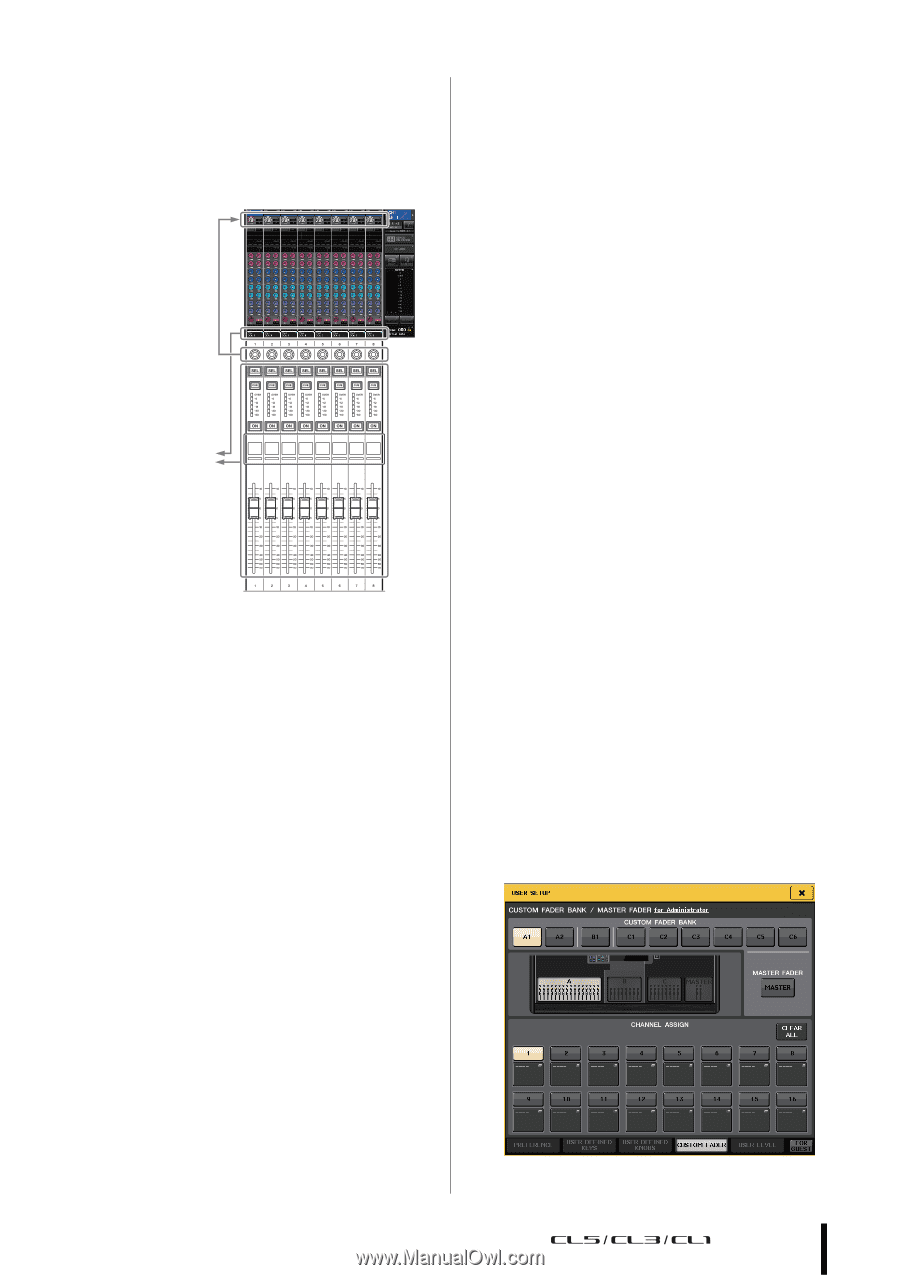
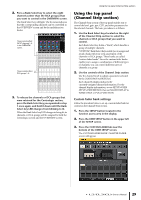
Using the top panel (Channel Strip Custom fader bank settings
 |
View all Yamaha CL3 manuals
Add to My Manuals
Save this manual to your list of manuals |
Page 29 highlights
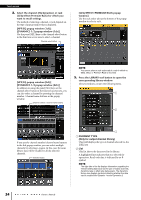
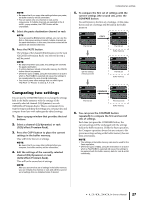
2. Press a Bank Select key to select the eight channels (other than the DCA groups) that you want to control in the OVERVIEW screen. The Bank Select key will light. The lit status indicates that the corresponding channels can be controlled in the OVERVIEW screen and by the multifunction knobs. These controls affect INPUT channels 1-8 in the OVERVIEW screen. These controls affect DCA groups 1-8. 3. To release the channels or DCA groups that were retained for the Centralogic section, press the Bank Select key you operated in step 1 once again, and hold it down until the Bank Select key LED changes from blinking to lit. When the Bank Select key LED changes to being lit, its channels or DCA groups will be assigned to both the Centralogic section and the OVERVIEW screen. Using the top panel (Channel Strip section) Using the top panel (Channel Strip section) The Channel Strip section of the top panel enables you to control the level, gain, pan, CUE, and other parameters for the selected channels. The basic procedure is as follows: 1. Use the Bank Select keys located on the right of the Channel Strip section to select the channels or DCA groups that you want to control. Each Bank Select key holds a "Bank," which bundles a group of multiple channels. "CUSTOM" Bank Select keys enable you to assign and recall a bank with your own assortment of the channels or DCA groups. These banks are called "custom fader banks." Since the custom fader banks enable you to assign a combination of different types of channels, you can control different types of channels as a group. 2. Use the controls of the Channel Strip section. Use the channel knob to adjust a parameter selected by the [GAIN/PAN/ASSIGN] key. Each channel's display indicates the currently-assigned channel information. For the channel display information, access SETUP→USER SETUP→PREFERENCE, then set NAME DISPLAY to NAME ONLY or FULL FUNCTION. Custom fader bank settings Follow the procedure below to set up a custom fader bank for control on the Channel Strip section. 1. Press the SETUP button located in the function access area in the display. 2. Press the USER SETUP button in the upper left of the SETUP screen. 3. Press the CUSTOM FADER tab near the bottom of the USER SETUP screen. The CUSTOM FADER BANK / MASTER FADER screen will appear. Owner's Manual 29
-
 1
1 -
2
-
3
-
4
-
5
-
6
-
7
-
8
-
9
-
10
-
11
-
12
-
13
-
14
-
15
-
16
-
17
-
18
-
19
-
20
-
21
-
22
-
23
-
 24
24 -
 25
25 -
 26
26 -
 27
27 -
 28
28 -
 29
29 -
 30
30 -
 31
31 -
 32
32 -
 33
33 -
 34
34 -
35
-
36
-
37
-
38
-
39
-
40
-
41
-
42
-
43
-
44
-
45
-
46
-
47
-
48
-
49
-
50
-
51
-
52
-
53
-
54
-
55
-
56
-
57
-
58
-
59
-
60
-
61
-
62
-
63
-
64
-
65
 |
 |