Yamaha CL3 Owner's Manual - Page 52
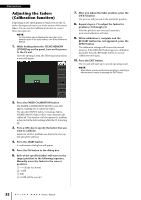
Adjusting the faders (Calibration function), Press the FADER CALIBRATION button.
 |
View all Yamaha CL3 manuals
Add to My Manuals
Save this manual to your list of manuals |
Page 52 highlights
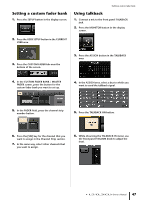
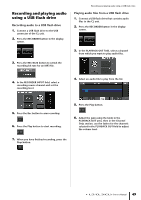
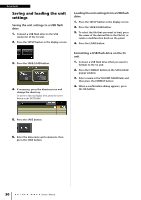
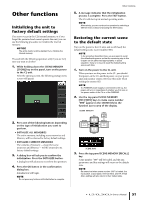
Other functions Adjusting the faders (Calibration function) Depending on the environment in which you use the CL series, discrepancies may occur in the motion of the motor faders. You can use the Calibration function to correct these discrepancies. NOTE For information about adjusting the input gain or the detection point of the touch screen, refer to the Reference Manual. 1. While holding down the SCENE MEMORY [STORE] key on the panel, turn on the power to the CL unit. After the opening screen, the following startup menu screen will appear. 7. After you adjust the fader position, press the [NEXT] button. The process will proceed to the next fader position. 8. Repeat steps 6-7 to adjust the faders for positions (1) through (4). After the positions are corrected, automatic motorized calibration will start. 9. When calibration is complete and the RESTART button has not appeared, press the APPLY button. The calibration settings will be saved in internal memory. If the RESTART button appears, calibration has failed. Press the RESTART button to execute calibration once again. 10. Press the EXIT button. The CL unit will start up in normal operating mode. NOTE Alternatively, you can continue the operation by selecting a different menu instead of pressing the EXIT button. 2. Press the FADER CALIBRATION button. The FADER CALIBRATION MODE screen will appear, enabling you to adjust the faders. The specified INPUT faders, Centralogic faders, STEREO/MONO faders will be semi-automatically calibrated. This window will also appear if a problem is detected in the fader settings while the CL is starting up. 3. Press a [SEL] key to specify the faders that you want to calibrate. Faders for which a problem was detected at start-up will already be selected. 4. Press the START button. A confirmation dialog box will appear. 5. Press the OK button in the dialog box. 6. Each of the specified faders will move to the target positions in the following sequence. Manually move the faders to the correct positions. 1 -∞ (all the way down) 2 -20dB 3 0dB 4 +10dB (all the way up) 52 Owner's Manual
-
 1
1 -
2
-
3
-
4
-
5
-
6
-
7
-
8
-
9
-
10
-
11
-
12
-
13
-
14
-
15
-
16
-
17
-
18
-
19
-
20
-
21
-
22
-
23
-
24
-
25
-
26
-
27
-
28
-
29
-
30
-
31
-
32
-
33
-
34
-
35
-
36
-
37
-
38
-
39
-
40
-
41
-
42
-
43
-
44
-
45
-
46
-
 47
47 -
 48
48 -
 49
49 -
 50
50 -
 51
51 -
 52
52 -
 53
53 -
 54
54 -
 55
55 -
 56
56 -
 57
57 -
58
-
59
-
60
-
61
-
62
-
63
-
64
-
65
 |
 |
