Yamaha CL3 Owner's Manual - Page 28
Basic operation of the CL series, Controlling selected channels (SELECTED CHANNEL
 |
View all Yamaha CL3 manuals
Add to My Manuals
Save this manual to your list of manuals |
Page 28 highlights
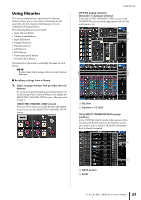
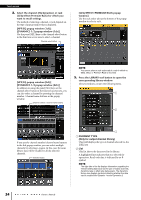
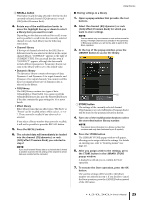
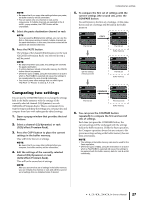
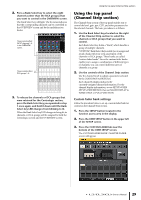
Basic operation of the CL series Basic operation of the CL series This section explains the basic operations of the CL series. CL series operations are divided into three main categories: • Controlling selected channels (SELECTED CHANNEL section) • Controlling eight channels as a group (Centralogic section) • Using the faders on the top panel (Channel Strip section) In general, you will operate the CL series for mixing using a combination of these operations. Controlling selected channels (SELECTED CHANNEL section) The SELECTED CHANNEL section located to the left of the display corresponds to the mixer module on a conventional analog mixer, and allows you to manually adjust all the major parameters of the currently-selected channel. Operations in this section will affect the channel that was most recently selected by its [SEL] key. The basic procedure is as follows: 1. Press the Bank Select key of a bank that includes the channel that you want to control. Select one of the preset or custom fader banks in the Channel Strip section or Centralogic section. 2. Use a [SEL] key to select the channel that you want to control. To select a MIX or MATRIX channel, use the Bank Select keys to recall the desired channel to the Centralogic section, and then press the [SEL] key for the desired channel. 3. Press any one of the knobs in the SELECTED CHANNEL section. The SELECTED CHANNEL VIEW screen for the selected channel will appear. You can view the actual setting values on screen. Even if a different screen is selected, the knobs of the SELECTED CHANNEL section always affect the currently-selected channel. In this case, a mini popup window indicating the value of that parameter will appear on screen when you operate a knob. 4. Use the knobs of the SELECTED CHANNEL section and the buttons in the SELECTED CHANNEL VIEW screen to edit the parameters of the selected channel. Controlling eight channels as a group (Centralogic section) The Centralogic section located below the touch screen lets you recall and simultaneously control a set of up to eight input channels, output channels, or DCA groups. Use the Bank Select keys on the right side of the Centralogic section to select the channels that you want to control. When you press the keys, the corresponding channels or DCA groups will be assigned to the Centralogic section, and the touch screen will display the OVERVIEW screen for those channels. The OVERVIEW screen displays the main parameters, which you can control using the Centralogic section's faders and keys. The basic procedure is as follows: 1. Use a Bank Select key to select the channel or DCA group that you want to control. Press the [INPUT] key to select from channel groups labeled at the left of the Bank Select keys, and press the [OUTPUT] key to select from channel groups labeled at the right of the Bank Select keys. When you press the Bank Select key, the touch screen will display the OVERVIEW screen, and the parameters of the eight channels you selected will appear. NOTE When the SELECTED CHANNEL VIEW screen is displayed, you can switch to the OVERVIEW screen by pressing any of the multifunction knobs 1-8. This is convenient when you want to quickly switch to the OVERVIEW screen while leaving the same channels or DCA groups selected for control. 2. Use the controls of the Centralogic section and the fields in the OVERVIEW screen to control the channels. NOTE • The bottom line of the OVERVIEW screen shows the channels or DCA groups that can be controlled by the faders, [ON] keys and [CUE] keys of the Centralogic section. • The top line of the OVERVIEW screen shows the channels that can be controlled by the multifunction knobs 1-8. Controlling another set of eight channels in the OVERVIEW screen You can retain channels or DCA groups controlled by the faders, [ON] keys, meters, [CUE] keys and [SEL] keys of the Centralogic section, and switch to another group of eight channels for control in the OVERVIEW screen. In this case, the multifunction knobs will control a different set of eight channels than the Centralogic section's controls. 1. Press the Bank Select key for the channels or DCA group that you want to retain for the Centralogic section, and hold it down for two seconds or longer. The LED of the Bank Select key will start blinking. The blinking indicates that the corresponding channels or DCA groups are now retained for the Centralogic section. 28 Owner's Manual
-
 1
1 -
2
-
3
-
4
-
5
-
6
-
7
-
8
-
9
-
10
-
11
-
12
-
13
-
14
-
15
-
16
-
17
-
18
-
19
-
20
-
21
-
22
-
 23
23 -
 24
24 -
 25
25 -
 26
26 -
 27
27 -
 28
28 -
 29
29 -
 30
30 -
 31
31 -
 32
32 -
 33
33 -
34
-
35
-
36
-
37
-
38
-
39
-
40
-
41
-
42
-
43
-
44
-
45
-
46
-
47
-
48
-
49
-
50
-
51
-
52
-
53
-
54
-
55
-
56
-
57
-
58
-
59
-
60
-
61
-
62
-
63
-
64
-
65
 |
 |
