Yamaha CL3 Owner's Manual - Page 41
Setting the input channels, Patching the mixer output to the I/O rack
 |
View all Yamaha CL3 manuals
Add to My Manuals
Save this manual to your list of manuals |
Page 41 highlights
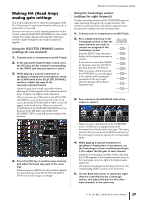
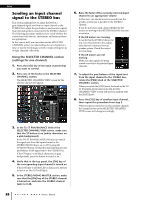
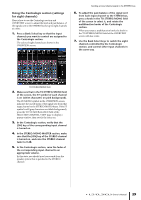
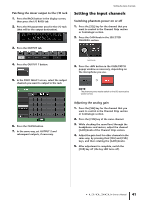
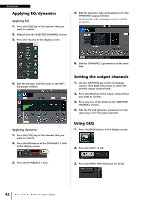
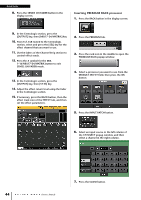
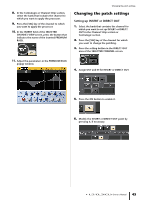
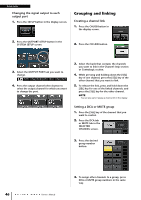
Patching the mixer output to the I/O rack 1. Press the RACK button in the display screen, then press the I/O RACK tab. 2. Press the HA parameter area for the I/O rack (that will be the output destination). 3. Press the OUTPUT tab. Setting the input channels Setting the input channels Switching phantom power on or off 1. Press the [SEL] key for the channel that you want to control in the Channel Strip section or Centralogic section. 2. Press the GAIN knob in the SELECTED CHANNEL section. 4. Press the OUTPUT 1 button. 5. In the PORT SELECT screen, select the output channels you want to output to the rack. GAIN knob 3. Press the +48V button in the GAIN/PATCH popup window as necessary, depending on the microphone you use. ➩ NOTE The phantom power master switch on the I/O rack must be turned on first. 6. Press the CLOSE button. 7. In the same way, set OUTPUT 2 and subsequent outputs, if necessary. Adjusting the analog gain 1. Press the [SEL] key for the channel that you want to control in the Channel Strip section or Centralogic section. 2. Press the [CUE] key of the same channel. 3. While checking the sound level through the headphones and meters, adjust the channel [GAIN] knob of the Channel Strip section. 4. Adjust the gain level for other channels in the same way, by pressing their [SEL] and [CUE] keys, and then rotating the [GAIN] knobs. 5. After adjustment is complete, switch the [CUE] key off (the key LED turns off). Owner's Manual 41
-
 1
1 -
2
-
3
-
4
-
5
-
6
-
7
-
8
-
9
-
10
-
11
-
12
-
13
-
14
-
15
-
16
-
17
-
18
-
19
-
20
-
21
-
22
-
23
-
24
-
25
-
26
-
27
-
28
-
29
-
30
-
31
-
32
-
33
-
34
-
35
-
 36
36 -
 37
37 -
 38
38 -
 39
39 -
 40
40 -
 41
41 -
 42
42 -
 43
43 -
 44
44 -
 45
45 -
 46
46 -
47
-
48
-
49
-
50
-
51
-
52
-
53
-
54
-
55
-
56
-
57
-
58
-
59
-
60
-
61
-
62
-
63
-
64
-
65
 |
 |
