Yamaha CL3 Owner's Manual - Page 36
Word clock connections and settings, Press the WORD CLOCK/SLOT SETUP button
 |
View all Yamaha CL3 manuals
Add to My Manuals
Save this manual to your list of manuals |
Page 36 highlights
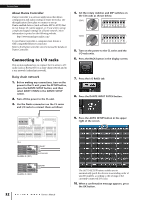
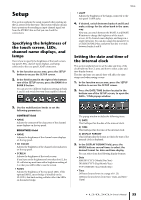
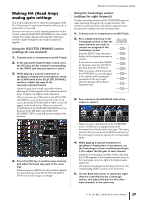
Setup 4. Use multifunction knobs 1-6 on the top panel to specify the current date and time. 5. When you have finished making settings, press the OK button. The date, time, and display format you specified will be finalized, and the popup window will close. If you press the CANCEL button or the X symbol instead of the OK button, your changes will be discarded and the popup window will close. Word clock connections and settings To send and receive digital audio signals between the CL and a connected external device, the word clock of both devices must be synchronized. 1. In the function access area, press the SETUP button. 3. In the WORD CLOCK SELECT field, select the desired clock source. • When using the internal word clock Press the INT 48k or INT 44.1k button. • When a device on the Dante network serves as the clock master Press the DANTE 48k or DANTE 44.1k button. • When using clock data from a digital audio signal as the clock source Press a valid two-channel button for the corresponding slot. • When using word clock data from the WORD CLOCK IN jack as the clock source Press the WORD CLOCK IN button. If the CL unit is operating correctly with the selected clock, the symbol immediately above the corresponding button will turn light blue. NOTE The clock data of the digital audio signal supplied via a digital I/O card in one of the slots 1-3 can be selected in two-channel units. 4. To close the WORD CLOCK/SLOT SETUP popup window, press the X symbol located in the upper right. You will return to the SETUP screen. 5. To close the SETUP screen, press the SETUP button in the function access area. 2. Press the WORD CLOCK/SLOT SETUP button in the SYSTEM SETUP field in the middle of the window. 36 Owner's Manual
-
 1
1 -
2
-
3
-
4
-
5
-
6
-
7
-
8
-
9
-
10
-
11
-
12
-
13
-
14
-
15
-
16
-
17
-
18
-
19
-
20
-
21
-
22
-
23
-
24
-
25
-
26
-
27
-
28
-
29
-
30
-
 31
31 -
 32
32 -
 33
33 -
 34
34 -
 35
35 -
 36
36 -
 37
37 -
 38
38 -
 39
39 -
 40
40 -
 41
41 -
42
-
43
-
44
-
45
-
46
-
47
-
48
-
49
-
50
-
51
-
52
-
53
-
54
-
55
-
56
-
57
-
58
-
59
-
60
-
61
-
62
-
63
-
64
-
65
 |
 |
