Yamaha CL3 Owner's Manual - Page 33
Audio input/output connections, Star network redundant network, Analog input connections
 |
View all Yamaha CL3 manuals
Add to My Manuals
Save this manual to your list of manuals |
Page 33 highlights
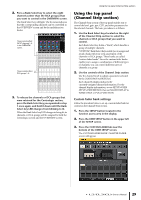
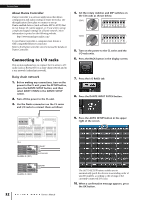
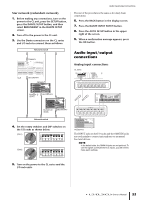
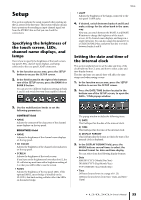
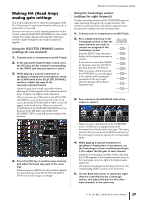
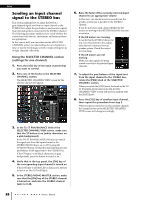
Star network (redundant network) 1. Before making any connections, turn on the power to the CL unit, press the SETUP button, press the DANTE SETUP button, and then select REDUNDANT in the DANTE SETUP screen. 2. Turn off to the power to the CL unit. 3. Use the Dante connectors on the CL series and I/O racks to connect them as follows: Network switch PRIMARY CL5 SECONDARY PRIMARY 789A Audio input/output connections The rest of the procedure is the same as for daisy chain connections. 6. Press the RACK button in the display screen. 7. Press the DANTE INPUT PATCH button. 8. Press the AUTO SETUP button in the upper right of the screen. 9. When a confirmation message appears, press the OK button. Audio input/output connections Analog input connections CL series 23456 BCD EF 01 EF 01 Rio3224-D (ID#1) SECONDARY PRIMARY 789A 23456 BCD Rio3224-D (ID#2) SECONDARY Network switch 4. Set the rotary switches and DIP switches on the I/O racks as shown below. (ID#1) 789A 3456 BCD ON 1 2 3 4 5 6 7 8 (ID#2) 789A 3456 BCD ON 1 2 3 4 5 6 7 8 23456 EF 01 BCD 789A Rio3224-D The INPUT jacks on the I/O racks and the OMNI IN jacks are used mainly to connect microphones or monaural line-level devices. NOTE In the default state, the OMNI IN jacks are not patched. To use the signals connected here as inputs, you will need to make patch settings. EF012 EF012 5. Turn on the power to the CL series and the I/O rack units. Owner's Manual 33
-
 1
1 -
2
-
3
-
4
-
5
-
6
-
7
-
8
-
9
-
10
-
11
-
12
-
13
-
14
-
15
-
16
-
17
-
18
-
19
-
20
-
21
-
22
-
23
-
24
-
25
-
26
-
27
-
 28
28 -
 29
29 -
 30
30 -
 31
31 -
 32
32 -
 33
33 -
 34
34 -
 35
35 -
 36
36 -
 37
37 -
 38
38 -
39
-
40
-
41
-
42
-
43
-
44
-
45
-
46
-
47
-
48
-
49
-
50
-
51
-
52
-
53
-
54
-
55
-
56
-
57
-
58
-
59
-
60
-
61
-
62
-
63
-
64
-
65
 |
 |
