Autodesk 507B1-90A211-1301 User Guide - Page 213
IMPORTANT, To delete a database link, Press ENTER.
 |
UPC - 606122713288
View all Autodesk 507B1-90A211-1301 manuals
Add to My Manuals
Save this manual to your list of manuals |
Page 213 highlights
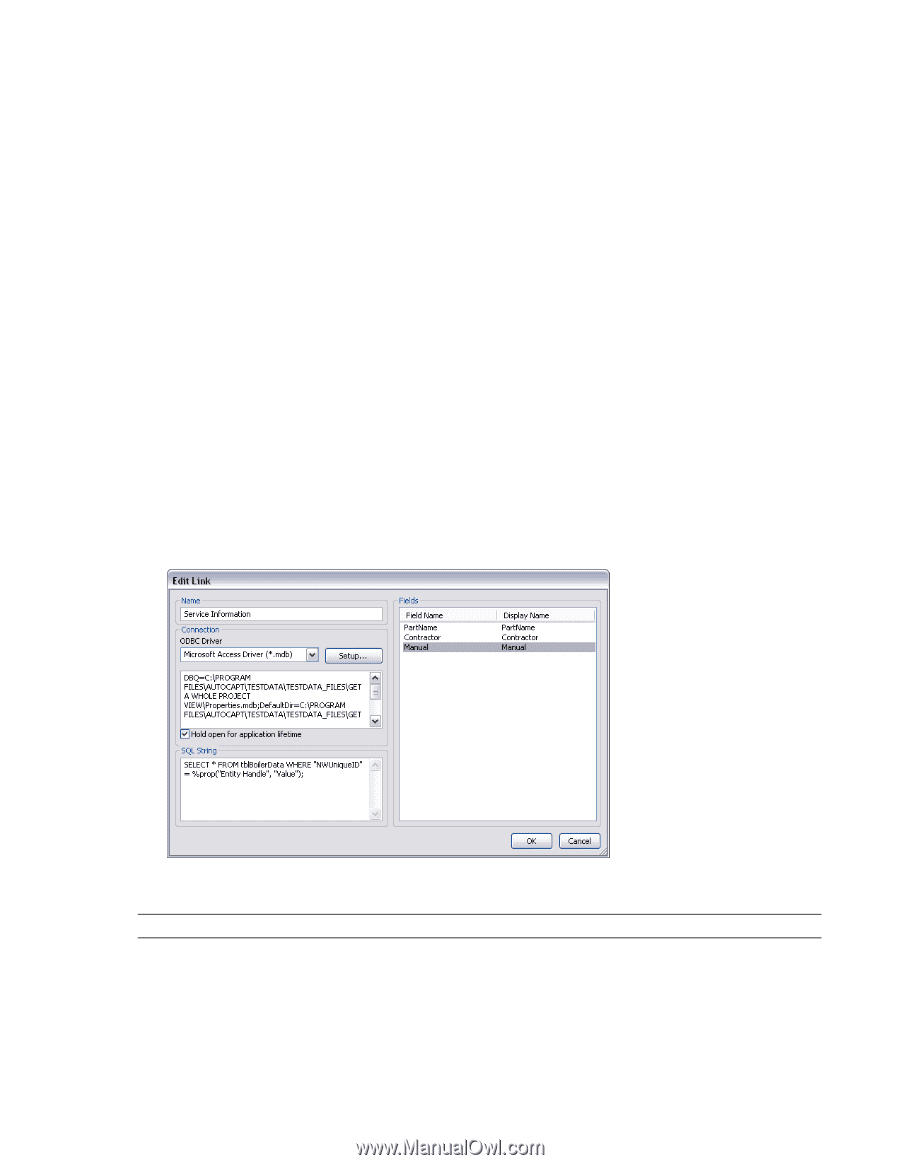
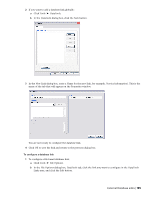
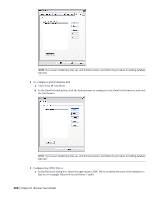
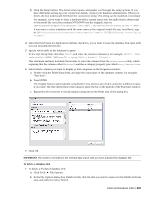
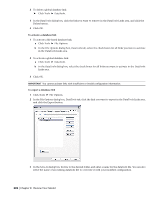
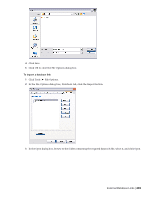
b Click the Setup button. The driver wizard opens, and guides you through the setup options. If you have difficulties setting up your connection details, contact your database administrator. When you finish, the box underneath will show the connection string. This string can be modified, if necessary. For example, if you want to select a database with a certain name (say, test.mdb) that is always next to the model file (as in the resultant NWD/NWF not the original), type in: DBQ=%pushpath(%poppath(%currentpath),"test.mdb"); DRIVER={Microsoft Access Driver (*.mdb)}; If you want to select a database with the same name as the original model file (say, AutoPlant), type in: DBQ=%join(%removeext(%removepath(%sourcepath)),".mdb"); DRIVER={Microsoft Access Driver (*.mdb)}; 4 Select the Hold Open for Application Lifetime check box, if you want to keep the database link open until you exit Autodesk Navisworks. 5 Specify which table in the database to query: In the SQL String field, click after SELECT, and enter the selection statement, for example: SELECT * FROM tblBoilerData WHERE "NWUniqueID" = %prop("Entity Handle", "Value"); This statement instructs Autodesk Navisworks to select all columns from the tblBoilerData table, whilst requiring that the column called NWUniqueID matches a category/property pair called Entity Handle/Value. 6 Select which columns you want to display as link categories on the Properties window: a Double-click the Fields Name field, and type the exact name of the database column, for example: "Part-time". b Press ENTER. The Display Name is automatically completed for you, but you can click it, and enter a different name, if you want. The text entered here is the category name shown on the link tab of the Properties window. c Repeat the above process to list all required categories in the Fields area of the dialog box. 7 Click OK. IMPORTANT The model is not linked to the external data source until you have activated the database link. To delete a database link 1 To delete a file-based database link: a Click Tools ➤ File Options. b In the File Options dialog box, DataTools tab, click the link you want to remove in the DataTools Links area, and click the Delete button. External Database Links | 201
-
 1
1 -
2
-
3
-
4
-
5
-
6
-
7
-
8
-
9
-
10
-
11
-
12
-
13
-
14
-
15
-
16
-
17
-
18
-
19
-
20
-
21
-
22
-
23
-
24
-
25
-
26
-
27
-
28
-
29
-
30
-
31
-
32
-
33
-
34
-
35
-
36
-
37
-
38
-
39
-
40
-
41
-
42
-
43
-
44
-
45
-
46
-
47
-
48
-
49
-
50
-
51
-
52
-
53
-
54
-
55
-
56
-
57
-
58
-
59
-
60
-
61
-
62
-
63
-
64
-
65
-
66
-
67
-
68
-
69
-
70
-
71
-
72
-
73
-
74
-
75
-
76
-
77
-
78
-
79
-
80
-
81
-
82
-
83
-
84
-
85
-
86
-
87
-
88
-
89
-
90
-
91
-
92
-
93
-
94
-
95
-
96
-
97
-
98
-
99
-
100
-
101
-
102
-
103
-
104
-
105
-
106
-
107
-
108
-
109
-
110
-
111
-
112
-
113
-
114
-
115
-
116
-
117
-
118
-
119
-
120
-
121
-
122
-
123
-
124
-
125
-
126
-
127
-
128
-
129
-
130
-
131
-
132
-
133
-
134
-
135
-
136
-
137
-
138
-
139
-
140
-
141
-
142
-
143
-
144
-
145
-
146
-
147
-
148
-
149
-
150
-
151
-
152
-
153
-
154
-
155
-
156
-
157
-
158
-
159
-
160
-
161
-
162
-
163
-
164
-
165
-
166
-
167
-
168
-
169
-
170
-
171
-
172
-
173
-
174
-
175
-
176
-
177
-
178
-
179
-
180
-
181
-
182
-
183
-
184
-
185
-
186
-
187
-
188
-
189
-
190
-
191
-
192
-
193
-
194
-
195
-
196
-
197
-
198
-
199
-
200
-
201
-
202
-
203
-
204
-
205
-
206
-
207
-
 208
208 -
 209
209 -
 210
210 -
 211
211 -
 212
212 -
 213
213 -
 214
214 -
 215
215 -
 216
216 -
 217
217 -
 218
218 -
219
-
220
-
221
-
222
-
223
-
224
-
225
-
226
-
227
-
228
-
229
-
230
-
231
-
232
-
233
-
234
-
235
-
236
-
237
-
238
-
239
-
240
-
241
-
242
-
243
-
244
-
245
-
246
-
247
-
248
-
249
-
250
-
251
-
252
-
253
-
254
-
255
-
256
-
257
-
258
-
259
-
260
-
261
-
262
-
263
-
264
-
265
-
266
-
267
-
268
-
269
-
270
-
271
-
272
-
273
-
274
-
275
-
276
-
277
-
278
-
279
-
280
-
281
-
282
-
283
-
284
-
285
-
286
-
287
-
288
-
289
-
290
-
291
-
292
-
293
-
294
-
295
-
296
-
297
-
298
-
299
-
300
-
301
-
302
-
303
-
304
-
305
-
306
-
307
-
308
-
309
-
310
-
311
-
312
-
313
-
314
-
315
-
316
-
317
-
318
-
319
-
320
-
321
-
322
-
323
-
324
-
325
-
326
-
327
-
328
-
329
-
330
-
331
-
332
-
333
-
334
-
335
-
336
-
337
-
338
-
339
-
340
-
341
-
342
-
343
-
344
-
345
-
346
-
347
-
348
-
349
-
350
-
351
-
352
-
353
-
354
-
355
-
356
-
357
-
358
-
359
-
360
-
361
-
362
-
363
-
364
-
365
-
366
-
367
-
368
-
369
-
370
-
371
-
372
-
373
-
374
-
375
-
376
-
377
-
378
-
379
-
380
-
381
-
382
-
383
-
384
-
385
-
386
-
387
-
388
-
389
-
390
-
391
-
392
-
393
-
394
-
395
-
396
-
397
-
398
-
399
-
400
-
401
-
402
-
403
-
404
-
405
-
406
-
407
-
408
-
409
-
410
-
411
-
412
-
413
-
414
-
415
-
416
-
417
-
418
-
419
-
420
-
421
-
422
-
423
-
424
-
425
-
426
-
427
-
428
-
429
-
430
-
431
-
432
-
433
-
434
-
435
-
436
-
437
-
438
-
439
-
440
-
441
-
442
-
443
-
444
-
445
-
446
-
447
-
448
-
449
-
450
-
451
-
452
-
453
-
454
-
455
-
456
-
457
-
458
-
459
-
460
-
461
-
462
-
463
-
464
-
465
-
466
-
467
-
468
-
469
-
470
-
471
-
472
 |
 |