Brother International Laura Ashley Innov-ís NX2000 Users Manual - English - Page 13
Operation Buttons, Included Accessories, CAUTION
 |
View all Brother International Laura Ashley Innov-ís NX2000 manuals
Add to My Manuals
Save this manual to your list of manuals |
Page 13 highlights
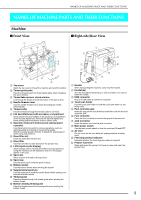
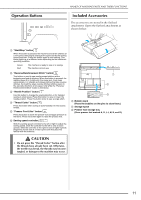
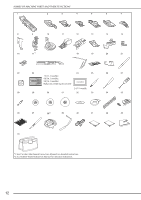
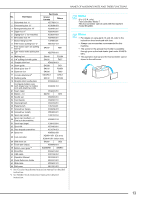
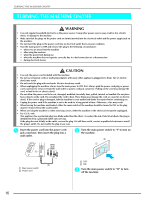
Operation Buttons NAMES OF MACHINE PARTS AND THEIR FUNCTIONS Included Accessories The accessories are stored in the flat bed attachment. Open the flat bed attachment as shown below. a "Start/Stop" button When this button is pressed, the machine sews a few stitches at a low speed, then begins sewing at the speed set by the sewing speed controller. Press this button again to stop sewing. This button lights up in a different color depending on the machine's operating condition. Green: Red: The machine is ready to sew or is sewing. The machine cannot sew. b "Reverse/Reinforcement Stitch" button This button is used to sew reinforcement stitches at the beginning and end of stitching. When this button is pressed, the machine sews 3 to 5 stitches in the same spot, then stops automatically. For straight and zigzag stitches that take reverse stitches, the machine sews reverse stitches (stitches sewn in the opposite direction) at low speed only while the "Reverse/ Reinforcement Stitch" button is held down. c "Needle Position" button Use this button to change the sewing direction or for detailed sewing in small areas. Press this button to raise or lower the needle position. Press this button twice to sew a single stitch. d "Thread Cutter" button Press this button after sewing to automatically trim the excess thread. e "Presser Foot Lifter" button Press this button to lower the presser foot and apply pressure to the fabric. Press this button again to raise the presser foot. f Sewing speed controller Slide the sewing speed controller to the left or right to adjust the sewing speed. Slide the controller to the left to sew at lower speeds. Slide the controller to the right to sew at higher speeds. Beginners should sew at a lower speed until they become familiar with the machine. a b c a Bobbin stand (Place the bobbins on the pins to store them.) b Storage space c Presser foot storage tray (Store presser feet marked A, G, I, J, M, N, and R.) CAUTION • Do not press the "Thread Cutter" button after the threads have already been cut. Otherwise, the needle may break, the threads may become tangled, or damage to the machine may occur. 11
-
 1
1 -
2
-
3
-
4
-
5
-
6
-
7
-
 8
8 -
 9
9 -
 10
10 -
 11
11 -
 12
12 -
 13
13 -
 14
14 -
 15
15 -
 16
16 -
 17
17 -
 18
18 -
19
-
20
-
21
-
22
-
23
-
24
-
25
-
26
-
27
-
28
-
29
-
30
-
31
-
32
-
33
-
34
-
35
-
36
-
37
-
38
-
39
-
40
-
41
-
42
-
43
-
44
-
45
-
46
-
47
-
48
-
49
-
50
-
51
-
52
-
53
-
54
-
55
-
56
-
57
-
58
-
59
-
60
-
61
-
62
-
63
-
64
-
65
-
66
-
67
-
68
-
69
-
70
-
71
-
72
-
73
-
74
-
75
-
76
-
77
-
78
-
79
-
80
-
81
-
82
-
83
-
84
-
85
-
86
-
87
-
88
-
89
-
90
-
91
-
92
-
93
-
94
-
95
-
96
-
97
-
98
-
99
-
100
-
101
-
102
-
103
-
104
-
105
-
106
-
107
-
108
-
109
-
110
-
111
-
112
-
113
-
114
-
115
-
116
-
117
-
118
-
119
-
120
-
121
-
122
-
123
-
124
-
125
-
126
-
127
-
128
-
129
-
130
-
131
-
132
-
133
-
134
-
135
-
136
-
137
-
138
-
139
-
140
-
141
-
142
-
143
-
144
-
145
-
146
-
147
-
148
-
149
-
150
-
151
-
152
-
153
-
154
-
155
-
156
-
157
-
158
-
159
-
160
-
161
-
162
-
163
-
164
 |
 |
