Brother International Laura Ashley Innov-ís NX2000 Users Manual - English - Page 76
Quilting with Satin Stitches
 |
View all Brother International Laura Ashley Innov-ís NX2000 manuals
Add to My Manuals
Save this manual to your list of manuals |
Page 76 highlights
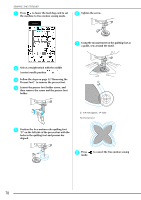
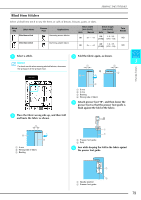
SEWING THE STITCHES e Check the needle drop point, and then sew along the edge of the appliqué while making sure that the needle drops slightly off the edge of the fabric. a e Set "WIDTH CONTROL" to "ON". The sewing speed will be adjusted using the foot controller. a Needle drop point CAUTION • Be careful that the needle does not strike a basting pin during sewing. Striking a pin can cause the needle to break, resulting in injury. ■ Quilting with Satin Stitches Use the foot controller to sew with satin stitches. If you set the speed control slide to control the stitch width, you can make subtle changes in the stitch width during sewing. a Connect the foot controller (see page 39). b Press , and then attach presser foot "J". c Press in the length display to shorten the stitch length. f Press . g While sewing, slide the sewing speed controller to adjust the stitch width. Memo • Slide the controller to the left to make the width narrower. Slide the controller to the right to make the width wider. • The stitch width is adjusted equally from the middle (center) needle position. (Stitches Q-08 and 1-11 will adjust from the right, stitches Q-09 and 1-12 will adjust from the left.) Memo a b A stitch length between 0.3 and 0.5 mm (approx. 1/64 and 1/32 inch) is best for satin stitches, although this range varies depending on the type of fabric and thickness of thread used. a Narrower b Wider J h When you are finished sewing, set "WIDTH CONTROL" back to "OFF". d Press . * Change the sewing speed controller to a stitch width controller. 74
-
 1
1 -
2
-
3
-
4
-
5
-
6
-
7
-
8
-
9
-
10
-
11
-
12
-
13
-
14
-
15
-
16
-
17
-
18
-
19
-
20
-
21
-
22
-
23
-
24
-
25
-
26
-
27
-
28
-
29
-
30
-
31
-
32
-
33
-
34
-
35
-
36
-
37
-
38
-
39
-
40
-
41
-
42
-
43
-
44
-
45
-
46
-
47
-
48
-
49
-
50
-
51
-
52
-
53
-
54
-
55
-
56
-
57
-
58
-
59
-
60
-
61
-
62
-
63
-
64
-
65
-
66
-
67
-
68
-
69
-
70
-
 71
71 -
 72
72 -
 73
73 -
 74
74 -
 75
75 -
 76
76 -
 77
77 -
 78
78 -
 79
79 -
 80
80 -
 81
81 -
82
-
83
-
84
-
85
-
86
-
87
-
88
-
89
-
90
-
91
-
92
-
93
-
94
-
95
-
96
-
97
-
98
-
99
-
100
-
101
-
102
-
103
-
104
-
105
-
106
-
107
-
108
-
109
-
110
-
111
-
112
-
113
-
114
-
115
-
116
-
117
-
118
-
119
-
120
-
121
-
122
-
123
-
124
-
125
-
126
-
127
-
128
-
129
-
130
-
131
-
132
-
133
-
134
-
135
-
136
-
137
-
138
-
139
-
140
-
141
-
142
-
143
-
144
-
145
-
146
-
147
-
148
-
149
-
150
-
151
-
152
-
153
-
154
-
155
-
156
-
157
-
158
-
159
-
160
-
161
-
162
-
163
-
164
 |
 |
