Brother International Laura Ashley Innov-ís NX2000 Users Manual - English - Page 42
Sewing Reinforcement Stitches, Sewing Curves
 |
View all Brother International Laura Ashley Innov-ís NX2000 manuals
Add to My Manuals
Save this manual to your list of manuals |
Page 42 highlights
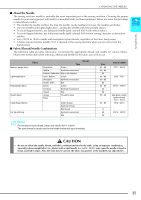
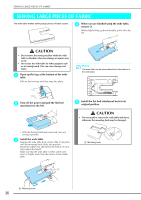
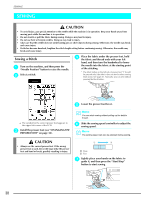
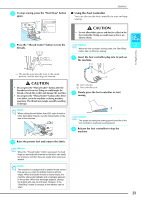
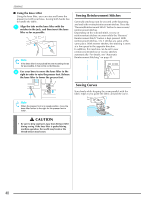
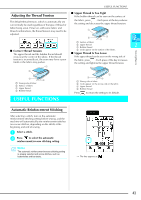
SEWING ■ Using the Knee Lifter Using the knee lifter, you can raise and lower the presser foot with your knee, leaving both hands free to handle the fabric. a Align the tabs on the knee lifter with the notches in the jack, and then insert the knee lifter as far as possible. Note If the knee lifter is not pushed into the mounting slot as far as possible, it may come out during use. b Use your knee to move the knee lifter to the right in order to raise the presser foot. Release the knee lifter to lower the presser foot. Sewing Reinforcement Stitches Generally stitching must be secured at the beginning and end with reverse/reinforcement stitches. Press the "Reverse/Reinforcement Stitch" button to sew reverse/ reinforcement stitches. Depending on the selected stitch, reverse or reinforcement stitches are sewn while the "Reverse/ Reinforcement Stitch" button is kept pressed. With reinforcement stitches, 3 to 5 stitches are sewn at the same place. With reverse stitches, the stitching is sewn at a low speed in the opposite direction. In addition, this machine can be set to sew reinforcement stitches (or reverse stitches) automatically. For details, see "Automatic Reinforcement Stitching" on page 43. Sewing Curves Sew slowly while keeping the seam parallel with the fabric edge as you guide the fabric around the curve. Note When the presser foot is in raised position, move the knee lifter further to the right for the presser foot to lower. CAUTION • Be sure to keep your knee away from the knee lifter during sewing. If the knee lifter is pushed during machine operation, the needle may break or the thread tension may loosen. 40
-
 1
1 -
2
-
3
-
4
-
5
-
6
-
7
-
8
-
9
-
10
-
11
-
12
-
13
-
14
-
15
-
16
-
17
-
18
-
19
-
20
-
21
-
22
-
23
-
24
-
25
-
26
-
27
-
28
-
29
-
30
-
31
-
32
-
33
-
34
-
35
-
36
-
 37
37 -
 38
38 -
 39
39 -
 40
40 -
 41
41 -
 42
42 -
 43
43 -
 44
44 -
 45
45 -
 46
46 -
 47
47 -
48
-
49
-
50
-
51
-
52
-
53
-
54
-
55
-
56
-
57
-
58
-
59
-
60
-
61
-
62
-
63
-
64
-
65
-
66
-
67
-
68
-
69
-
70
-
71
-
72
-
73
-
74
-
75
-
76
-
77
-
78
-
79
-
80
-
81
-
82
-
83
-
84
-
85
-
86
-
87
-
88
-
89
-
90
-
91
-
92
-
93
-
94
-
95
-
96
-
97
-
98
-
99
-
100
-
101
-
102
-
103
-
104
-
105
-
106
-
107
-
108
-
109
-
110
-
111
-
112
-
113
-
114
-
115
-
116
-
117
-
118
-
119
-
120
-
121
-
122
-
123
-
124
-
125
-
126
-
127
-
128
-
129
-
130
-
131
-
132
-
133
-
134
-
135
-
136
-
137
-
138
-
139
-
140
-
141
-
142
-
143
-
144
-
145
-
146
-
147
-
148
-
149
-
150
-
151
-
152
-
153
-
154
-
155
-
156
-
157
-
158
-
159
-
160
-
161
-
162
-
163
-
164
 |
 |
