Brother International Laura Ashley Innov-ís NX2000 Users Manual - English - Page 74
Quilting Using Walking Foot
 |
View all Brother International Laura Ashley Innov-ís NX2000 manuals
Add to My Manuals
Save this manual to your list of manuals |
Page 74 highlights
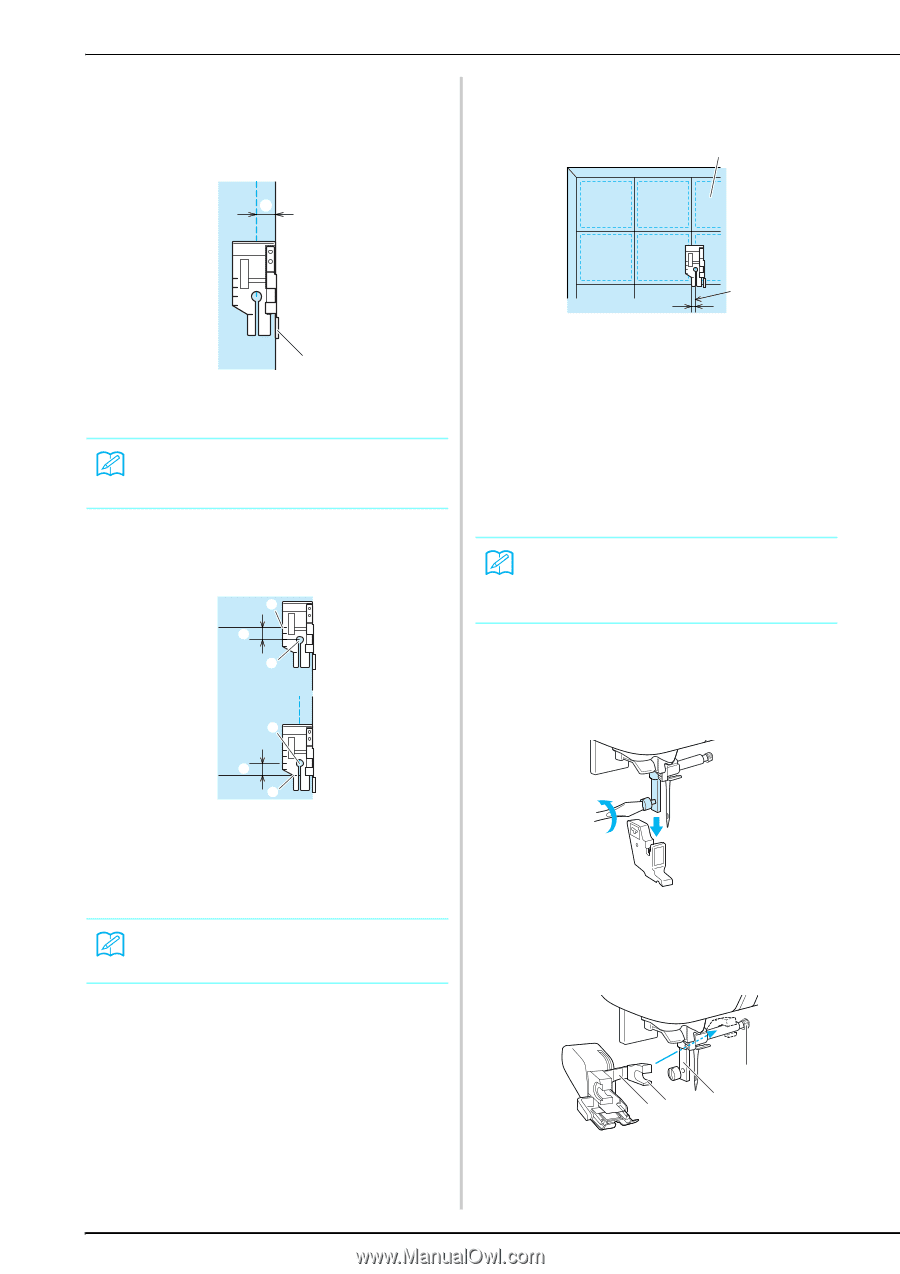
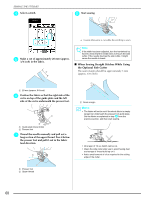
SEWING THE STITCHES b Use the guide and marks on the presser foot to sew accurate seam allowances. Piecing a 1/4 inch seam allowance Sew keeping the edge of the fabrics against the guide. b Topstitching quilting, 1/8 inch Sew with the edge of the fabric aligned with the left side of the presser foot end. a a a Guide b 1/4 inch Memo For accurate fabric placement, refer to "Needle Plate and Needle Plate Cover Marks" on page 56. Creating an accurate seam allowance Use the mark on the foot to begin, end, or pivot 1/4 inch from edge of fabric. a e b c a Surface of fabric b Seam c 1/8 inch b c ■ Quilting Using Walking Foot Sewing together the quilt top, batting, and backing is called quilting. You can sew the quilt with the walking foot to keep the quilt top, batting, and backing from sliding. The walking foot has a set of feed dogs that move together with the feed dogs in the needle plate during sewing. Memo Thread the needle manually when using the walking foot, or only attach the walking foot after threading the needle using the needle threader. a Follow the steps on page 32 to remove the presser foot. b Loosen the screw of the presser foot holder to remove the presser foot holder. e d a Align this mark with edge of fabric to begin. b Beginning of stitching c End of stitching d Opposite edge of fabric to end or pivot e 1/4 inch Memo For details on pivoting, refer to "Pivoting" on page 45. c Set the operation lever of the walking foot so that the needle clamp screw is set between the fork, and position the walking foot on the presser foot bar. ac b d a Operation lever b Needle clamp screw c Fork d Presser foot bar 72
-
 1
1 -
2
-
3
-
4
-
5
-
6
-
7
-
8
-
9
-
10
-
11
-
12
-
13
-
14
-
15
-
16
-
17
-
18
-
19
-
20
-
21
-
22
-
23
-
24
-
25
-
26
-
27
-
28
-
29
-
30
-
31
-
32
-
33
-
34
-
35
-
36
-
37
-
38
-
39
-
40
-
41
-
42
-
43
-
44
-
45
-
46
-
47
-
48
-
49
-
50
-
51
-
52
-
53
-
54
-
55
-
56
-
57
-
58
-
59
-
60
-
61
-
62
-
63
-
64
-
65
-
66
-
67
-
68
-
 69
69 -
 70
70 -
 71
71 -
 72
72 -
 73
73 -
 74
74 -
 75
75 -
 76
76 -
 77
77 -
 78
78 -
 79
79 -
80
-
81
-
82
-
83
-
84
-
85
-
86
-
87
-
88
-
89
-
90
-
91
-
92
-
93
-
94
-
95
-
96
-
97
-
98
-
99
-
100
-
101
-
102
-
103
-
104
-
105
-
106
-
107
-
108
-
109
-
110
-
111
-
112
-
113
-
114
-
115
-
116
-
117
-
118
-
119
-
120
-
121
-
122
-
123
-
124
-
125
-
126
-
127
-
128
-
129
-
130
-
131
-
132
-
133
-
134
-
135
-
136
-
137
-
138
-
139
-
140
-
141
-
142
-
143
-
144
-
145
-
146
-
147
-
148
-
149
-
150
-
151
-
152
-
153
-
154
-
155
-
156
-
157
-
158
-
159
-
160
-
161
-
162
-
163
-
164
 |
 |