Brother International Laura Ashley Innov-ís NX2000 Users Manual - English - Page 54
Using the Sewing Type Selection Key
 |
View all Brother International Laura Ashley Innov-ís NX2000 manuals
Add to My Manuals
Save this manual to your list of manuals |
Page 54 highlights
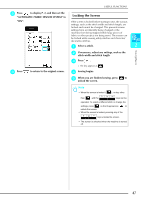
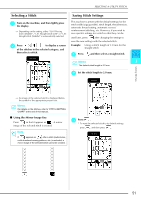
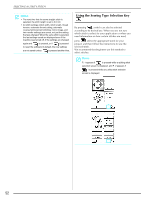
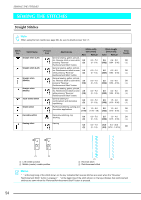
SELECTING A UTILITY STITCH Memo • The next time that the same straight stitch is selected, the stitch length is set to 2.0 mm. • All stitch settings (stitch width, stitch length, thread tension, automatic thread cutting, automatic reverse/reinforcement stitching, mirror image, and twin needle settings) are saved, not just the setting that was changed. When the same stitch is selected, the last settings saved are displayed even if the machine was turned off. If the settings are changed again and is pressed, or if is pressed to reset the setting to its default, the new settings are not saved unless is pressed another time. Using the Sewing Type Selection Key By pressing , a stitch can also be selected according to its desired use. When you are not sure which stitch to select for your application or when you need information on how certain stitches are used, press , select the appropriate stitch for your project, and then follow the instructions to sew the selected stitch. We recommend that beginners use this method to select stitches. Memo P. 1 appears if is pressed while a quilting stitch selection screen is displayed, and P. 2 appears if is pressed while any utility stitch selection screen is displayed. 52
-
 1
1 -
2
-
3
-
4
-
5
-
6
-
7
-
8
-
9
-
10
-
11
-
12
-
13
-
14
-
15
-
16
-
17
-
18
-
19
-
20
-
21
-
22
-
23
-
24
-
25
-
26
-
27
-
28
-
29
-
30
-
31
-
32
-
33
-
34
-
35
-
36
-
37
-
38
-
39
-
40
-
41
-
42
-
43
-
44
-
45
-
46
-
47
-
48
-
 49
49 -
 50
50 -
 51
51 -
 52
52 -
 53
53 -
 54
54 -
 55
55 -
 56
56 -
 57
57 -
 58
58 -
 59
59 -
60
-
61
-
62
-
63
-
64
-
65
-
66
-
67
-
68
-
69
-
70
-
71
-
72
-
73
-
74
-
75
-
76
-
77
-
78
-
79
-
80
-
81
-
82
-
83
-
84
-
85
-
86
-
87
-
88
-
89
-
90
-
91
-
92
-
93
-
94
-
95
-
96
-
97
-
98
-
99
-
100
-
101
-
102
-
103
-
104
-
105
-
106
-
107
-
108
-
109
-
110
-
111
-
112
-
113
-
114
-
115
-
116
-
117
-
118
-
119
-
120
-
121
-
122
-
123
-
124
-
125
-
126
-
127
-
128
-
129
-
130
-
131
-
132
-
133
-
134
-
135
-
136
-
137
-
138
-
139
-
140
-
141
-
142
-
143
-
144
-
145
-
146
-
147
-
148
-
149
-
150
-
151
-
152
-
153
-
154
-
155
-
156
-
157
-
158
-
159
-
160
-
161
-
162
-
163
-
164
 |
 |