Brother International Laura Ashley Innov-ís NX2000 Users Manual - English - Page 43
Changing Sewing Direction, Sewing Heavyweight Fabric, Sewing Lightweight Fabric
 |
View all Brother International Laura Ashley Innov-ís NX2000 manuals
Add to My Manuals
Save this manual to your list of manuals |
Page 43 highlights
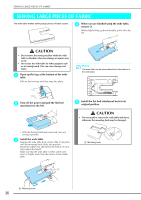
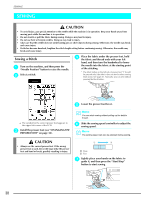
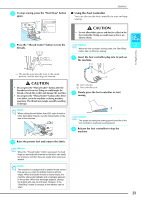
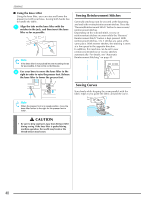
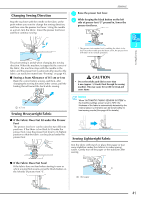
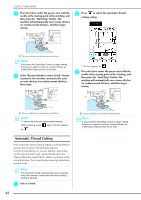
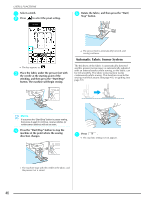
Changing Sewing Direction Stop the machine with the needle in the fabric at the point where you want to change the sewing direction, and then raise the presser foot lever. Using the needle as a pivot, turn the fabric, lower the presser foot lever, and then continue sewing. SEWING a Raise the presser foot lever. b While keeping the black button on the left side of presser foot "J" pressed in, lower the presser foot lever. 2 * The presser foot remains level, enabling the fabric to be fed. Once the trouble spot has been sewn, the presser foot will return to its normal operation. Sewing Basics The pivot setting is useful when changing the sewing direction. When the machine is stopped at the corner of the fabric, the machine stops with the needle in the fabric and the presser foot is automatically raised so the fabric can easily be rotated (see "Pivoting" on page 45). ■ Sewing a Seam Allowance of 0.5 cm or Less Baste the corner before sewing, and then, after changing the sewing direction at the corner, pull the basting thread toward the back while sewing. CAUTION • Do not forcefully push fabrics more than 6 mm (approx. 1/4 inch) thick through the sewing machine. This may cause the needle to break and cause injury. a a 0.5 cm Sewing Heavyweight Fabric ■ If the Fabric Does Not Fit under the Presser Foot The presser foot lever can be raised to two different positions. If the fabric is too thick to fit under the presser foot, raise the presser foot lever to its highest position so that the fabric can be placed under the presser foot. Memo When "AUTOMATIC FABRIC SENSOR SYSTEM" in the machine settings screen is set to "ON", the thickness of the fabric is automatically detected by the internal sensor so the fabric can be fed smoothly for best sewing results.(See page 46 for details.) Sewing Lightweight Fabric Iron the fabric with starch or place thin paper or tear away stabilizer under thin fabrics to make sewing easier. Gently tear off the paper or the stabilizer after sewing. ■ If the Fabric Does Not Feed If the fabric does not feed when starting to sew or when sewing thick seams, press the black button on a the left side of presser foot "J". a Thin paper 41
-
 1
1 -
2
-
3
-
4
-
5
-
6
-
7
-
8
-
9
-
10
-
11
-
12
-
13
-
14
-
15
-
16
-
17
-
18
-
19
-
20
-
21
-
22
-
23
-
24
-
25
-
26
-
27
-
28
-
29
-
30
-
31
-
32
-
33
-
34
-
35
-
36
-
37
-
 38
38 -
 39
39 -
 40
40 -
 41
41 -
 42
42 -
 43
43 -
 44
44 -
 45
45 -
 46
46 -
 47
47 -
 48
48 -
49
-
50
-
51
-
52
-
53
-
54
-
55
-
56
-
57
-
58
-
59
-
60
-
61
-
62
-
63
-
64
-
65
-
66
-
67
-
68
-
69
-
70
-
71
-
72
-
73
-
74
-
75
-
76
-
77
-
78
-
79
-
80
-
81
-
82
-
83
-
84
-
85
-
86
-
87
-
88
-
89
-
90
-
91
-
92
-
93
-
94
-
95
-
96
-
97
-
98
-
99
-
100
-
101
-
102
-
103
-
104
-
105
-
106
-
107
-
108
-
109
-
110
-
111
-
112
-
113
-
114
-
115
-
116
-
117
-
118
-
119
-
120
-
121
-
122
-
123
-
124
-
125
-
126
-
127
-
128
-
129
-
130
-
131
-
132
-
133
-
134
-
135
-
136
-
137
-
138
-
139
-
140
-
141
-
142
-
143
-
144
-
145
-
146
-
147
-
148
-
149
-
150
-
151
-
152
-
153
-
154
-
155
-
156
-
157
-
158
-
159
-
160
-
161
-
162
-
163
-
164
 |
 |
