Brother International Laura Ashley Innov-ís NX2000 Users Manual - English - Page 60
Insert the bobbin case so that
 |
View all Brother International Laura Ashley Innov-ís NX2000 manuals
Add to My Manuals
Save this manual to your list of manuals |
Page 60 highlights
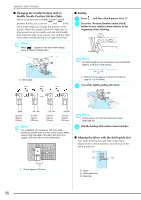
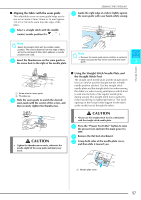
SEWING THE STITCHES d Grasp the bobbin case, and then pull it out. g Insert the bobbin case so that the ▲ mark aligns with the ● mark as shown below, and then attach the needle plate cover. a Bobbin case e Use the disc-shaped screwdriver included with the machine to unscrew and remove the regular needle plate. a b a b f Set the straight stitch needle plate in place and use the screwdriver to tighten the plate. a ▲ mark b ● mark * Align the ▲ and ● marks. h After reinstalling the needle plate cover, select one of the following straight stitches. 1 Note Align the two screw holes on the needle plate with the two holes on the machine. Use the disc-shaped screwdriver to tighten the screws in the needle plate. Memo When using the straight stitch needle plate, all straight stitches become middle needle position stitches. You cannot change the needle position using the width display. CAUTION • Selecting other stitches will cause an error message to be displayed. • Be sure to turn the handwheel slowly in your direction before sewing and make sure that the needle is not contacting the straight stitch foot and straight stitch needle plate. i Attach the straight stitch foot. 58
-
 1
1 -
2
-
3
-
4
-
5
-
6
-
7
-
8
-
9
-
10
-
11
-
12
-
13
-
14
-
15
-
16
-
17
-
18
-
19
-
20
-
21
-
22
-
23
-
24
-
25
-
26
-
27
-
28
-
29
-
30
-
31
-
32
-
33
-
34
-
35
-
36
-
37
-
38
-
39
-
40
-
41
-
42
-
43
-
44
-
45
-
46
-
47
-
48
-
49
-
50
-
51
-
52
-
53
-
54
-
 55
55 -
 56
56 -
 57
57 -
 58
58 -
 59
59 -
 60
60 -
 61
61 -
 62
62 -
 63
63 -
 64
64 -
 65
65 -
66
-
67
-
68
-
69
-
70
-
71
-
72
-
73
-
74
-
75
-
76
-
77
-
78
-
79
-
80
-
81
-
82
-
83
-
84
-
85
-
86
-
87
-
88
-
89
-
90
-
91
-
92
-
93
-
94
-
95
-
96
-
97
-
98
-
99
-
100
-
101
-
102
-
103
-
104
-
105
-
106
-
107
-
108
-
109
-
110
-
111
-
112
-
113
-
114
-
115
-
116
-
117
-
118
-
119
-
120
-
121
-
122
-
123
-
124
-
125
-
126
-
127
-
128
-
129
-
130
-
131
-
132
-
133
-
134
-
135
-
136
-
137
-
138
-
139
-
140
-
141
-
142
-
143
-
144
-
145
-
146
-
147
-
148
-
149
-
150
-
151
-
152
-
153
-
154
-
155
-
156
-
157
-
158
-
159
-
160
-
161
-
162
-
163
-
164
 |
 |