Brother International Laura Ashley Innov-ís NX2000 Users Manual - English - Page 57
Hold the Reverse/Reinforcement Stitch
 |
View all Brother International Laura Ashley Innov-ís NX2000 manuals
Add to My Manuals
Save this manual to your list of manuals |
Page 57 highlights
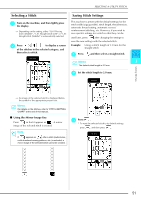
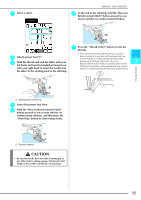
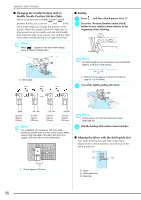
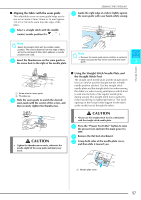
a Select a stitch. SEWING THE STITCHES f At the end of the stitching, hold the "Reverse/ Reinforcement Stitch" button pressed to sew reverse stitches (or reinforcement stitches). g Press the "Thread Cutter" button to trim the threads. b Attach presser foot "J". c Hold the thread ends and the fabric with your left hand, and turn the handwheel toward you with your right hand to insert the needle into the fabric at the starting point of the stitching. * If the automatic thread cutting setting is selected before sewing, the machine will automatically sew reverse stitches (or reinforcement stitches) at the beginning of stitching. When the "Reverse/ 3 Reinforcement Stitch" button is pressed at the end of stitching, the machine will automatically sew reverse stitches (or reinforcement stitches) and cut the thread. Utility Stitches a a Starting point of stitching d Lower the presser foot lever. e Hold the "Reverse/Reinforcement Stitch" button pressed to sew reverse stitches (or reinforcement stitches), and then press the "Start/Stop" button to start sewing slowly. a a Reverse stitches CAUTION • Be sure the needle does not strike a basting pin, or any other objects, during sewing. The thread could tangle or the needle could break, causing injury. 55
-
 1
1 -
2
-
3
-
4
-
5
-
6
-
7
-
8
-
9
-
10
-
11
-
12
-
13
-
14
-
15
-
16
-
17
-
18
-
19
-
20
-
21
-
22
-
23
-
24
-
25
-
26
-
27
-
28
-
29
-
30
-
31
-
32
-
33
-
34
-
35
-
36
-
37
-
38
-
39
-
40
-
41
-
42
-
43
-
44
-
45
-
46
-
47
-
48
-
49
-
50
-
51
-
 52
52 -
 53
53 -
 54
54 -
 55
55 -
 56
56 -
 57
57 -
 58
58 -
 59
59 -
 60
60 -
 61
61 -
 62
62 -
63
-
64
-
65
-
66
-
67
-
68
-
69
-
70
-
71
-
72
-
73
-
74
-
75
-
76
-
77
-
78
-
79
-
80
-
81
-
82
-
83
-
84
-
85
-
86
-
87
-
88
-
89
-
90
-
91
-
92
-
93
-
94
-
95
-
96
-
97
-
98
-
99
-
100
-
101
-
102
-
103
-
104
-
105
-
106
-
107
-
108
-
109
-
110
-
111
-
112
-
113
-
114
-
115
-
116
-
117
-
118
-
119
-
120
-
121
-
122
-
123
-
124
-
125
-
126
-
127
-
128
-
129
-
130
-
131
-
132
-
133
-
134
-
135
-
136
-
137
-
138
-
139
-
140
-
141
-
142
-
143
-
144
-
145
-
146
-
147
-
148
-
149
-
150
-
151
-
152
-
153
-
154
-
155
-
156
-
157
-
158
-
159
-
160
-
161
-
162
-
163
-
164
 |
 |
