Brother International Laura Ashley Innov-ís NX2000 Users Manual - English - Page 22
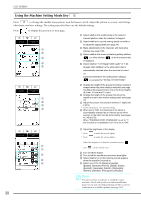
Using the Machine Setting Mode Key
 |
View all Brother International Laura Ashley Innov-ís NX2000 manuals
Add to My Manuals
Save this manual to your list of manuals |
Page 22 highlights
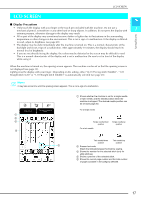
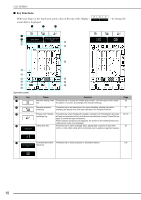
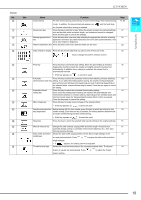
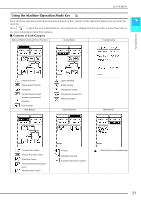
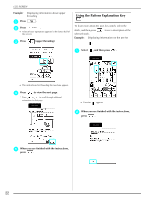
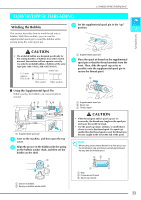
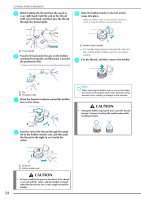
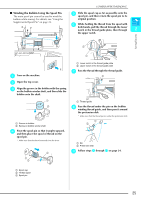
LCD SCREEN Using the Machine Setting Mode Key Press to change the needle stop position, turn the buzzer on/off, adjust the pattern or screen, and change other basic machine settings. The settings specified here are the default settings. Press to display the previous or next page. a b c d e a Select whether the needle stops in the raised or lowered position when the machine is stopped. b Select whether to use the sewing speed controller or to adjust the zigzag width (see page 74). c Make adjustments to the character and decorative stitches (see page 106). d Select whether the screen containing quilting stitches ( ) or utility stitches ( ) is the first screen that is displayed. e Select whether "1-01 Straight stitch (Left)" or "1-03 Straight stitch (Middle)" is the utility stitch that is automatically selected when the machine is turned on. Cannot be selected if the quilting stitch category ( ) is selected for "INITIAL STITCH PAGE". a Change the height of the presser foot when sewing is stopped when the pivot setting is selected (see page 45).Adjust the presser foot to one of the three heights (3.2 mm, 5.0 mm and 7.5 mm). b Change the height of the presser foot when the a machine is set to free-motion sewing mode (see page 75). b c Adjust the presser foot pressure between 1 (light) and c 4 (firm). d * Set the pressure to 3 for normal sewing. d When set to "ON", the thickness of the fabric is automatically detected by an internal sensor while sewing, so the fabric can be fed smoothly (see pages 41, 46 and 75). When "PRESSER FOOT PRESSURE" is set to "1", this function is not available even if it is set to "ON". a b c d e 20 a Adjust the brightness of the display. * Press * Press to make the screen lighter. to make the screen darker. Adjust the brightness so that the contrast between and can be clearly seen. b Turn on/off the buzzer. c Turn on/off the needle area and work area lights. d Select whether or not the opening screen appears when the machine is turned on. e Select one of the 13 display languages: [English], [German], [French], [Italian], [Dutch], [Spanish], [Japanese], [Danish], [Norwegian], [Finnish], [Swedish], [Portuguese], [Russian] Memo The latest version of software is installed in your machine. Check with your local authorized Brother dealer or our web site (http://solutions.brother.com) for notification of available updates (see page 149).
-
 1
1 -
2
-
3
-
4
-
5
-
6
-
7
-
8
-
9
-
10
-
11
-
12
-
13
-
14
-
15
-
16
-
 17
17 -
 18
18 -
 19
19 -
 20
20 -
 21
21 -
 22
22 -
 23
23 -
 24
24 -
 25
25 -
 26
26 -
 27
27 -
28
-
29
-
30
-
31
-
32
-
33
-
34
-
35
-
36
-
37
-
38
-
39
-
40
-
41
-
42
-
43
-
44
-
45
-
46
-
47
-
48
-
49
-
50
-
51
-
52
-
53
-
54
-
55
-
56
-
57
-
58
-
59
-
60
-
61
-
62
-
63
-
64
-
65
-
66
-
67
-
68
-
69
-
70
-
71
-
72
-
73
-
74
-
75
-
76
-
77
-
78
-
79
-
80
-
81
-
82
-
83
-
84
-
85
-
86
-
87
-
88
-
89
-
90
-
91
-
92
-
93
-
94
-
95
-
96
-
97
-
98
-
99
-
100
-
101
-
102
-
103
-
104
-
105
-
106
-
107
-
108
-
109
-
110
-
111
-
112
-
113
-
114
-
115
-
116
-
117
-
118
-
119
-
120
-
121
-
122
-
123
-
124
-
125
-
126
-
127
-
128
-
129
-
130
-
131
-
132
-
133
-
134
-
135
-
136
-
137
-
138
-
139
-
140
-
141
-
142
-
143
-
144
-
145
-
146
-
147
-
148
-
149
-
150
-
151
-
152
-
153
-
154
-
155
-
156
-
157
-
158
-
159
-
160
-
161
-
162
-
163
-
164
 |
 |
