Brother International Laura Ashley Innov-ís NX2000 Users Manual - English - Page 75
Using the Quilting Guide, Appliqués
 |
View all Brother International Laura Ashley Innov-ís NX2000 manuals
Add to My Manuals
Save this manual to your list of manuals |
Page 75 highlights
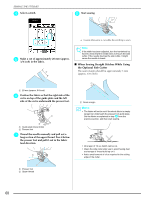
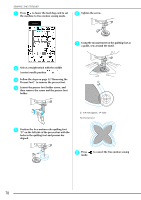
d Lower the presser foot lever. Tighten the screw securely with the screwdriver. Presser foot holder SEWING THE STITCHES e Place one hand on each side of the walking foot to hold the fabric secure while sewing. b Adjust the stem of the quilting guide so that the guide aligns with the seam that has already been sewn. Note Utility Stitches • Sew at slow to medium speed. • Do not sew in reverse or use stitches that require 3 side ways or reverse feeding. • Always check to be sure that your quilting surface is securely basted before beginning to sew. Specialized machine quilt needles and threads are also available for machine quilting. ■ Appliqués The seam will blend in if transparent nylon thread is used for the upper thread. • If "AUTOMATIC FABRIC SENSOR SYSTEM" in the machine settings screen is set to "ON", the fabric can be fed smoothly for best sewing results. For details on the automatic fabric sensor system, refer to "Automatic Fabric Sensor System" on page 46. a Trace the pattern onto the appliqué fabric, and then cut around it. a ■ Using the Quilting Guide Use the quilting guide to sew parallel stitches that are equally spaced. a Seam allowance: 3 to 5 mm b Cut a piece of thick paper or stabilizer to the finished size of the appliqué design, place it on the back of the appliqué, and then fold over the seam allowance using an iron. a Insert the stem of the quilting guide into the hole at the rear of the walking foot or presser foot holder. Walking foot c Turn the applique over and remove the stabilizer or paper. Pin or bast the applique on to the main fabric. d Press , and then attach the open toe foot. 73
-
 1
1 -
2
-
3
-
4
-
5
-
6
-
7
-
8
-
9
-
10
-
11
-
12
-
13
-
14
-
15
-
16
-
17
-
18
-
19
-
20
-
21
-
22
-
23
-
24
-
25
-
26
-
27
-
28
-
29
-
30
-
31
-
32
-
33
-
34
-
35
-
36
-
37
-
38
-
39
-
40
-
41
-
42
-
43
-
44
-
45
-
46
-
47
-
48
-
49
-
50
-
51
-
52
-
53
-
54
-
55
-
56
-
57
-
58
-
59
-
60
-
61
-
62
-
63
-
64
-
65
-
66
-
67
-
68
-
69
-
 70
70 -
 71
71 -
 72
72 -
 73
73 -
 74
74 -
 75
75 -
 76
76 -
 77
77 -
 78
78 -
 79
79 -
 80
80 -
81
-
82
-
83
-
84
-
85
-
86
-
87
-
88
-
89
-
90
-
91
-
92
-
93
-
94
-
95
-
96
-
97
-
98
-
99
-
100
-
101
-
102
-
103
-
104
-
105
-
106
-
107
-
108
-
109
-
110
-
111
-
112
-
113
-
114
-
115
-
116
-
117
-
118
-
119
-
120
-
121
-
122
-
123
-
124
-
125
-
126
-
127
-
128
-
129
-
130
-
131
-
132
-
133
-
134
-
135
-
136
-
137
-
138
-
139
-
140
-
141
-
142
-
143
-
144
-
145
-
146
-
147
-
148
-
149
-
150
-
151
-
152
-
153
-
154
-
155
-
156
-
157
-
158
-
159
-
160
-
161
-
162
-
163
-
164
 |
 |
