Brother International Laura Ashley Innov-ís NX2000 Users Manual - English - Page 98
Multi-Directional Sewing Straight, Stitch and Zigzag Stitch
 |
View all Brother International Laura Ashley Innov-ís NX2000 manuals
Add to My Manuals
Save this manual to your list of manuals |
Page 98 highlights
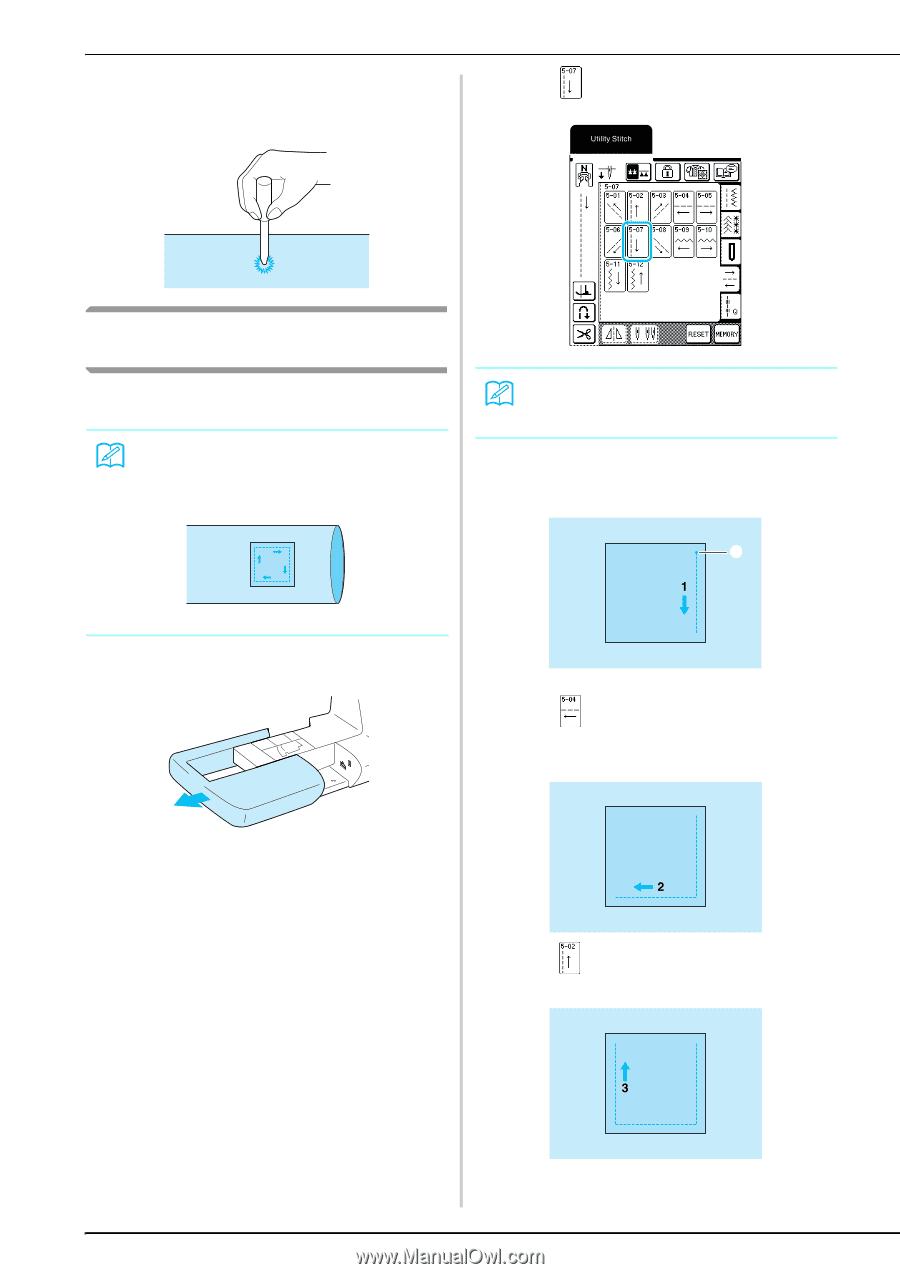
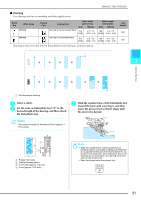
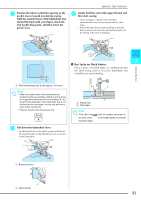
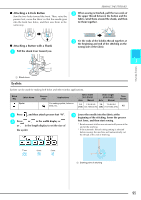
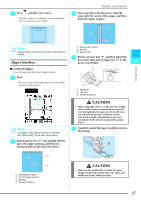
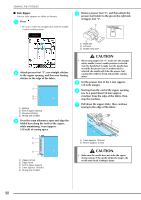
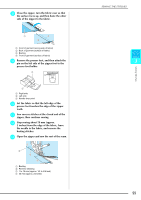
SEWING THE STITCHES d Use the eyelet punch to cut a hole in the center of the stitching. c Press , and then attach presser foot "N". Multi-Directional Sewing (Straight Stitch and Zigzag Stitch) Use these stitches to attach patches or emblems to pant legs, shirt sleeves, etc. Memo Pass the free-arm through the tubular piece of fabric, and then sew in the order shown in the illustration. Memo For details on the stitches, refer to the "STITCH SETTING CHART" at the end of this manual. d Insert the needle into the fabric at the starting point of the stitching, and then sew seam 1. 4 a 3 1 2 a Remove the flat bed attachment to enable free-arm sewing. a Starting point of stitching e Press , and then sew seam 2. * The fabric will move sideways, so guide the fabric with your hands to sew straight. b Pass the free-arm through the fabric. f Press , and then sew seam 3. 96
-
 1
1 -
2
-
3
-
4
-
5
-
6
-
7
-
8
-
9
-
10
-
11
-
12
-
13
-
14
-
15
-
16
-
17
-
18
-
19
-
20
-
21
-
22
-
23
-
24
-
25
-
26
-
27
-
28
-
29
-
30
-
31
-
32
-
33
-
34
-
35
-
36
-
37
-
38
-
39
-
40
-
41
-
42
-
43
-
44
-
45
-
46
-
47
-
48
-
49
-
50
-
51
-
52
-
53
-
54
-
55
-
56
-
57
-
58
-
59
-
60
-
61
-
62
-
63
-
64
-
65
-
66
-
67
-
68
-
69
-
70
-
71
-
72
-
73
-
74
-
75
-
76
-
77
-
78
-
79
-
80
-
81
-
82
-
83
-
84
-
85
-
86
-
87
-
88
-
89
-
90
-
91
-
92
-
 93
93 -
 94
94 -
 95
95 -
 96
96 -
 97
97 -
 98
98 -
 99
99 -
 100
100 -
 101
101 -
 102
102 -
 103
103 -
104
-
105
-
106
-
107
-
108
-
109
-
110
-
111
-
112
-
113
-
114
-
115
-
116
-
117
-
118
-
119
-
120
-
121
-
122
-
123
-
124
-
125
-
126
-
127
-
128
-
129
-
130
-
131
-
132
-
133
-
134
-
135
-
136
-
137
-
138
-
139
-
140
-
141
-
142
-
143
-
144
-
145
-
146
-
147
-
148
-
149
-
150
-
151
-
152
-
153
-
154
-
155
-
156
-
157
-
158
-
159
-
160
-
161
-
162
-
163
-
164
 |
 |