Brother International MFC-J4710DW Software Users Manual - English - Page 49
Auto Crop, Guidelines for Auto Crop - windows 10
 |
View all Brother International MFC-J4710DW manuals
Add to My Manuals
Save this manual to your list of manuals |
Page 49 highlights
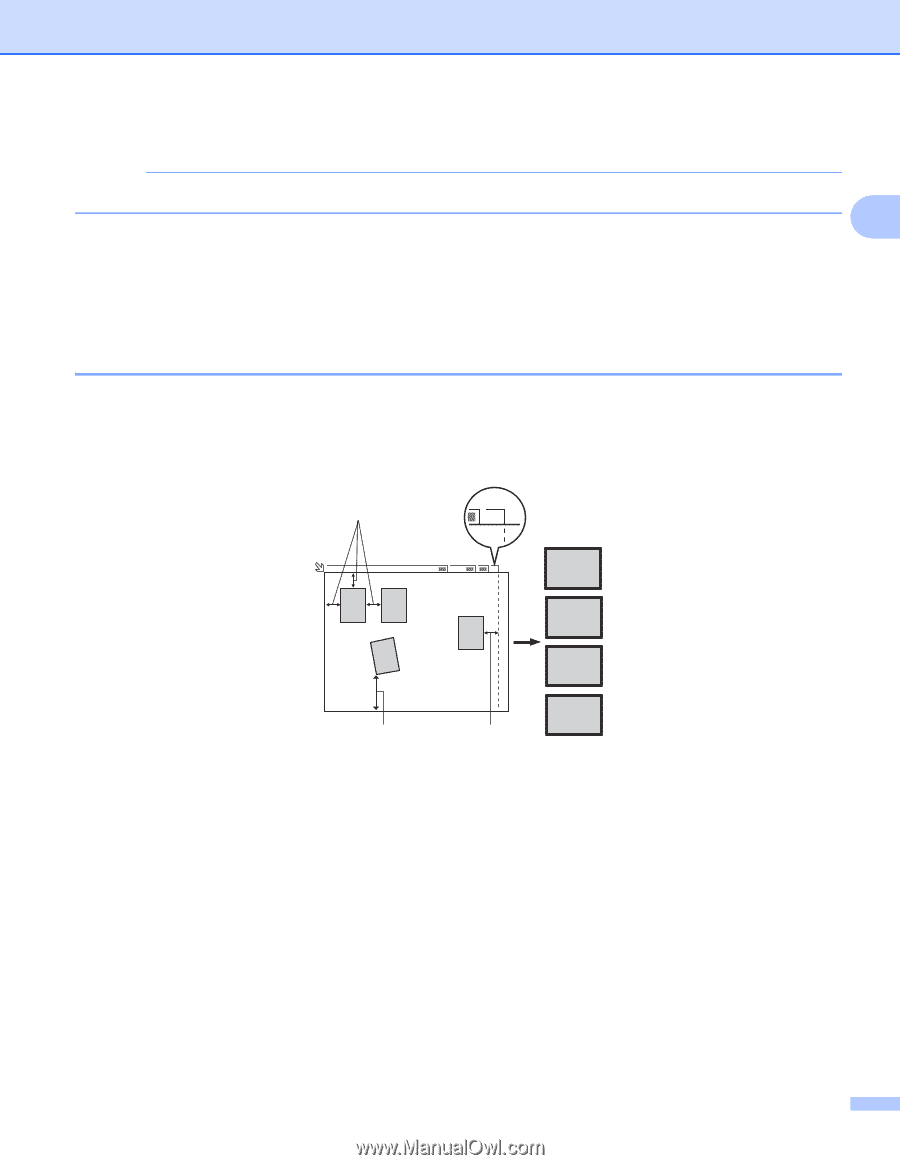
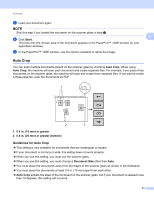
Scanning e Load your document again. NOTE Skip this step if you loaded the document on the scanner glass in step a. 2 f Click Start. This time only the chosen area of the document appears in the PaperPort™ 12SE window (or your application window). g In the PaperPort™ 12SE window, use the options available to refine the image. Auto Crop 2 You can scan multiple documents placed on the scanner glass by checking Auto Crop. When using Auto Crop, the machine will scan each document and create separate files. For example, if you place three documents on the scanner glass, the machine will scan and create three separate files. If you want to create a three page file, scan the documents as PDF. 1 A4 13 2 A4 4 4321 2 1 1 0.4 in. (10 mm) or greater 2 0.8 in. (20 mm) or greater (bottom) Guidelines for Auto Crop 2 This setting is only available for documents that are rectangular or square. If your document is too long or wide, this setting does not work properly. When you use this setting, you must use the scanner glass. When you use this setting, you must choose a Document Size other than Auto. You must place the documents away from the edges of the scanner glass as shown in the illustration. You must place the documents at least 0.4 in. (10 mm) apart from each other. Auto Crop adjusts the skew of the document on the scanner glass, but if your document is skewed more than 10 degrees, this setting will not work. 41
-
 1
1 -
2
-
3
-
4
-
5
-
6
-
7
-
8
-
9
-
10
-
11
-
12
-
13
-
14
-
15
-
16
-
17
-
18
-
19
-
20
-
21
-
22
-
23
-
24
-
25
-
26
-
27
-
28
-
29
-
30
-
31
-
32
-
33
-
34
-
35
-
36
-
37
-
38
-
39
-
40
-
41
-
42
-
43
-
 44
44 -
 45
45 -
 46
46 -
 47
47 -
 48
48 -
 49
49 -
 50
50 -
 51
51 -
 52
52 -
 53
53 -
 54
54 -
55
-
56
-
57
-
58
-
59
-
60
-
61
-
62
-
63
-
64
-
65
-
66
-
67
-
68
-
69
-
70
-
71
-
72
-
73
-
74
-
75
-
76
-
77
-
78
-
79
-
80
-
81
-
82
-
83
-
84
-
85
-
86
-
87
-
88
-
89
-
90
-
91
-
92
-
93
-
94
-
95
-
96
-
97
-
98
-
99
-
100
-
101
-
102
-
103
-
104
-
105
-
106
-
107
-
108
-
109
-
110
-
111
-
112
-
113
-
114
-
115
-
116
-
117
-
118
-
119
-
120
-
121
-
122
-
123
-
124
-
125
-
126
-
127
-
128
-
129
-
130
-
131
-
132
-
133
-
134
-
135
-
136
-
137
-
138
-
139
-
140
-
141
-
142
-
143
-
144
-
145
-
146
-
147
-
148
-
149
-
150
-
151
-
152
-
153
-
154
-
155
-
156
-
157
-
158
-
159
-
160
-
161
-
162
-
163
-
164
-
165
-
166
-
167
-
168
-
169
-
170
-
171
-
172
-
173
-
174
-
175
-
176
-
177
-
178
-
179
-
180
-
181
-
182
-
183
-
184
-
185
-
186
-
187
-
188
-
189
-
190
-
191
-
192
-
193
-
194
-
195
-
196
-
197
-
198
-
199
-
200
-
201
-
202
-
203
-
204
-
205
-
206
-
207
-
208
-
209
-
210
-
211
-
212
-
213
-
214
-
215
-
216
-
217
-
218
-
219
-
220
-
221
-
222
-
223
-
224
-
225
-
226
-
227
-
228
-
229
-
230
-
231
-
232
-
233
-
234
-
235
-
236
-
237
-
238
-
239
-
240
 |
 |