Brother International MFC-J4710DW Software Users Manual - English - Page 75
File types, Document Size, Advanced Settings, For Save and Send E-mail, For OCR, Uncompressed
 |
View all Brother International MFC-J4710DW manuals
Add to My Manuals
Save this manual to your list of manuals |
Page 75 highlights
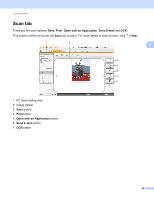
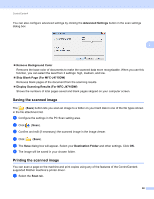
ControlCenter4 File types 3 You can choose a file type to save the scanned image as from the following list: For Save and Send E-mail Windows® Bitmap (*.bmp) JPEG (*.jpg) TIFF (*.tif) TIFF Multi-Page (*.tif) Portable Network Graphics (*.png) PDF (*.pdf) High Compression PDF (*.pdf) Secure PDF (*.pdf) Searchable PDF (*.pdf) XML Paper Specification (*.xps) 3 3 For OCR 3 HTML (*.htm) Excel (*.xls) Rich Text Format (*.rtf) Word Perfect (*.wpd) Text (*.txt) Searchable PDF (*.pdf) NOTE • The XML Paper Specification is available for Windows Vista®, Windows® 7 or when using applications which support XML Paper Specification files. • If you set the file type to TIFF or TIFF Multi-Page, you can choose Uncompressed or Compressed. Document Size 3 You can choose the document size from the Scan Size drop-down list. If you choose a 1 to 2 document size, such as 1 to 2 (A4), the scanned image will be divided into two A5 size documents. Advanced Settings 3 You can configure advanced settings by choosing Custom and then click Custom Settings. The Custom Settings dialog box will appear, click Advanced Settings and the Advanced Settings dialog box will appear. 67
-
 1
1 -
2
-
3
-
4
-
5
-
6
-
7
-
8
-
9
-
10
-
11
-
12
-
13
-
14
-
15
-
16
-
17
-
18
-
19
-
20
-
21
-
22
-
23
-
24
-
25
-
26
-
27
-
28
-
29
-
30
-
31
-
32
-
33
-
34
-
35
-
36
-
37
-
38
-
39
-
40
-
41
-
42
-
43
-
44
-
45
-
46
-
47
-
48
-
49
-
50
-
51
-
52
-
53
-
54
-
55
-
56
-
57
-
58
-
59
-
60
-
61
-
62
-
63
-
64
-
65
-
66
-
67
-
68
-
69
-
 70
70 -
 71
71 -
 72
72 -
 73
73 -
 74
74 -
 75
75 -
 76
76 -
 77
77 -
 78
78 -
 79
79 -
 80
80 -
81
-
82
-
83
-
84
-
85
-
86
-
87
-
88
-
89
-
90
-
91
-
92
-
93
-
94
-
95
-
96
-
97
-
98
-
99
-
100
-
101
-
102
-
103
-
104
-
105
-
106
-
107
-
108
-
109
-
110
-
111
-
112
-
113
-
114
-
115
-
116
-
117
-
118
-
119
-
120
-
121
-
122
-
123
-
124
-
125
-
126
-
127
-
128
-
129
-
130
-
131
-
132
-
133
-
134
-
135
-
136
-
137
-
138
-
139
-
140
-
141
-
142
-
143
-
144
-
145
-
146
-
147
-
148
-
149
-
150
-
151
-
152
-
153
-
154
-
155
-
156
-
157
-
158
-
159
-
160
-
161
-
162
-
163
-
164
-
165
-
166
-
167
-
168
-
169
-
170
-
171
-
172
-
173
-
174
-
175
-
176
-
177
-
178
-
179
-
180
-
181
-
182
-
183
-
184
-
185
-
186
-
187
-
188
-
189
-
190
-
191
-
192
-
193
-
194
-
195
-
196
-
197
-
198
-
199
-
200
-
201
-
202
-
203
-
204
-
205
-
206
-
207
-
208
-
209
-
210
-
211
-
212
-
213
-
214
-
215
-
216
-
217
-
218
-
219
-
220
-
221
-
222
-
223
-
224
-
225
-
226
-
227
-
228
-
229
-
230
-
231
-
232
-
233
-
234
-
235
-
236
-
237
-
238
-
239
-
240
 |
 |