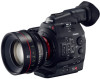
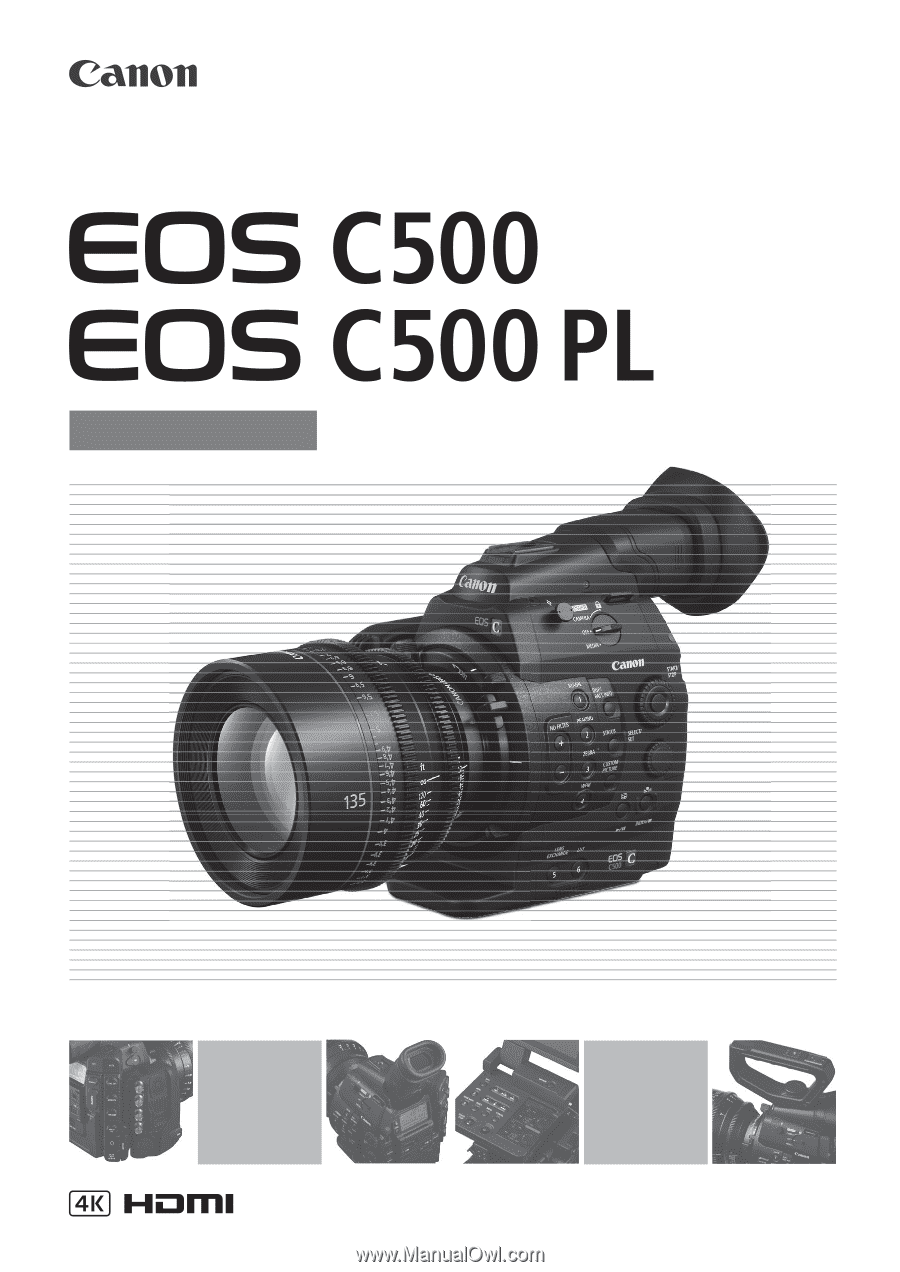
Canon EOS C500 Instruction Manual
Canon EOS C500 Manual
 |
View all Canon EOS C500 manuals
Add to My Manuals
Save this manual to your list of manuals |
Canon EOS C500 manual content summary:
- Canon EOS C500 | Instruction Manual - Page 1
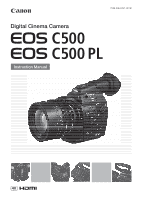
Digital Cinema Camera Instruction Manual PUB. DIE-0441-001B - Canon EOS C500 | Instruction Manual - Page 2
NOTICE Digital Cinema Camera, EOS C500 / EOS C500 PL Systems. This with the instructions, may cause manual. If such changes or modifications should be made, you could be required to stop operation of the equipment. Canon U.S.A., Inc. One Canon Park, Melville, NY 11747, USA Tel No. 1-800-OK-CANON - Canon EOS C500 | Instruction Manual - Page 3
to alert the user to the presence of important 3 operating and maintenance (servicing) instructions in the literature accompanying the product. Only for European Union and EEA ( , waste authority, approved scheme or your household waste disposal service or visit www.canon-europe.com/weee, or www - Canon EOS C500 | Instruction Manual - Page 4
Canon Digital Cinema Camera EOS C500 / EOS C500 PL and all its accessories. 1. Read these instructions. 2. Keep these instructions. 3. Heed all warnings. 4. Follow all instructions periods of time. 13. Refer all servicing to qualified service personnel. Servicing is required when the apparatus has - Canon EOS C500 | Instruction Manual - Page 5
the Canon Cinema Lens series and EF Lens series. The EOS C500 PL features a PL lens mount, allowing you to use a vast array of cinematography lenses compatible with a Canon PL lens mount and other lenses commonly used in motion picture production. 4K, 2K and MXF modes In 4K and 2K modes, the camera - Canon EOS C500 | Instruction Manual - Page 6
settings can be recorded onto an SD card, which allows multiple C500 / C500 PL cameras to use the same settings, or embedded in the recording itself production workflow The Cinema RAW Development software, which can be downloaded from your local Canon Web site, can develop the 4K RAW data recorded - Canon EOS C500 | Instruction Manual - Page 7
Used in this Manual 11 Supplied Accessories 13 Names of Parts 14 Monitor Unit 19 Handle Unit 19 4K Workflow Overview 21 Color Grading with the ACES Workflow 22 2. Preparations 23 Preparing the Power Supply 23 Using a Battery Pack 23 Using a Household Power Outlet 25 Turning the Camera On and Off - Canon EOS C500 | Instruction Manual - Page 8
Focus 79 Adjusting the Focus Manually 79 2 Remote Operation Using Audio Input Source to the Camera 92 Selecting the Audio Input Setting a User Memo Created with Canon XF Utility 97 Setting a User Mark or % Mark to the Last Clip Recorded 103 Remote Operation Using Wi-Fi Remote 103 Reviewing - Canon EOS C500 | Instruction Manual - Page 9
Cinema RAW Development (Mac OS) 152 Viewing the Software Instruction Manual 153 Saving MXF Clips to a Computer 154 Installing Canon XF Utility (Windows) 154 Installing Canon XF Utility (Mac OS) 155 Viewing the Software Instruction Manuals 156 7. Photos 159 Taking Photos 159 Taking Photos in CAMERA - Canon EOS C500 | Instruction Manual - Page 10
10 Specifications 202 Index 207 - Canon EOS C500 | Instruction Manual - Page 11
Thank you for purchasing the Canon EOS C500/C500 PL. Please read this manual carefully before you use the camera and retain it for future reference. Should the camera fail to operate correctly, refer to Troubleshooting (A 185). Conventions Used in this Manual • IMPORTANT: Precautions related to the - Canon EOS C500 | Instruction Manual - Page 12
About this Manual The arrow is used to abbreviate menu selections. For a detailed explanation modes: Selecting the Running Mode During MXF mode, you can select the running mode of the camera s time code. During 4K and 2K modes, the running mode will be set to [Free Run] during normal shooting and - Canon EOS C500 | Instruction Manual - Page 13
Supplied Accessories The following accessories are supplied with the camera. Monitor Unit Handle Unit Body Cap1 Supplied Accessories 13 in.) Tripods WFT Attachment Bracket2 1 Comes pre-attached to the camera. 2 Used to secure the optional WFT-E6 Wireless File Transmitter, when it is attached to - Canon EOS C500 | Instruction Manual - Page 14
dial (A 71, 74) 11 STATUS button (A 178) 12 Å (white balance adjustment) button (A 76)/ INDEX button (A 128)/Ñ (stop) button (A 128) 13 u (review recording) button (A 104)/Ò (play/pause) button (A 128) 14 LENS EXCHANGE button (A 34)/Assignable button 5 (A 111) 15 LUT (lookup table) button (A 148 - Canon EOS C500 | Instruction Manual - Page 15
1 and 2 (A 41) 31 MIC (microphone) terminal (A 92) 32 GRIP terminal This terminal is the same as the grip unit connection terminal on the C300 / C300 PL or C100 camcorder. - Canon EOS C500 | Instruction Manual - Page 16
Names of Parts 2 16 33 37 2 EF Lens mount 33 Mount handle (A 33) 34 EF Lens mount index (A 32) 35 EF-S Lens mount index (A 32) 36 EF Lens contacts (A 32) 37 START/STOP button (A 51) 3 38 34 35 39 40 36 37 3 PL Lens mount 38 Bayonet ring handles (A 35) 39 PL Lens index pin (A 35) 40 - Canon EOS C500 | Instruction Manual - Page 17
Names of Parts 41 42 43 44 45 46 47 48 49 50 51 52 60 61 62 63 53 17 54 55 56 57 58 59 49 41 Viewfinder unit 42 Viewfinder unit LOCK/RELEASE screw (A 196) 43 (rear panel's backlight) button (A 57) 44 FUNC. (main functions) button (A 66) 45 START/STOP button (A 51) 46 Joystick (A 29)/SET button - Canon EOS C500 | Instruction Manual - Page 18
to accurately measure the distance from the focal plane. 65 Focal plane marks 66 Socket for the WFT Attachment Bracket (A 50) 67 Strap mounts 0.64 cm (1/4 in.) screws For attaching accessories such as the optional VL-10Li II Battery Video Light. 71 72 69 70 69 TB-1 Tripod Base for tripods with - Canon EOS C500 | Instruction Manual - Page 19
Monitor Unit Operation panel (A 20) 1 LCD panel 2 MIRROR button (A 37) 3 Microphone lock screw (A 92) Handle Unit 1 2 Names of Parts 19 1 2 3 4 5 6 4 Microphone holder (A 92) 5 Microphone cable clamp (A 92) 6 XLR terminals CH1 (right) and CH2 (left) (A 92) 3 4 1 Mounting hole for 0.64 cm (1/4 in.) - Canon EOS C500 | Instruction Manual - Page 20
Names of Parts Operation panel 20 7 8 9 10 11 12 1 2 13 3 4 5 14 6 15 16 17 18 1 DISP. (display) button (A 55, 129) 2 Ñ (stop) button (A 128)/ Assignable button 14 (A 111) 3 WFM (waveform monitor) button (A 100)/ Assignable button 8 (A 111) 4 Ú (skip backward) button (A 130)/ Assignable - Canon EOS C500 | Instruction Manual - Page 21
RAW data using an external recorder connected to the camera's 3G-SDI terminals (A 41). ᕢ Insert a CF card into the camera to record an MXF clip simultaneously with the 4K RAW data (A 63). ᕣ Develop the RAW data using the Cinema RAW Development software (A 152) to generate fullquality data. • You can - Canon EOS C500 | Instruction Manual - Page 22
Workflow Overview Color Grading with the ACES Workflow Post-production 22 RAW Open EXR 3G-SDI output External 4K data Cinema RAW Development (ACES) recorder Color grading RAW recording ASC- IDT CDL MON. 2 output ACES proxy10 Inverse log ASCCDL RRT ODT On-set Color Grading RRT - Canon EOS C500 | Instruction Manual - Page 23
and Recording and Playback Times (A 200). Using a Battery Pack You can power the camera using the supplied BP-955 or an optional BP-950G, BP-970G or BP-975 -970G / BP-975 Battery Pack was not originally designed for use with this camera. Because of its size, you will not be able to close the battery - Canon EOS C500 | Instruction Manual - Page 24
, slide the battery pack toward the right and then pull it out. 4 Close the battery compartment cover. Checking the Remaining Battery Charge When the camera is turned on, you can check the remaining battery charge by looking at any recording/playback screen or the [Battery/Hour Meter] status screen - Canon EOS C500 | Instruction Manual - Page 25
check the battery life on the [Battery/Hour Meter] status screen (A 183) or the battery information screen (press the BATT. INFO button while the camera is turned off). Fully charging the battery pack and then discharging it will give you a more accurate reading. • USA and Canada only: The Lithium - Canon EOS C500 | Instruction Manual - Page 26
Q switch to CAMERA for mode or MEDIA for mode. • If a message appears prompting you to open the MON./3G-SDI terminal cover, open the cover to shoot in 4K or 2K mode. CAMERA mode MEDIA mode: Allows you to play back recordings made on a CF card. To turn off the camera Set the Q switch - Canon EOS C500 | Instruction Manual - Page 27
Date, Time and Language Settings Setting the Date and Time You will need to set the date and time of the camera before you can start using it. When the camera's clock is not set, the [Date/Time] screen will appear automatically with the first field selected (month or day, depending on - Canon EOS C500 | Instruction Manual - Page 28
the menu. • The selected date/time display will appear at the bottom of the screen. Changing the Language The default language of the camera is English. You can change it to German, Spanish, French, Italian, Polish, Russian, Simplified Chinese, Korean or Japanese. Please note that some settings - Canon EOS C500 | Instruction Manual - Page 29
menu. In the procedures throughout the rest of this manual, opening and closing the menu is assumed and not included the previous time the menu was closed (unless the camera was turned off). 2 Push the joystick up/down mark next to a menu item indicates another submenu. Repeat steps 3 and 4. - Canon EOS C500 | Instruction Manual - Page 30
any time closes the menu. • When an optional RC-V100 Remote Controller is connected to the camera, you can use the remote controller's up/down/left/right/SET buttons in the same way as the camera's joystick. • You can check some of the current settings on the status screens (A 178). Using the - Canon EOS C500 | Instruction Manual - Page 31
Removing Menu Settings 1 Open the My Menu [Delete] screen. [¥ My Menu] > [Edit] > [Delete] 2 Push the joystick up/down or turn the SELECT dial to select the setting you want to remove and then press SET. 3 Select [OK] and then press SET twice. Resetting the My Menu Submenu 1 Reset all the menu - Canon EOS C500 | Instruction Manual - Page 32
covers how to adjust the viewfinder 32 and LCD screen. Your camera is nothing if not versatile and you can choose the configuration that quickly and in a clean environment free of dust. Refer also to the instruction manual of the lens used. IMPORTANT • When attaching/removing a lens, avoid direct - Canon EOS C500 | Instruction Manual - Page 33
lens and mount making sure that the index marks are aligned. • EF lenses: Align the red mark on the lens with the red EF Lens mount index mark on the camera. • EF-S lenses: Align the white mark on the lens with the white EF-S Lens mount index mark on the camera. 5 After the lens is attached to the - Canon EOS C500 | Instruction Manual - Page 34
illumination drop. If the camera has correction data available for the EF lens used, it can apply Canon Web site and check if there is correction data available for the lens you are using. If so, download the necessary update package and upgrade the camera's firmware following the instructions - Canon EOS C500 | Instruction Manual - Page 35
Preparing the Camera - When using non-Canon lenses, peripheral illumination will not be corrected. Even if the [~ Camera Setup] > [Periph. Illum. Corr.] setting is available (not grayed out), it is recommended to set it to [Off]. 3 Attaching a PL Lens 35 1 Hold a bayonet ring handle and turn the - Canon EOS C500 | Instruction Manual - Page 36
Preparing the Camera Using the Viewfinder Adjusting the Viewfinder's Position 36 1 Gently pull out the viewfinder until it stops the eye cup as shown in the illustration. Dioptric Adjustment Turn on the camera and adjust the dioptric adjustment dial. Eye cup Viewfinder unit Dioptric adjustment dial - Canon EOS C500 | Instruction Manual - Page 37
sideways allowing for easy monitoring and operation from the side of the camera. Additionally, the independently articulated LCD panel can be rotated 180º techniques, with more than 99.99% of the pixels operating to specification. Less than 0.01% of the pixels may occasionally misfire or appear - Canon EOS C500 | Instruction Manual - Page 38
Preparing the Camera Adjusting the Viewfinder/LCD Screen You can adjust the brightness, & white display on and off. Using a Tripod The camera is shipped with the TB-1 Tripod Base for tripods with 0.95 cm (3/8 in.) screws. You can mount the camera on a tripod but do not use tripods with mounting - Canon EOS C500 | Instruction Manual - Page 39
the tripod. • Firmly screw in the tripod screw. Attaching the Handle Unit 1 Insert the attachment base at the bottom of the handle unit to the camera's accessory shoe. 2 Tighten the handle unit's lock screw while gently pressing it down. NOTES • You can use the accessory shoe or the socket for 0.64 - Canon EOS C500 | Instruction Manual - Page 40
Preparing the Camera Removing and Attaching the Terminal Covers You can remove the plastic covers of the following terminals and SD card slot to access them more readily. For information on removing the MON./3G-SDI terminal cover, refer to Connecting to a 4K- or 2K-Compatible 40 External - Canon EOS C500 | Instruction Manual - Page 41
must enable it after you connect the camera to the external recorder. Refer also to the external recorder's instruction manual for details on how to record. * To make 4K recordings, the external recorder must be compatible with Canon RAW files. Refer to Canon's Web site for the latest information on - Canon EOS C500 | Instruction Manual - Page 42
. The following summarizes the video signal output from the 3G-SDI terminals for slow & fast motion mode. System priority / Recording mode 4K / RAW 2K / 12-bit 2K / 10-bit 4K / HRAW 4K / 4K1K RAW 2K / 10-bit Video configuration System frequency 59.94 Hz 24.00 Hz 50.00 Hz 59.94 Hz - Canon EOS C500 | Instruction Manual - Page 43
UDMA-compatible* Type I CF cards with a capacity of at least 512 MB with the camera. For more details on cards that can be used, visit your local Canon Web site. * The Ultra Direct Memory Access (UDMA) specification allows data to be transferred between the CF card and device at high transfer speeds - Canon EOS C500 | Instruction Manual - Page 44
permanent data loss. - Do not disconnect the power source or turn off the camera. - Do not open the cover of the CF card slot being accessed. access indicators will not illuminate. Inserting and Removing an SD Card 1 Turn off the camera. 2 Open the SD card slot cover. 3 Insert the SD card all the - Canon EOS C500 | Instruction Manual - Page 45
. Inserting an SD card facing the wrong direction can cause a malfunction of the camera. Be sure to insert the SD card as described in step 3. NOTES • media will permanently erase all data, including clips with an $ mark, protected photos, and custom picture files. Lost data cannot be recovered - Canon EOS C500 | Instruction Manual - Page 46
with a Î mark on top of the CF card icon. NOTES • If both CF card slots contain a CF card and you open the cover of the selected slot, the camera will automatically switch to activate it. 1 Open the [Relay Rec] submenu. [ 4K/2K/MXF Setup] > [Set CF Card Slot] > [Relay Rec] 2 Select [On] and then - Canon EOS C500 | Instruction Manual - Page 47
Recording Media To use double slot recording [ 4K/2K/MXF Setup] 1 Open the [Double Slot Rec] submenu. [ 4K/2K/MXF Setup] > [Set CF Card fast motion recording. Checking the Available Recording Time for CF Cards When the camera is in mode, the display on the upper left of the screen indicates - Canon EOS C500 | Instruction Manual - Page 48
Press SET and repeat the procedure from the beginning. NOTES • Adjusting the black balance may be necessary in the following cases: - When using the camera for the very first time or after a long period of not using it. - After sudden or extreme changes in ambient temperature. - After changing the - Canon EOS C500 | Instruction Manual - Page 49
to connect it to the camera. For details on how to connect and use the remote controller, refer to its instruction manual. Operating modes: REMOTE need to update the lens's firmware. For details, consult a Canon Service Center. • Adjusting picture-related settings with the remote controller can be - Canon EOS C500 | Instruction Manual - Page 50
a metadata profile, set various shot marks and check the recording media, remaining recording camera's WFT terminal and complete the wireless network setup. Download 'WFT-E6 Wireless File Transmitter - Guide for Canon Camcorders' (PDF file) from your local Canon Web site and follow the instructions - Canon EOS C500 | Instruction Manual - Page 51
camera is operating correctly. Record for approximately 6 minutes at 50 Mbps (A 60). Should the camera fail to operate correctly, refer to Troubleshooting 35). 5 To make 4K and 2K recordings, connect the camera to an external recorder (A 41). 6 Adjust the viewfinder. NOTES • The camera can add a user - Canon EOS C500 | Instruction Manual - Page 52
recorder connected to the HD/SD SDI or 3G-SDI terminals instructing it to start recording. [ÜREC `] appears at the upper center of the screen and the tally lamp illuminates. - If there is a CF card in a CF card slot, the camera simultaneously records an MXF clip on the card. In such case - Canon EOS C500 | Instruction Manual - Page 53
. - Do not disconnect the power source or turn off the camera. • Be sure to save your recordings regularly (A 154), especially after making important recordings. Canon shall not be liable for any loss or corruption of data. NOTES • By default, [ 4K/2K/MXF Setup] > [Rec Command] is set to [On]. With - Canon EOS C500 | Instruction Manual - Page 54
Review] (A 104) to review part or all of the last clip recorded. - If you set an assignable button to [Add $ Mark] or [Add % Mark] (A 111), you can press the button to add an $ mark or % mark application. 1 Press [LIVE VIEW ON/OFF] to show the camera's live view image on the Wi-Fi Remote screen. 2 - Canon EOS C500 | Instruction Manual - Page 55
time for double slot recording (A 47) 3 2 Current focal length of an attached EF lens1 4 Temperature warning / Fan 5 ND filter (A 73) 6 View assistance (A an optional WFT-E6 Wireless File Transmitter is connected to the camera. 3 During 4K and 2K modes, when the shooting frame rate is enclosed by - Canon EOS C500 | Instruction Manual - Page 56
CF card The CF card selected for recording is indicated with a Ð mark. 2 CF card recording operation (4K and 2K modes) • When double slot recording (A 46) is activated, one. • Depending on the conditions under which the camera and the battery pack are used, the actual battery charge may not - Canon EOS C500 | Instruction Manual - Page 57
of 1/100, etc. 3 Only displayed while adjusting the setting. 4 Only when an optional WFT-E6 Wireless File Transmitter is connected to the camera. Adjusting the Brightness of the Rear Panel Repeatedly pressing the (backlight) button will change the brightness of the rear panel in the following - Canon EOS C500 | Instruction Manual - Page 58
will not be available. [~ Camera Setup] [/ CINEMA Locked] [On] System priority 4K 2K MXF Output terminal/ Recording destination 3G-SDI terminals MON. terminals CF card CF card [/ CINEMA Locked] setting - - [On] [Off] [On] [Off] Picture setting Canon Log gamma Canon Log gamma with or without - Canon EOS C500 | Instruction Manual - Page 59
), even while you are recording. [Fan] [Automatic] NOTES • While the cooling fan is set to [Automatic], when you start the camera in a cooled down state and shoot in 4K or 2K mode, the cooling fan will activate in approximately 10 minutes, based on a surrounding temperature of 25 °C (77 °F). Also - Canon EOS C500 | Instruction Manual - Page 60
] Selecting the System Frequency 1 Open the [System Frequency] submenu. [ 4K/2K/MXF Setup] > [System Frequency] 2 Select the desired option and then press SET. • The camera will restart in the selected mode. • In this manual, recordings with a system frequency of 59.94 Hz, 50.00 Hz and 24.00 Hz are - Canon EOS C500 | Instruction Manual - Page 61
& 4K1K RAW fast motion recording. When you develop the clip using the Cinema RAW Development software (A 152), you can covert it using options such as the YCC color space, 4:2:2 color sampling, and has a 10-bit bit depth. [ 4K/2K/MXF Setup] [2K (2048/1920)] 61 [Mode] [ 12-bit] NOTES • - Canon EOS C500 | Instruction Manual - Page 62
is not necessary for 24.00 Hz recordings because the frame rate will automatically be set to [24.00P]. 1 Open the [Frame Rate] submenu. [ 4K/2K/MXF Setup] > [4K (4096/3840)] or [2K (2048/1920)] > [Frame Rate] 2 Select the desired frame rate and then press SET. • The available frame rates depend on - Canon EOS C500 | Instruction Manual - Page 63
and 2K Modes While recording on an external recorder in 4K and 2K modes, the camera can simultaneously record an MXF clip on a CF card inserted in the camera, except during special recording modes. The selected video configuration for 4K and 2K modes will be converted to HD video and recorded onto - Canon EOS C500 | Instruction Manual - Page 64
/MXF Setup] > [System Priority] 2 Select [MXF] and then press SET. • The camera will restart in MXF mode. [ 4K/2K/MXF Setup] [System Priority] [4K] Selecting the System Frequency 1 Open the [System Frequency] submenu. [ 4K/2K/MXF Setup] > [System Frequency] 2 Select a desired option and then press - Canon EOS C500 | Instruction Manual - Page 65
Setup] > [MXF] > [Frame Rate] 2 Select the desired option and then press SET. • The selected frame rate will appear on the upper right of the screen. [ 4K/2K/MXF Setup] [MXF] 65 [Frame Rate] NOTES • A single CF card cannot be used to record clips with different system frequencies (59.94 Hz/50 - Canon EOS C500 | Instruction Manual - Page 66
or using only the rear panel, which is convenient when the monitor unit is not attached to the camera. This section will explain the basic operation of the direct setting mode. For specific details about the functions please refer to the each function's section: shutter speed (A 67), white balance - Canon EOS C500 | Instruction Manual - Page 67
Speed Set the shutter speed based on the recording conditions. For example, you may want to set slower shutter speeds in darker environments. The camera offers the following 5 modes. 67 Operating modes: [Speed]: Allows you to set the shutter speed (in fractions of a second). You can select the - Canon EOS C500 | Instruction Manual - Page 68
you can select the increment scale to use when adjusting the shutter speed; otherwise, skip to step 5. 3 Open the [Shutter Increment] submenu. [~ Camera Setup] > [Shutter] > [Shutter Increment] 4 Select [1/3 stop] or [1/4 stop] and then press SET. 5 Adjust the shutter speed, angle value or clear - Canon EOS C500 | Instruction Manual - Page 69
screen. In such case, use a faster shutter speed or select a lower ISO speed or gain value (A 70). • Even when using the [C9: EOS Std.] preset custom picture file, if you set the camera to a certain shutter speed, you may not get the exactly the same image brightness as you would on an - Canon EOS C500 | Instruction Manual - Page 70
dB Fine 0 dB to 24 dB in 0.5 dB increments - 1 Settings available only when [~ Camera Setup] > [ISO/Gain] > [Extended Range] is set to [On]. 2 The minimum scale is selected. 3 ISO speed required for a suitable dynamic range for Canon Log gamma. Equivalent to a gain value of 2.5 dB. 4 This value - Canon EOS C500 | Instruction Manual - Page 71
Dial You can adjust the value of the ISO speed or gain using the control dial on the camera. When you have attached the grip unit of the C300 / C300 PL or C100 to the camera, you can select the function assigned to each control dial independently. You will need to set the - Canon EOS C500 | Instruction Manual - Page 72
momentarily on the screen. Do not adjust the ISO speed/gain level while recording. • When an optional RC-V100 Remote Controller is connected to the camera, you can adjust the ISO speed or gain value with the remote controller's ISO/GAIN Í/Î buttons. - Canon EOS C500 | Instruction Manual - Page 73
is identical to that of the ND FILTER + and - buttons on the camera. • The selected ND filter setting will be displayed on the Wi-Fi Remote screen and will be applied on the camera. NOTES • Depending on the scene, the color may change when turning the - Canon EOS C500 | Instruction Manual - Page 74
Operating modes: Using the Control Dial You can adjust the aperture value of most EF lenses using the control dial on the camera. When you have attached the grip unit of the C300 / C300 PL or C100 to the camera, you can select the function assigned to each control dial independently. By default the - Canon EOS C500 | Instruction Manual - Page 75
applied on the lens. NOTES • When using an EF lens with no lens contacts or an EF Cinema lens (except for a CINE-SERVO CN7x17 KAS S/E1 lens), you cannot adjust the aperture using the camera. Adjust the aperture using the lens. • When using an EF lens that can correct the aperture value according to - Canon EOS C500 | Instruction Manual - Page 76
make the transition look smoother when you change the white balance settings. • When an optional RC-V100 Remote Controller is connected to the camera, you can adjust the white balance with the remote controller's A/B, PRESET and Å buttons. Setting the White Balance 1 Set the white balance mode using - Canon EOS C500 | Instruction Manual - Page 77
then press SET. • The selected adjustment value will be set and the camera will exit the direct setting mode. • On the screen: The selected adjustment then press SET. • The selected color temperature will be set and the camera will exit the direct setting mode. • On the screen: The selected color - Canon EOS C500 | Instruction Manual - Page 78
will flash slowly. • During the procedure, [Å] will flash quickly. When it stops flashing, the procedure is completed and the setting will be applied on the camera. NOTES • Using the custom white balance setting: - Readjust the custom white balance if you turn the ND filter on/off or when the light - Canon EOS C500 | Instruction Manual - Page 79
mode in advance. • Refer to the instruction manual of the lens used. 2 Turn the focus ring to adjust the focus. • 2 Set the focus mode switch of the EF lens to MF in advance. NOTES • 2 On some EF lenses, you can turn the focus ring to adjust the focus even when focus mode switch is - Canon EOS C500 | Instruction Manual - Page 80
EF lens is set to MF, you will not be able control the focus through remote operation. Depending on the lens used, remote operation may not work correctly. 80 • If you operate the zoom after focusing, the focus on the subject may be lost. • If you focus manually and then leave the camera [ 4K/2K/MXF - Canon EOS C500 | Instruction Manual - Page 81
not appear when using the other terminals. • Peaking/Magnification will not affect recordings made on a CF card. • When using the camera's screen to focus: - The camera features professional video scopes (A 100). You can display the edge monitor to help you focus even more accurately. - You can use - Canon EOS C500 | Instruction Manual - Page 82
help you identify areas that are overexposed. The onscreen displays and zebra 82 pattern appear on the camera screen and an external monitor connected to the MON. 1 terminal. The onscreen markers and zebra [1.75:1], [1.66:1], [14:9], [13:9] and [4:3]. Safety zone 80% Level marker Aspect guide 4:3 - Canon EOS C500 | Instruction Manual - Page 83
and right side will not be displayed. Displaying Zebra Patterns The camera has a zebra pattern feature that shows black and white diagonal stripes LCD/VF Setup] [Select] (under [Zebra]) [Zebra 1] NOTES • You can use the [ 4K/2K/MXF Setup] > [HD/SD Output] > [Zebra HD Output] setting to display the - Canon EOS C500 | Instruction Manual - Page 84
Synchronizing with an External Device (A 88). Operating modes: Selecting the Running Mode During MXF mode, you can select the running mode of the camera's time code. During 4K and 2K modes, the running mode will be set to [Free Run] during normal shooting and slow & fast recording mode; it will be - Canon EOS C500 | Instruction Manual - Page 85
Run], the time code will start running from the selected time code the moment you press SET. Selecting Drop or Non-Drop Frame When [ 4K/2K/MXF Setup] > [4K (4096/3840)], [2K (2048/1920)] or [MXF] > [Frame Rate] is set to [59.94P], [59.94i] or [29.97P], you can select between - Canon EOS C500 | Instruction Manual - Page 86
to 24. For other frame rates, it runs from 0 to 29. • In 4K and 2K modes or when using pre-recording mode in MXF mode, [Free Run] even if you disconnect all other power sources. However, this is less accurate than when the camera is on. • If you set an assignable button to [Time Code] (A 111), you - Canon EOS C500 | Instruction Manual - Page 87
Setting the User Bit Setting the User Bit The user bit display can be selected from the date or the time of recording, or an identification code consisting of 8 characters in the hexadecimal system. There are sixteen possible characters: the numbers 0 to 9 and the letters A to F. If user bit - Canon EOS C500 | Instruction Manual - Page 88
use the TIME CODE terminal. Be sure to set the TIME CODE terminal to input or output in advance. Connect the external device to the camera as shown in the following diagram. * For the reference video signal, you can use an analog blackburst or tri-level signal. Connection Diagram GENLOCK terminal - Canon EOS C500 | Instruction Manual - Page 89
the rear panel). • When an external time code signal is received, the camera's own time code will be synchronized to it and the synchronization will be code will be restored once you reconnect the cable. - Turning the camera off/on - Changing the operating mode to mode - Changing the video - Canon EOS C500 | Instruction Manual - Page 90
-level signal) through the SYNC OUT terminal to synchronize an external device to this camera. 90 Operating modes: In mode, you must first set [¤ TC/UB Setup System Recording priority mode Resolution Frame rate 59.94P 29.97P RAW 4K 4096×2160 3840×2160 23.98P 50.00P 25.00P 24.00P HRAW - Canon EOS C500 | Instruction Manual - Page 91
HD/SD SDI terminal. Operating modes: NOTES • The user bit of the time code signal is output while the camera is recording in mode or during playback of a clip recorded on a CF card in mode. For the HD/SD conversion (2:3 pulldown data) to convert the signal to the original 23.98P specifications. - Canon EOS C500 | Instruction Manual - Page 92
) that can be used to record audio independently to the two audio channels. In addition to XLR microphones, you can also connect to the camera's MIC terminal commercially available condenser microphones with their own power supply and a ∅ 3.5 mm mini-stereo plug*. If the monitor unit is attached to - Canon EOS C500 | Instruction Manual - Page 93
channels from a microphone or analog audio input source. Note that the camera's MIC terminal is given priority over the XLR terminals. To record ] [CH1] IMPORTANT • When connecting a microphone or device that does not support phantom power, make sure to set the XLR terminal switch to MIC or LINE - Canon EOS C500 | Instruction Manual - Page 94
or manual for each channel. 94 Automatic Audio Level Adjustment Set the ã switch of the desired channel to A (automatic) to let the camera automatically adjust panel will go to the right of the 18 dB mark (one mark right of the 20 dB mark) only occasionally. • Closing the protective cover for XLR - Canon EOS C500 | Instruction Manual - Page 95
of the 20 dB mark) only occasionally. [¡ Audio Setup] [Audio Input] [MIC Mode] [Automatic] [¡ Audio Setup] [Audio Input] [MIC Level] [50] NOTES • When adjusting the audio level manually, you can activate the audio peak limiter with the [¡ Audio Setup] > [Audio Input] > [Limiter] setting. When - Canon EOS C500 | Instruction Manual - Page 96
Recording Audio Activating the Microphone's Attenuator If the audio level is too high and the sound sounds distorted, activate the microphone attenuator (20 dB). 96 1 Open the [MIC Att.] submenu. [¡ Audio Setup] > [Audio Input] > [MIC Att.] 2 Select [On] and then press SET. [¡ Audio Setup] [Audio - Canon EOS C500 | Instruction Manual - Page 97
camera automatically adds metadata to MXF clips, which are recorded on a CF card. You can use the Canon XF Utility software to check and search for specific Canon XF Utility Instruction Manual. 2 Insert the SD card into the SD card slot of the camera. 3 Open the metadata [Setting] submenu. [ 4K/ - Canon EOS C500 | Instruction Manual - Page 98
additional advantages over user memos created with Canon XF Utility: you can change the user user memo in advance; and you can enter manually the GPS information of your shooting location. 1 Press Press [- Activate]. • Alternatively, on the camera, you can set [ 4K/2K/MXF Setup] > [Metadata] > [ - Canon EOS C500 | Instruction Manual - Page 99
and then press SET. • The selected color bars appear on the screen and will be recorded when you press the START/STOP button. • Turning the camera off or changing the operating mode to mode will deactivate the color bars. • Alternatively, if you set an assignable button to [Color Bars] (A 111), you - Canon EOS C500 | Instruction Manual - Page 100
to use the video scopes, the monitor unit must be attached to the camera. * The edge monitor looks at the focus of the entire picture and or [Edge Mon.] for the edge monitor. Configuring the Waveform Monitor The camera's waveform monitor function offers 5 modes. You can also change the gain. - Canon EOS C500 | Instruction Manual - Page 101
Video Scopes Configuring the Vectorscope The camera's vectorscope function offers 2 modes. You can also change the gain. Operating modes: [w Other Functions] [WFM (LCD)] 1 Open the [Vectorscope] submenu. [w Other Functions] > [WFM (LCD)] > [Vectorscope] 2 - Canon EOS C500 | Instruction Manual - Page 102
to set apart. You can add all four types of marks remotely using the Wi-Fi Remote application. When the camera is in mode, you can add or delete shot marks (A 138). You can also display an index screen of all the shot marks (A 137), allowing you to find a particular scene in a clip more - Canon EOS C500 | Instruction Manual - Page 103
while Recording MXF Clips NOTES • There may be up to a 0.5 second delay from when you press the button to when the camera adds the shot mark. When using the Wi-Fi Remote application, the delay may be longer depending on the conditions of the wireless signal. • When you are using interval - Canon EOS C500 | Instruction Manual - Page 104
press the u button. • The last clip that was recorded is played back without audio for the selected duration. [Ð REVIEW] appears at the top of the screen. • Press the CANCEL button to stop reviewing the clip and change the camera back to record pause mode. • After the clip finishes playing back, the - Canon EOS C500 | Instruction Manual - Page 105
, MXF clips will not be recorded simultaneously on a CF card even if a card is inserted in the camera. Operating modes: Configuring Interval Recording Mode 1 Open the [Interval] submenu. [ 4K/2K/MXF Setup] > [Interval Rec] > [Interval] 2 Select the desired interval and then press SET. • See the - Canon EOS C500 | Instruction Manual - Page 106
mode only. Frame Recording Mode Set the number of frames in advance. We recommend operating the camera remotely or stabilizing the camera, for example, on a tripod. Sound is not recorded in this mode. During 4K and 2K modes, MXF clips will not be recorded simultaneously on a CF card even if a card - Canon EOS C500 | Instruction Manual - Page 107
• Repeat until you finish recording. 4 Open the [Special Rec] submenu. [ 4K/2K/MXF Setup] > [Special Rec] 5 Select [Off] and then press SET and all of the recorded frames are joined together into one clip. • [STBY`] (during 4K and 2K modes) or [STBY] (during MXF mode) appears at the top of the - Canon EOS C500 | Instruction Manual - Page 108
clips will not be recorded simultaneously on a CF card even if a card is inserted in the camera. Operating modes: Configuring Slow & Fast Motion Mode 1 Open the [S&F Frame Rate] submenu. [ 4K/2K/MXF Setup] > [S&F Frame Rate] 2 Select the desired shooting frame rate and then press SET. • Available - Canon EOS C500 | Instruction Manual - Page 109
special recording mode is changed or turned off. It will be deactivated also if you change the video configuration. • When the bit rate in the [ 4K/2K/MXF Setup] > [MXF] > [Bit Rate/Resolution] setting is set to [50 Mbps 1920x1080] or [50 Mbps 1280x720], relay recording is not available during slow - Canon EOS C500 | Instruction Manual - Page 110
audio recorded before you pressed the button. Operating modes: [ 4K/2K/MXF Setup] [Special Rec] [Off] 1 Set the system priority to recording. 5 Press the START/STOP button again to stop recording. • The camera records the clip, including approximately 3 seconds of video and audio recorded before - Canon EOS C500 | Instruction Manual - Page 111
default settings for each assignable button. Also, the label on the camera for assignable buttons 1 to 9 indicates the default setting*. By default 7 is usable only when you attach the grip unit of the C300 / C300 PL or C100. 3 Select the desired function and then press SET. • If you marked by a ¥. - Canon EOS C500 | Instruction Manual - Page 112
functions assigned to the assignable buttons, without affecting other camera settings, with the [w Other Functions] >[Reset] > Shot Mark 1] Adds an " mark to the clip. Ü [Add Shot Mark 2] Adds an # mark to the clip. Ü [Add $ Mark] Adds an $ mark to the clip. Ü [Add % Mark] Adds a % mark to - Canon EOS C500 | Instruction Manual - Page 113
Assignable Buttons Function name Description [Photo]* Records a photo. Ü [FUNC.] Enters the direct setting mode, replicating the function of the camera's FUNC. button. Ü [FUNC. Shutter] Enters the direct setting mode with the shutter speed highlighted and ready to be adjusted. Ü [FUNC. - Canon EOS C500 | Instruction Manual - Page 114
files created with this camera are compatible only with other C500 and C500 PL cameras. Operating modes: Selecting Custom Picture Files Select a custom picture file to apply its settings to your recordings or to edit, rename, protect, or transfer it. 1 If necessary, set [/ CINEMA Locked] to [Off - Canon EOS C500 | Instruction Manual - Page 115
preset files. [C8: CINEMA]: Uses the Canon Log gamma and color matrix for an outstanding dynamic range and an image suitable for processing in post-production. [C9: EOS Std.]: Reproduces the image quality and look (high contrast, vibrant colors) of an EOS digital SLR camera with its picture style - Canon EOS C500 | Instruction Manual - Page 116
the file and then press SET. 3 Select [OK] and then press SET. • The currently selected file will be copied to the selected slot on the camera, overwriting the file in that slot. When the confirmation screen appears, press SET. 4 Press the CUSTOM PICTURE button to exit the custom picture menu. - Canon EOS C500 | Instruction Manual - Page 117
The file on the SD card will be overwritten by the one on the camera. When the confirmation screen appears, press SET. 4 Press the CUSTOM PICTURE cinema-like feel and cinema-like tones. [Cine 2] has softer contrasts than does [Cine 1] but is also suitable for creating a cinema-like picture. [Canon - Canon EOS C500 | Instruction Manual - Page 118
gamma curve approximates the look of an EOS digital SLR camera when the picture style is set to [Standard] (high contrast, vibrant colors). 118 Gamma Normal 2/3/4 Cine 1 Cine 2 Canon log Output Output Normal 4 Normal 3 Normal 1/2 Normal 1 Canon Log Input Input [Black] Controls the black - Canon EOS C500 | Instruction Manual - Page 119
highlights, you can prevent parts of the image from being overexposed. This is not available when [Gamma] is set to [Cine 1], [Cine 2], [Canon Log] or [EOS Std.]. [Enable]: Activates/deactivates the setting. (Default: [On]) [Slope]: Determines the slope of the gamma curve above the knee point. This - Canon EOS C500 | Instruction Manual - Page 120
gain and slope. When [Gamma] is set to [Cine 1], [Cine 2], [Canon Log] or [EOS Std.], this setting has no effect on the picture. [Gain]: Sets the to turn the noise reduction off. (Default: [Off]) [Skin Detail] The camera applies a softening filter to areas in the picture with skin tones to give - Canon EOS C500 | Instruction Manual - Page 121
is set to [Canon Log]. [Select]: Available options are [Normal 1] to [Normal 4], [Cine 1] and [Cine 2], [Canon Log] and [EOS Std.]. Generally, can be adjusted from -50 to 50. (Default: ±0) [Color Correction] The camera detects the characteristics of a certain color (color phase, chroma, area and Y - Canon EOS C500 | Instruction Manual - Page 122
the white level at 100%. Available options are [On] and [Off]. (Default: [Off]) NOTES • When an optional RC-V100 Remote Controller is connected to the camera, the following custom picture settings can be changed using the buttons and dials on the remote controller. They cannot be changed from the - Canon EOS C500 | Instruction Manual - Page 123
On], the lens will retract fully when the camera is turned off. • Canon EF 40mm f/2.8 STM lens, EF-S 24mm f/2.8 STM lens, EF 50mm f/1.8 STM lens [F. Assist. B&W] . [3D Rec Mode] [On], [Off] When using another C500 or C500 PL camera to shoot 3D, this function compensates for the video and audio - Canon EOS C500 | Instruction Manual - Page 124
Customizing Functions and Onscreen Displays Customizing Onscreen Displays 124 For details on which onscreen displays can be customized, refer to Onscreen Displays (A 55). For details on the setting options, refer to [Custom Display 1] and [Custom Display 2] (A 172). Operating modes: 1 Open the - Canon EOS C500 | Instruction Manual - Page 125
settings on an SD card. You can load those settings at a later date or on another C500 or C500 PL camera so that you can use that camera in that same exact way. Operating modes: 125 Saving Camera Settings to an SD Card 1 Open the [Save To *] submenu. [w Other Functions] > [Transfer Menu//] > [Save - Canon EOS C500 | Instruction Manual - Page 126
Saving and Loading Camera Settings 126 - Canon EOS C500 | Instruction Manual - Page 127
an External Monitor (A 146). For details on viewing photos on the SD card, refer to Viewing Photos (A 161). You cannot use this camera to play back video recorded in 4K or 2K mode on an external recorder. For details on developing RAW clips in order to play them back, refer to Developing - Canon EOS C500 | Instruction Manual - Page 128
and [% Mark] index screen. Use the playback control buttons on the monitor unit. When the monitor unit is not attached, you have limited playback control options (play/pause/stop only) with the buttons on the camera and full playback control options using the joystick and joystick guide. 1 Move - Canon EOS C500 | Instruction Manual - Page 129
the power source or turn off the camera. - Do not open the cover of 16 17 18 19 20 1 Remaining battery time (A 56) 2 Joystick guide (A 130) 3 Shutter speed1 (A 67) 4 2 Aperture value1 (A Playback operation 8 Selected CF card 9 Relay recording 10 $ mark/% mark (A 103, 134) 11 Time code (A 84) 12 - Canon EOS C500 | Instruction Manual - Page 130
the middle part(s) and 7 indicates the last part. Playback Controls When you play back a clip, operate the buttons on camera's body or on the monitor unit or use the joystick and joystick guide to use fast playback, play back frame-by-frame or skip clips. Refer to the following table. Available - Canon EOS C500 | Instruction Manual - Page 131
Audio Output During playback, audio will be available through the × (headphone) terminal. You can adjust the headphone volume with the [¡ Audio Setup] > [Audio Output] > [Headphone Volume] setting. The audio signal will also be output through the HD/SD SDI terminal and the HDMI OUT terminal. NOTES • - Canon EOS C500 | Instruction Manual - Page 132
[Copy / File] Copies the custom picture file from a clip to the camera. Ü [Add Shot Mark 1]/ Adds or deletes a " mark. - [Del. Shot Mark 1] [Add Shot Mark 2]/ [Del. Shot Mark 2] Adds or deletes a # mark. - [Fewer Index Pics] Decreases the number of thumbnails that are displayed. - [More - Canon EOS C500 | Instruction Manual - Page 133
permanent data loss. - Do not disconnect the power source or turn off the camera. - Do not open the cover of the either CF card slot. 133 (A 53) 11 Bit rate and resolution (A 60) 12 Frame rate (A 60)* 13 $ mark / % mark (A 103, 134) 14 Embedded custom picture file (A 114) 15 Time code of the clip - Canon EOS C500 | Instruction Manual - Page 134
cannot have both an $ mark and % mark at the same time. When you add a % mark to a clip with an $ mark, the $ mark will be deleted. Similarly, when you add an $ mark to a clip with a % mark, the % mark will be deleted. Deleting $ Marks or % Marks Deleting an $ Mark or % Mark from a Clip 1 Select - Canon EOS C500 | Instruction Manual - Page 135
can press SET to cancel. 3 When the confirmation message appears, press SET. [w Other Functions] [Clips] [Copy All Clips] Copying All Clips with an $ Mark 1 Open the [Copy $ Clips] submenu. [w Other Functions] > [Clips] > [Copy $ Clips] 2 Select [OK] and then press SET. • All of the clips with an - Canon EOS C500 | Instruction Manual - Page 136
] and then press SET. • All of the clips (except for clips with an $ mark) on the selected CF card will be deleted. • Select [Cancel] instead to cancel the a Clip You can copy the custom picture file embedded in a clip to the camera. 1 Select the desired clip (a clip with the / icon) and then press - Canon EOS C500 | Instruction Manual - Page 137
with the orange selection frame indicating a custom picture file slot in the camera. • Alternatively, you can press the CUSTOM PICTURE button. • You C9] are protected. Displaying an Index Screen of Shot Marks After you add shot marks to a clip, you can display an index screen that contains all the - Canon EOS C500 | Instruction Manual - Page 138
playing back a clip from this index screen, the index screen that was open before the [Expand Clip] index screen will appear. Adding Shot Marks You can add shot marks (", # or both) to shots in a clip you want to set apart. Later, you can display an index screen that shows only the clips - Canon EOS C500 | Instruction Manual - Page 139
to a single clip. • There may be up to a 0.5 second delay from when you press the button to when the camera adds the shot mark. 139 Deleting Shot Marks 1 Open the [Shot Mark] index screen or [Expand Clip] index screen. 2 Select the desired frame (thumbnail) and then press SET to open the clip - Canon EOS C500 | Instruction Manual - Page 140
MXF Clip Operations 140 - Canon EOS C500 | Instruction Manual - Page 141
output the onscreen displays and superimpose them on the picture of an external monitor (A 151). 141 Video Configuration and Video Output Configuration for 4K and 2K Modes Refer to the following tables for the video configuration for recording, video configuration recorded on the CF card and video - Canon EOS C500 | Instruction Manual - Page 142
and magnification to the MON. 1 terminal output. The camera can apply magnification to the MON. 2 terminal output. 3 Depending on the signal, you can switch between the P and PsF setting (A 147, 149) for output. 4 Set [¢ Video Setup] (in mode) or [ 4K/2K/MXF Setup] (in mode) > [HD/SD SDI - Canon EOS C500 | Instruction Manual - Page 143
the P and PsF setting (A 147) for output. 2 Set [¢ Video Setup] (in mode) or [ 4K/2K/MXF Setup] (in mode) > [HD/SD SDI] > [Output] to [HD], [SD] or ). Zebra patterns will not be output during SD output. 4 When the camera is connected via HDMI OUT terminal to an external monitor, the video signal - Canon EOS C500 | Instruction Manual - Page 144
just by adjusting the intensity. Cinema Gamut. Color space developed by Canon and based on the specific characteristics of the camera's sensor. Features a wider color definition television (4K/8K). [~ Camera Setup] [Color Space] [BT. 709] Visual range BT. 709 DCI-P3 DCI-P3+ Cinema Gamut BT. 2020 - Canon EOS C500 | Instruction Manual - Page 145
- Off MON. 2 Terminal output Color space Gamma BT. 709 Canon Log DCI-P3+ Canon Log Cinema Gamut Canon Log BT. 2020 Canon Log BT. 709 BT. 709 Wide DR DCI Canon Log BT. 709 DCI-P3+ Wide DR DCI Canon Log BT. 709 Cinema Gamut Wide DR DCI Canon Log BT. 709 BT. 2020 Wide DR - Canon EOS C500 | Instruction Manual - Page 146
to an external monitor using the SYNC OUT terminal, use headphones to monitor the sound (A 96). We recommend that you power the camera from a household power outlet using the compact power adapter. MON. 1 terminal MON. 2 terminal BNC cable (commercially available) HDMI OUT terminal HDMI cable - Canon EOS C500 | Instruction Manual - Page 147
for the MON. terminals. • If you do not intend to use the MON. terminals, select [Off]. Doing so will also conserve the camera's power. [ 4K/2K/MXF Setup] [MON. 1 & 2] [Output] [On] Selecting the Resolution of the Output When the resolution of the video configuration is [3840x2160], [3840x1080 - Canon EOS C500 | Instruction Manual - Page 148
jagged. • For MON. terminal output during 4K mode, because the camera uses a simple conversion process, color shifting may Canon Log Gamma When checking video recorded with Canon Log gamma on an external monitor connected to a MON. terminal or the HD/SD-SDI terminal, you can apply a LUT. [ 4K - Canon EOS C500 | Instruction Manual - Page 149
When you output from the HD/SD SDI terminal video in HD that was shot with Canon Log gamma, you can apply a LUT (A 148). Using the HDMI OUT Terminal The monitor. You can select the resizing method (A 63) when the camera outputs HD video during 4K or 2K mode. * Not available for 24.00 Hz recordings. - Canon EOS C500 | Instruction Manual - Page 150
[Composite] (SD analog composite signal), you can select the SD resizing method with the following procedure. • If necessary, adjust the scan mode with the [ 4K/2K/MXF Setup] (in mode) or [¢ Video Setup] (in mode) > [SYNC OUT] > [Scan Mode] setting. You can adjust the scan mode only when [¤ TC - Canon EOS C500 | Instruction Manual - Page 151
Output Display] is set to [On]). NOTES • Onscreen displays will not appear on an external monitor for SD output if [ 4K/2K/MXF Setup] (in mode) or [¢ Video Setup] (in mode) > [Resize SD Output] is set to [ displays on video output from the camera's terminals (simultaneously for HD and SD video). - Canon EOS C500 | Instruction Manual - Page 152
Clips 152 Use the Cinema RAW Development software to develop RAW clips recorded on an external recorder connected to the camera's 3G-SDI terminals local Canon Web site to download the software and check the system requirements and latest information on it. Refer to the instruction manual (PDF file - Canon EOS C500 | Instruction Manual - Page 153
refer to the instruction manual (PDF file). The instruction manual is installed with the software. Windows: 1 From the Start menu, select All Programs > Canon Utilities > Cinema RAW Development > Cinema RAW Development Instruction Manual. 2 Select the language of the instruction manual to view. Mac - Canon EOS C500 | Instruction Manual - Page 154
the software and plugins. For details about using the software, refer to the respective instruction manual (PDF file). * Plugins are available for NLE software by Avid and Apple. Operating modes: Canon XF Utility: Browser for transferring clips to a computer and playing back, checking and managing - Canon EOS C500 | Instruction Manual - Page 155
Canon Utilities > Desired plugin > Uninstall Canon XF Plugin for Avid Media Access Instruction Manual or Uninstall Canon XF Plugin 64 for Avid Media Access Instruction Manual Canon XF Utility /Applications/Canon Utilities/Canon XF Utility Canon XF Plugin for Final Cut Pro /Library/Application Support - Canon EOS C500 | Instruction Manual - Page 156
language and double-click the PDF file. You can also view the instruction manual by starting the Canon XF Utility software and then selecting Help > View Instruction Manual. Viewing the Plugin Instructions Instructions for Canon XF Plugin for Avid Media Access and Canon XF Plugin 64 for Avid Media - Canon EOS C500 | Instruction Manual - Page 157
Saving MXF Clips to a Computer Instructions for Canon XF Plugin for Avid Media Access and Canon XF Plugin 64 for Avid Media Access (Mac OS): 1 From Applications, open Canon Utilities > Desired plugin > Manual. 2 Open the folder of the language and double-click the PDF file. 157 - Canon EOS C500 | Instruction Manual - Page 158
Saving MXF Clips to a Computer 158 - Canon EOS C500 | Instruction Manual - Page 159
, the photo size is 1920x1080. If the clip is 1280x720, the photo size is 1280x720. * At this size, the camera can save approximately 670 photos on a 1 GB SD card. Also, during 4K and 2K modes, if [ Setup] > [Resize MXF Output] is set to [Letterbox], the picture angle will differ. **Only when - Canon EOS C500 | Instruction Manual - Page 160
card access indicator is flashing. Failure to do so may result in permanent data loss. - Do not disconnect the power source or turn off the camera. - Do not remove the SD card. NOTES • If the LOCK switch on the SD card is set to prevent writing, you will not be able - Canon EOS C500 | Instruction Manual - Page 161
modes: 161 Displaying the [Photos] Index Screen Display the [Photos] index screen to view photos. 1 Set the Q switch to MEDIA. • The camera switches to mode and the clip index screen appears. 2 Press the INDEX button. • The index screen selection menu appears. 3 Select [Photo Index - Canon EOS C500 | Instruction Manual - Page 162
Photo Operations Photo Operations 162 You can use the photo menu to delete a photo, protect or unprotect a photo, or copy a custom picture file embedded in a photo. You can display the photo menu from the [Photos] index screen or photo playback screen. Using the Photo Menu 1 From the [Photos] - Canon EOS C500 | Instruction Manual - Page 163
Photo Operations Deleting All Photos 1 Display the [Photos] index screen or a photo (A 161). 2 Open the [Delete All Photos] submenu. [w Other Functions] > [Delete All Photos] 3 Select [OK] and then press SET. • All of the photos on the SD card, except for protected ones, will be deleted. • Select [ - Canon EOS C500 | Instruction Manual - Page 164
photo menu. 3 Select [Copy / File] and then press SET. • The [/ Data 1/3] screen appears with the orange selection frame indicating a file slot in the camera. • Alternatively, you can press the CUSTOM PICTURE button. • You can push the joystick up/down or turn the SELECT dial to display the [/ Data - Canon EOS C500 | Instruction Manual - Page 165
that of the last photo on the SD card. Photo numbers will continue from the number following that of the last photo recorded with the camera. 165 NOTES • If you select [Continu.] and the SD card you insert already contains a photo with a larger number, a new photo will be assigned a number one - Canon EOS C500 | Instruction Manual - Page 166
Photo Operations 166 - Canon EOS C500 | Instruction Manual - Page 167
out. 167 To skip directly to the page of a specific menu: [~ Camera Setup] menu [ 4K/2K/MXF Setup] menu [¢ Video Setup] menu [¡ Audio Scan], [Slow], [Off] 67 [Shutter Increment] [1/3 stop], [1/4 stop] [Color Space] [/ CINEMA Locked] [BT. 709], [DCI-P3+], [C. Gamut], [BT. 2020] 144 [On], [Off - Canon EOS C500 | Instruction Manual - Page 168
[20 sec], [30 sec], [40 sec], [50 sec], 105 [1 min] to [10 min] During 4K or 2K mode, or MXF mode when [Frame Rate] is set to [59.94i], [29.97P], [23 set to [59.94P], [50.00i], [50.00P] 105 or [25.00P]: 2, 6 ,12 During 4K or 2K mode, or MXF mode when [Frame Rate] is set to [59.94i], [29.97P], [ - Canon EOS C500 | Instruction Manual - Page 169
] [Output] [LUT] [Select] [Scan Mode] [Output] [Scan Mode] Setting options A During 4K mode when [Mode] is set to [RAW], or 2K mode when [Mode] is set to [ For 50.00 Hz recordings: [1] to [25], [26] to [50]* ([24]) During 4K mode when [Mode] is set to [HRAW] / [4K1K RAW], or 2K mode when [ - Canon EOS C500 | Instruction Manual - Page 170
[User Code]: This identifier designates the user. Leave this blank if [Organization] is set to [0000]. [Rec Command]: When you connect the camera to another device using the 3G-SDI terminals (during 4K and 2K modes) or HD/SD SDI terminal (during MXF mode), if you start or stop recording with the - Canon EOS C500 | Instruction Manual - Page 171
[+12 dB], [+6 dB], [0 dB], [-6 dB], [-12 dB] Ü [On], [Off] Ü [Linked], [Separated] Ü [On], [Off] Ü [-12 dB], [-18 dB], [-20 dB], [Off] Ü [Automatic], [Manual] Ü 0 to 99 (50) Ü [On], [Off] Ü [CH1/CH2], [CH1/CH1], [CH2/CH2], [All/All] Ü [Off], 1 to 15 (8) Ü Setting options -99 to 99 - Canon EOS C500 | Instruction Manual - Page 172
] [View Assist.] 2 [Lens] [Remaining Battery] [Remaining Rec Time] [Rec Mode] [Genlock] [Time Code] [Interval Counter] [SD Card Status] [Temperature/Fan] [4K/2K Mode] [Bit Rate] [Resolution] [Frame Rate] [Character Rec] [Output Display] [Rec Command] [User Memo] [User Bit] [Audio Output CH] Setting - Canon EOS C500 | Instruction Manual - Page 173
clip. 2 [Focal Length]: Displays the current focal length of an attached EF lens when set to [On]. [ND Filter]: Displays the ND filter warning icon indicates that the camera's internal temperature has become high. [4K/2K Mode]: Displays the recording mode onscreen display for 4K mode ([RAW] or [ - Canon EOS C500 | Instruction Manual - Page 174
of the recording command that is being output when [ 4K/2K/MXF Setup] > [Rec Command] is set the date and time of recording and/or the camera data (shutter speed, aperture value, gain) during . [XF Legacy]: Synchronization mode compatible with Canon XF series camcorders. Synchronizes the time code - Canon EOS C500 | Instruction Manual - Page 175
item [Reset] [Transfer Menu//] [Time Zone] Submenu [All Settings] [Camera Settings] [Assignable Buttons] [Save To *] [Load From *] [Set ] [Media Access LED] [Fan] [Genlock Adjust.] [Rec Review] [Delete Last Clip] [Clips]4 [Delete All $ Marks]4 [Photo Numbering] [Delete All Photos]6 [Add / File] - Canon EOS C500 | Instruction Manual - Page 176
] [C START/STOP] [Set Up New] [Select] [Edit] [Camera Settings] [Select User] [User Setting] [CF A] [CF B] details refer to "WFT-E6 Wireless File Transmitter - Guide for Canon Camcorders" (PDF file). Ü A - 123 Ü - - [Add Shot Mark 1], [Add Shot Mark 2], [Add $ Mark], [Add % Mark], [Time Code - Canon EOS C500 | Instruction Manual - Page 177
Delete Last Clip]: Deletes the last MXF clip you recorded. This setting option will not appear if you turned the camera off since recording the last clip. [Reset Hour Meter]: The camera has two "hour meters" - the first keeps track of total operation time and the second keeps track of operation time - Canon EOS C500 | Instruction Manual - Page 178
screen Description [Gamma/Color Space] [Camera] Displays the output settings for each terminal the recording media. Ü [4K/2K/MXF 1/2], [4K/2K/MXF 2/2] Ü Displays the Transmitter - Guide for Ü Canon Camcorders" (PDF file) from your local Canon Web site and follow the instructions to complete - Canon EOS C500 | Instruction Manual - Page 179
(A 58, 117) 7 LCD screen/viewfinder* (A 58, 117) * When using Canon Log gamma and [£ LCD/VF Setup] > [View Assist.] is set to [On], [Wide DR] will be displayed in the [Gamma] column. [Camera] Status Screen ( mode only) 1 2 3 4 5 1 ISO speed/Gain increment (A 70 - Canon EOS C500 | Instruction Manual - Page 180
Displaying the Status Screens [Assign Button 1/2], [Assign Button 2/2] Status Screen 180 1 1 1 Assignable buttons 1 to 15* (A 111) * Assignable buttons 10 to 15 do not appear in mode. [Audio] Status Screen In mode 1 8 2 9 3 4 10 5 6 7 In mode 7 1 XLR terminal recording channel (A - Canon EOS C500 | Instruction Manual - Page 181
, the total space displayed on the screen may differ from the nominal capacity listed on the CF card or SD card. [4K/2K/MXF 1/2] Status Screen ( 1 2 3 4 mode, 4K and 2K modes only) 5 6 7 1 3G-SDI terminal output status (A 41) 2 MON. terminal output status (A 147) 3 MON. terminal LUT output (A 148 - Canon EOS C500 | Instruction Manual - Page 182
Displaying the Status Screens [4K/2K/MXF 2/2] ( mode) / [Video] ( 1 182 2 3 4 mode) Status Screen 5 6* 7* ( mode only) 1 2 3 4 5 1 User memo file name (A 97) 2 Clip title 3 Camera operator 4 Filming location 5 Clip description [Metadata 2/2] Status Screen ( 1 2 3 mode only) 1 Country - Canon EOS C500 | Instruction Manual - Page 183
Displaying the Status Screens [Battery/Hour Meter] Status Screen 1 2 183 3 4 5 1 Remaining recording time 2 Remaining battery level indicator 3 Battery life indicator 4 Total operation time (A 177) 5 Operation time since using [Reset Hour Meter] (A 177) [/ Data 1/3] Status Screen ( mode only - Canon EOS C500 | Instruction Manual - Page 184
Displaying the Status Screens [/ Data 2/3] Status Screen ( 1 184 2 3 4 5 6 7 mode only) 1 Sharpness settings (level, horizontal detail frequency, horizontal/vertical detail balance, and limit) (A 119) 2 Sharpness settings (select, knee aperture gain and slope) (A 119) 3 Level depend - Canon EOS C500 | Instruction Manual - Page 185
Troubleshooting Troubleshooting If you have a problem with your camera, refer to this section. Consult a Canon Service Center if the problem persists. 185 Power source The camera will not turn on or it turns off by itself. - The battery pack is exhausted. Replace or charge the battery pack. - - Canon EOS C500 | Instruction Manual - Page 186
manually (A 198). Eventually, consult a Canon Service Center. Playing Back MXF Clips Cannot delete a clip. - You cannot delete clips with an $ mark. Remove the $ mark occurred. Turn off the camera and back on again. If this does not solve the problem, consult a Canon Service Center. The tally lamp - Canon EOS C500 | Instruction Manual - Page 187
screen and the camera does not operate properly. - Disconnect the power source and reconnect it after a short time. If the problem still persists, MIC terminal: [Audio Setup] > [Audio Input] > [MIC Mode] is set to [Manual] and the [MIC Level] setting is too low. Check the audio level meter on the - Canon EOS C500 | Instruction Manual - Page 188
Make sure the camera is connected to the external recorder correctly (A 41). - Check the external recorder's instruction manual to make sure mark. - If you are using a battery pack that bears the Intelligent System mark, there may be a problem with the camera or battery pack. Consult a Canon Service - Canon EOS C500 | Instruction Manual - Page 189
camera and back on again. Then, remove the CF card being used and reinsert it. Alternatively, replace the CF card. If this does not solve the problem, consult a Canon Service smaller video files reaches 99. CF A/CF B Using a card that supports UDMA mode 4 or higher is recommended - The CF card's UDMA - Canon EOS C500 | Instruction Manual - Page 190
Troubleshooting 190 CF card slot cover is open. - The CF card slot cover was open when the camera was switched to or turned on in mode. Close the cover. Change the battery pack - The battery pack is exhausted. Replace or charge the battery pack. % / $ Mark Error - Could not add a % mark or $ - Canon EOS C500 | Instruction Manual - Page 191
and then back on. Then, try to add the mark again. System error - Turn off the camera and back on again. If this does not solve the problem, there may be a malfunction with the camera. Consult a Canon Service Center. This photo cannot be displayed - You may not be able to display photos taken - Canon EOS C500 | Instruction Manual - Page 192
noise to appear. • Do not use or store the camera in dusty or sandy places. The camera is not waterproof - avoid also water, mud or salt. If any of the above should get into the camera it may damage the camera and/or the lens. Consult a Canon Service Center as soon as possible. • Be careful to - Canon EOS C500 | Instruction Manual - Page 193
drop it or subject it to shocks. • Do not get it wet. 193 • Dirty terminals may cause a poor contact between the battery pack and the camera. Wipe the terminals with a soft cloth. Long-term storage • Store battery packs in a dry place at temperatures no higher than 30 °C (86 °F). • To extend the - Canon EOS C500 | Instruction Manual - Page 194
the battery compartment cover. Regarding the use of non-Canon battery packs • We recommend using genuine Canon battery packs bearing the Intelligent System mark. • If you attach to the camera battery packs that are not genuine Canon battery packs, the remaining battery time will not be displayed - Canon EOS C500 | Instruction Manual - Page 195
lithium battery to keep the date/time and other settings. The built-in lithium battery is recharged while you use the camera; however, it will discharge completely if you do not use the camera for about 3 months. To recharge the built-in lithium battery: Connect the compact power adapter to the - Canon EOS C500 | Instruction Manual - Page 196
• Use a soft, dry cloth to clean the camera body. Never use chemically treated cloths or volatile solvents away dirt with a cotton swab. 3 Reattach the viewfinder unit by sliding it back onto the camera and turn back the LOCK/RELEASE screw to the LOCK position. IMPORTANT • Be careful not to scratch - Canon EOS C500 | Instruction Manual - Page 197
tabs. NOTES • Filters can be reused by washing them in water or mild detergent. Make sure filters are completely dry before attaching them to the camera. • Contact a Canon Service Center to purchase replacement filters. Cooling fan filter Cooling fan cover 197 Condensation Moving the - Canon EOS C500 | Instruction Manual - Page 198
the ND filter manually as an emergency measure. 1 Turn off the camera and remove the lens Camera Abroad Power Sources You can use the compact power adapter to operate the camera and to charge battery packs in any country with power supply between 100 and 240 V AC, 50/60 Hz. Consult a Canon Service - Canon EOS C500 | Instruction Manual - Page 199
USA: Call or visit your local retailer/dealer for genuine Canon video accessories. You can also obtain genuine accessories for your Canon camera by calling: 1-800-828-4040, Canon U.S.A. Information Center. Use of genuine Canon accessories is recommended. This product is designed to achieve excellent - Canon EOS C500 | Instruction Manual - Page 200
battery packs bearing the Intelligent System mark, the camera will communicate with the battery and EF lenses with lens contacts draw power from the camera to camera to operate. Effective usage times will decrease when such accessories are used while shooting. Approximate times when shooting in 4K - Canon EOS C500 | Instruction Manual - Page 201
-955 155 95 BP-970G 220 135 BP-975 235 140 TA-100 Tripod Adapter The TA-100 allows you to quickly mount/unmount the camera on/from a tripod. This mark identifies genuine Canon video accessories. When you use Canon video equipment, we recommend Canon-brand accessories or products bearing the same - Canon EOS C500 | Instruction Manual - Page 202
Specifications Specifications 202 C500 / C500 PL System • Video Configuration for 4K and 2K Modes 4K SD High Capacity) memory card2 2 Custom picture files, camera settings and user memo files can be saved on Mount 2 Canon EF mount compatible with Canon EF lenses (including EF-S lenses) 3 PL Lens - Canon EOS C500 | Instruction Manual - Page 203
Specifications • 2 Iris: Lens Peripheral Illumination Correction: Available for Canon EF lenses5 5 Some Canon EF lenses are not compatible with peripheral illumination 00i, 25.00P/PsF, 24.00P/PsF Color space: BT. 709, DCI-P3+, Cinema Gamut, BT. 2020 LUT: BT. 709, Wide DR, DCI Embedded audio, time - Canon EOS C500 | Instruction Manual - Page 204
4K mode, RAW, 4096x2160: 59.94P: 23.9 W, 50.00P: 22.9 W During 2K mode, RGB444, 2048x1080: 59.94P: 20.9 W, 50.00P: 20.9 W During MXF mode, 50 Mbps 1920x1080, 24.00P: 12.4 W Maximum rated power consumption: 31.0 W • Operating Temperature 0 - 40 °C (32 - 104 °F) • Dimensions (W x H x D)* Camera - Canon EOS C500 | Instruction Manual - Page 205
Specifications • Weight ** Camera unit only: 2 1820 g (4.0 lb.) 3 1930 g (4.3 lb.) Camera with monitor unit, BP-955 battery pack and two CF cards: 2 2705 g (6.0 lb.) 3 2815 g (6.2 lb.) Camera : -60 dBu (manual volume center, full scale -18 dB) / 600 Ω LINE setting: 4 dBu (manual volume center, full - Canon EOS C500 | Instruction Manual - Page 206
Specifications 206 CG-940 Battery Charger • Rated Input: 100 - 240 V AC, 50/60 Hz, 24 W • Rated Output: 8.4 : 220 g (7.8 oz) Weight and dimensions are approximate. Errors and omissions excepted. The information in this manual is verified as of September 2015. Subject to change without notice. - Canon EOS C500 | Instruction Manual - Page 207
4K Camera settings 125 Canon Log gamma 58 CF card Inserting 43 Recording method 46 Recovering data 47 Removing 44 Switching CF card slots 46, 128 Check marks 103, 134 CINEMA (preset custom picture 58 Cinema Gamut 144 Clips, MXF Adding an $ mark/% mark Edge monitor 101 EF lens mount 32 EXT - Canon EOS C500 | Instruction Manual - Page 208
(frame size 60 Reviewing an MXF clip 104 RGB, 4:4:4 60 Running mode (time code 84 S Safety zone 82 Saving MXF clips to a computer 154 SD card 44 Shooting frame rate 108 Shot marks 102, 138 Shutter speed 67 Slow & fast motion recording mode 108 Specifications 202 *2 only **3 only - Canon EOS C500 | Instruction Manual - Page 209
64 System priority 60, 64 T Tally lamp 175 Terminal covers 40 Time code 84 TIME CODE terminal 89, 91 Tripod 38 Troubleshooting 185 Turning the camera on/off 26 U User bit 87 User memo 97 V Vectorscope 101 Video configuration 60 Video output configuration 141 View assistance 58 - Canon EOS C500 | Instruction Manual - Page 210
CANON INFORMATION CENTER AT 855-CINE-EOS (855-246-3367) or on the internet at pro.usa.canon.com/support. You will be directed to the nearest service use of non-Canon accessories or failure to follow operating, maintenance or environmental instructions prescribed in Canon USA's user's manual; B. If - Canon EOS C500 | Instruction Manual - Page 211
respect to (a) the Canon Cinema EOS product, and (b) the accessories for the Canon Cinema EOS Product (if any), packaged with this limited warranty (collectively the "Products")* and purchased in Canada. This limited warranty is only effective upon presentation of your Bill of Sale or other proof of - Canon EOS C500 | Instruction Manual - Page 212
MEXICANA, S DE RL DE CV 52 (55) 5249-4905 USA http://pro.usa.canon.com CANON U.S.A., INC. http://pro.usa.canon.com/support (855) CINE-EOS (855-246-3367) (USA only) Visit your local Canon Web site to download the latest version of this Instruction Manual. © CANON INC. 2015 PUB. DIE-0441-001B
-
 1
1 -
 2
2 -
 3
3 -
 4
4 -
 5
5 -
 6
6 -
 7
7 -
8
-
9
-
10
-
11
-
12
-
13
-
14
-
15
-
16
-
17
-
18
-
19
-
20
-
21
-
22
-
23
-
24
-
25
-
26
-
27
-
28
-
29
-
30
-
31
-
32
-
33
-
34
-
35
-
36
-
37
-
38
-
39
-
40
-
41
-
42
-
43
-
44
-
45
-
46
-
47
-
48
-
49
-
50
-
51
-
52
-
53
-
54
-
55
-
56
-
57
-
58
-
59
-
60
-
61
-
62
-
63
-
64
-
65
-
66
-
67
-
68
-
69
-
70
-
71
-
72
-
73
-
74
-
75
-
76
-
77
-
78
-
79
-
80
-
81
-
82
-
83
-
84
-
85
-
86
-
87
-
88
-
89
-
90
-
91
-
92
-
93
-
94
-
95
-
96
-
97
-
98
-
99
-
100
-
101
-
102
-
103
-
104
-
105
-
106
-
107
-
108
-
109
-
110
-
111
-
112
-
113
-
114
-
115
-
116
-
117
-
118
-
119
-
120
-
121
-
122
-
123
-
124
-
125
-
126
-
127
-
128
-
129
-
130
-
131
-
132
-
133
-
134
-
135
-
136
-
137
-
138
-
139
-
140
-
141
-
142
-
143
-
144
-
145
-
146
-
147
-
148
-
149
-
150
-
151
-
152
-
153
-
154
-
155
-
156
-
157
-
158
-
159
-
160
-
161
-
162
-
163
-
164
-
165
-
166
-
167
-
168
-
169
-
170
-
171
-
172
-
173
-
174
-
175
-
176
-
177
-
178
-
179
-
180
-
181
-
182
-
183
-
184
-
185
-
186
-
187
-
188
-
189
-
190
-
191
-
192
-
193
-
194
-
195
-
196
-
197
-
198
-
199
-
200
-
201
-
202
-
203
-
204
-
205
-
206
-
207
-
208
-
209
-
210
-
211
-
212
 |
 |
Instruction Manual
Digital Cinema Camera
PUB. DIE-0441-001B