Canon EOS C500 Instruction Manual - Page 74
<C500> Adjusting the Aperture, Using the Control Dial
 |
View all Canon EOS C500 manuals
Add to My Manuals
Save this manual to your list of manuals |
Page 74 highlights
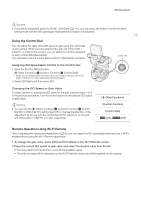
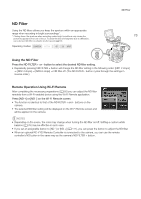
2 Adjusting the Aperture 2 Adjusting the Aperture You can affect the brightness of your recordings or change the depth of field by adjusting the aperture. For example, use a small aperture value for a shallow depth of field that isolates the subject in focus and nicely blurs 74 the background. Available aperture values will vary depending on the EF lens attached to the camera. Operating modes: Using the Control Dial You can adjust the aperture value of most EF lenses using the control dial on the camera. When you have attached the grip unit of the C300 / C300 PL or C100 to the camera, you can select the function assigned to each control dial independently. By default the control dial's function is set to aperture control. If it has been changed, follow the procedure below to set the control dial's function to [Iris] in advance. Control dial Assigning Aperture Control to the Control Dial 1 Open the [Control Dial] submenu. [w Other Functions] > [Custom Function] > [Control Dial]* * When you are assigning the function to the control dial on the grip unit of the C300 / C300 PL or C100, select [Grip Ctrl Dial] instead. 2 Select [Iris] and then press SET. Selecting the Increment Scale to Use When Adjusting the Aperture 1 Open the [Iris Increment] submenu. [~ Camera Setup] > [Iris] > [Iris Increment] 2 Select [1/2 stop], [1/3 stop] or [Fine] and then press SET. [w Other Functions] [Custom Function] [Control Dial] [Iris] [~ Camera Setup] [Iris] Changing the Aperture Value Turn the control dial to adjust the aperture. • The selected aperture value will appear on the lower left of the screen. • When [~ Camera Setup] > [Iris] > [Iris Increment] is set to [Fine], the actual increments will be smaller than 1/3 stop but the onscreen display will show the closest 1/3-stop aperture value. [Iris Increment] [1/3 stop] NOTES • You can use the [w Other Functions] > [Custom Function] > [Control Dial Dir.] or [Grip Dial Dir.] setting (A 123) to change the direction of the adjustment when you turn the control dial.
-
 1
1 -
2
-
3
-
4
-
5
-
6
-
7
-
8
-
9
-
10
-
11
-
12
-
13
-
14
-
15
-
16
-
17
-
18
-
19
-
20
-
21
-
22
-
23
-
24
-
25
-
26
-
27
-
28
-
29
-
30
-
31
-
32
-
33
-
34
-
35
-
36
-
37
-
38
-
39
-
40
-
41
-
42
-
43
-
44
-
45
-
46
-
47
-
48
-
49
-
50
-
51
-
52
-
53
-
54
-
55
-
56
-
57
-
58
-
59
-
60
-
61
-
62
-
63
-
64
-
65
-
66
-
67
-
68
-
 69
69 -
 70
70 -
 71
71 -
 72
72 -
 73
73 -
 74
74 -
 75
75 -
 76
76 -
 77
77 -
 78
78 -
 79
79 -
80
-
81
-
82
-
83
-
84
-
85
-
86
-
87
-
88
-
89
-
90
-
91
-
92
-
93
-
94
-
95
-
96
-
97
-
98
-
99
-
100
-
101
-
102
-
103
-
104
-
105
-
106
-
107
-
108
-
109
-
110
-
111
-
112
-
113
-
114
-
115
-
116
-
117
-
118
-
119
-
120
-
121
-
122
-
123
-
124
-
125
-
126
-
127
-
128
-
129
-
130
-
131
-
132
-
133
-
134
-
135
-
136
-
137
-
138
-
139
-
140
-
141
-
142
-
143
-
144
-
145
-
146
-
147
-
148
-
149
-
150
-
151
-
152
-
153
-
154
-
155
-
156
-
157
-
158
-
159
-
160
-
161
-
162
-
163
-
164
-
165
-
166
-
167
-
168
-
169
-
170
-
171
-
172
-
173
-
174
-
175
-
176
-
177
-
178
-
179
-
180
-
181
-
182
-
183
-
184
-
185
-
186
-
187
-
188
-
189
-
190
-
191
-
192
-
193
-
194
-
195
-
196
-
197
-
198
-
199
-
200
-
201
-
202
-
203
-
204
-
205
-
206
-
207
-
208
-
209
-
210
-
211
-
212
 |
 |