Canon EOS C500 Instruction Manual - Page 95
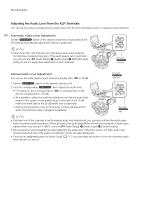
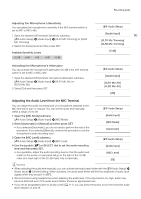
Adjusting the Audio Level from the MIC Terminal, Audio Setup], XLR1 Mic Trimming], 0 dB]
 |
View all Canon EOS C500 manuals
Add to My Manuals
Save this manual to your list of manuals |
Page 95 highlights
Recording Audio Adjusting the Microphone's Sensitivity You can adjust the microphone's sensitivity if the XLR terminal switch is set to MIC or MIC+48V. 1 Open the desired XLR terminal's sensitivity submenu. [¡ Audio Setup] > [Audio Input] > [XLR1 Mic Trimming] or [XLR2 Mic Trimming] 2 Select the desired level and then press SET. Available Sensitivity Levels +12 dB +6 dB 0 dB -6 dB -12 dB [¡ Audio Setup] [Audio Input] 95 [XLR1 Mic Trimming] [XLR2 Mic Trimming] [0 dB] Activating the Microphone's Attenuator You can activate the microphone's attenuator (20 dB) if the XLR terminal switch is set to MIC or MIC+48V. 1 Open the desired XLR terminal's microphone attenuator submenu. [¡ Audio Setup] > [Audio Input] > [XLR1 Mic Att.] or [XLR2 Mic Att.] 2 Select [On] and then press SET. [¡ Audio Setup] [Audio Input] [XLR1 Mic Att.] [XLR2 Mic Att.] [Off] Adjusting the Audio Level from the MIC Terminal You can adjust the audio recording level of a microphone attached to the MIC terminal to auto or manual. You can set the audio level manually within a range of 0 to 99. 1 Open the [MIC Mode] submenu. [¡ Audio Setup] > [Audio Input] > [MIC Mode] 2 Select [Automatic] or [Manual] and then press SET. • If you selected [Automatic], you do not need to perform the rest of the procedure. If you selected [Manual], continue the procedure to set the microphone's audio recording level. 3 Open the [MIC Level] submenu. [¡ Audio Setup] > [Audio Input] > [MIC Level] 4 Use the joystick (Ý) or SELECT dial to set the audio recording level and then press SET. • As a guideline, adjust the audio recording level so that the audio level meter on the screen or rear panel will go to the right of the 18 dB mark (one mark right of the 20 dB mark) only occasionally. [¡ Audio Setup] [Audio Input] [MIC Mode] [Automatic] [¡ Audio Setup] [Audio Input] [MIC Level] [50] NOTES • When adjusting the audio level manually, you can activate the audio peak limiter with the [¡ Audio Setup] > [Audio Input] > [Limiter] setting. When activated, the audio peak limiter will limit the amplitude of audio input signals when they exceed -6 dBFS. • We recommend using headphones when adjusting the audio level. If the input level is too high, audio may become distorted even if the audio level indicator shows an appropriate level. • If you set an assignable button to [Audio Level] (A 111), you can press the button to turn the onscreen audio level indicator on and off.
-
 1
1 -
2
-
3
-
4
-
5
-
6
-
7
-
8
-
9
-
10
-
11
-
12
-
13
-
14
-
15
-
16
-
17
-
18
-
19
-
20
-
21
-
22
-
23
-
24
-
25
-
26
-
27
-
28
-
29
-
30
-
31
-
32
-
33
-
34
-
35
-
36
-
37
-
38
-
39
-
40
-
41
-
42
-
43
-
44
-
45
-
46
-
47
-
48
-
49
-
50
-
51
-
52
-
53
-
54
-
55
-
56
-
57
-
58
-
59
-
60
-
61
-
62
-
63
-
64
-
65
-
66
-
67
-
68
-
69
-
70
-
71
-
72
-
73
-
74
-
75
-
76
-
77
-
78
-
79
-
80
-
81
-
82
-
83
-
84
-
85
-
86
-
87
-
88
-
89
-
 90
90 -
 91
91 -
 92
92 -
 93
93 -
 94
94 -
 95
95 -
 96
96 -
 97
97 -
 98
98 -
 99
99 -
 100
100 -
101
-
102
-
103
-
104
-
105
-
106
-
107
-
108
-
109
-
110
-
111
-
112
-
113
-
114
-
115
-
116
-
117
-
118
-
119
-
120
-
121
-
122
-
123
-
124
-
125
-
126
-
127
-
128
-
129
-
130
-
131
-
132
-
133
-
134
-
135
-
136
-
137
-
138
-
139
-
140
-
141
-
142
-
143
-
144
-
145
-
146
-
147
-
148
-
149
-
150
-
151
-
152
-
153
-
154
-
155
-
156
-
157
-
158
-
159
-
160
-
161
-
162
-
163
-
164
-
165
-
166
-
167
-
168
-
169
-
170
-
171
-
172
-
173
-
174
-
175
-
176
-
177
-
178
-
179
-
180
-
181
-
182
-
183
-
184
-
185
-
186
-
187
-
188
-
189
-
190
-
191
-
192
-
193
-
194
-
195
-
196
-
197
-
198
-
199
-
200
-
201
-
202
-
203
-
204
-
205
-
206
-
207
-
208
-
209
-
210
-
211
-
212
 |
 |
