Canon EOS C500 Instruction Manual - Page 137
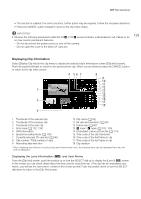
Displaying an Index Screen of Shot Marks, Select [Shot Mark] and then press SET.
 |
View all Canon EOS C500 manuals
Add to My Manuals
Save this manual to your list of manuals |
Page 137 highlights
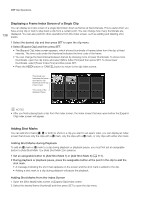
MXF Clip Operations • The [/ Data 1/3] screen appears with the orange selection frame indicating a custom picture file slot in the camera. • Alternatively, you can press the CUSTOM PICTURE button. • You can push the joystick up/down or turn the SELECT dial to display the [/ Data 2/3] and [/ Data 3/3] screens. 3 Push the joystick left/right to select the desired file slot and then press SET. 4 Select [OK] and then press SET. • The custom picture file already in the selected file slot will be overwritten. • Select [Cancel] instead to cancel the operation. 5 When the confirmation message appears, press SET. 137 NOTES • You cannot copy the custom picture file to a file slot with a protected file. • By default, file slots [C8] and [C9] are protected. Displaying an Index Screen of Shot Marks After you add shot marks to a clip, you can display an index screen that contains all the frames in a clip with either shot mark, only the " mark or only the # mark. When you play back a clip from this index screen, playback will start from the frame indicated by the shot mark. You can also perform other operations from this index screen, such as adding and deleting shot marks. 1 Select the desired clip and then press SET to open the clip menu. 2 Select [Shot Mark] and then press SET. • The [Shot Mark] index screen appears, which contains all the frames with shot marks in the clip. Select instead [Shot Mark 1] to display an index screen only of the frames with the " mark or [Shot Mark 2] to display an index screen only of the frames with the # mark. • The time code under the thumbnail indicates the time code of the frame with the shot mark. • Press the INDEX button or CANCEL button to return to the clip index screen. Time code of the frame with the shot mark NOTES • After you finish playing back a clip from this index screen, the index screen that was open before the [Shot Mark] index screen will appear.
-
 1
1 -
2
-
3
-
4
-
5
-
6
-
7
-
8
-
9
-
10
-
11
-
12
-
13
-
14
-
15
-
16
-
17
-
18
-
19
-
20
-
21
-
22
-
23
-
24
-
25
-
26
-
27
-
28
-
29
-
30
-
31
-
32
-
33
-
34
-
35
-
36
-
37
-
38
-
39
-
40
-
41
-
42
-
43
-
44
-
45
-
46
-
47
-
48
-
49
-
50
-
51
-
52
-
53
-
54
-
55
-
56
-
57
-
58
-
59
-
60
-
61
-
62
-
63
-
64
-
65
-
66
-
67
-
68
-
69
-
70
-
71
-
72
-
73
-
74
-
75
-
76
-
77
-
78
-
79
-
80
-
81
-
82
-
83
-
84
-
85
-
86
-
87
-
88
-
89
-
90
-
91
-
92
-
93
-
94
-
95
-
96
-
97
-
98
-
99
-
100
-
101
-
102
-
103
-
104
-
105
-
106
-
107
-
108
-
109
-
110
-
111
-
112
-
113
-
114
-
115
-
116
-
117
-
118
-
119
-
120
-
121
-
122
-
123
-
124
-
125
-
126
-
127
-
128
-
129
-
130
-
131
-
 132
132 -
 133
133 -
 134
134 -
 135
135 -
 136
136 -
 137
137 -
 138
138 -
 139
139 -
 140
140 -
 141
141 -
 142
142 -
143
-
144
-
145
-
146
-
147
-
148
-
149
-
150
-
151
-
152
-
153
-
154
-
155
-
156
-
157
-
158
-
159
-
160
-
161
-
162
-
163
-
164
-
165
-
166
-
167
-
168
-
169
-
170
-
171
-
172
-
173
-
174
-
175
-
176
-
177
-
178
-
179
-
180
-
181
-
182
-
183
-
184
-
185
-
186
-
187
-
188
-
189
-
190
-
191
-
192
-
193
-
194
-
195
-
196
-
197
-
198
-
199
-
200
-
201
-
202
-
203
-
204
-
205
-
206
-
207
-
208
-
209
-
210
-
211
-
212
 |
 |