Canon EOS C500 Instruction Manual - Page 123
Customizing Functions and Onscreen Displays, Customizing Functions
 |
View all Canon EOS C500 manuals
Add to My Manuals
Save this manual to your list of manuals |
Page 123 highlights
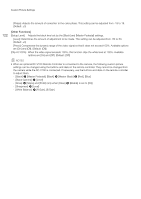
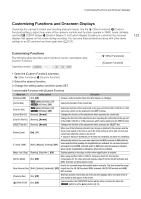
Customizing Functions and Onscreen Displays Customizing Functions and Onscreen Displays Customize the camera to match your shooting style and needs. Use the [w Other Functions] > [Custom Function] setting to adjust how some of the camera's controls and functions operate in mode. Similarly, use the [£ LCD/VF Setup] > [Custom Display 1] or [Custom Display 2] setting to customize the onscreen displays that appear on the screen during recording. You can save these preferences along with other menu settings to an SD card and use them again later (A 125). 123 Customizing Functions The following table describes which functions can be customized using [Custom Function]. Operating modes: [w Other Functions] [Custom Function] 1 Open the [Custom Function] submenu. [w Other Functions] > [Custom Function] 2 Select the desired function. 3 Change the setting option and then press SET. Customizable Functions with [Custom Function] Menu item Setting options Description [Shockless WB] [Control Dial] [On], [Off] 2 [Iris], [ISO/Gain], [Off] 3 [ISO/Gain], [Off] Creates a softer transition when the white balance is changed. Selects the function of the control dial. [Grip Ctrl Dial] 2 [Iris], [ISO/Gain], [Off] 3 [ISO/Gain], [Off] Selects the function of the control dial on the grip unit of the C300 / C300 PL or C100 camcorder, which can be attached to the GRIP terminal. [Control Dial Dir.] [Reverse], [Normal] Changes the direction of the adjustment when operating the control dial. [Grip Ctrl Dial Dir.] [Reverse], [Normal] Changes the direction of the adjustment when operating the control dial on the grip unit of the C300 / C300 PL or C100 camcorder, which can be attached to the GRIP terminal. [SELECT Dial Dir.] [Reverse], [Normal] Changes the direction of the adjustment when operating the SELECT dial. [Retract Lens] [On], [Off] When one of the following optional Canon lenses is attached to the camera and the focus mode switch on the lens is set to AF, if this setting is set to [On], the lens will retract fully when the camera is turned off. • Canon EF 40mm f/2.8 STM lens, EF-S 24mm f/2.8 STM lens, EF 50mm f/1.8 STM lens [F. Assist. B&W] [Both], [Magnify], [Peaking], [Off] Automatically switches the screen and output from the MON. terminals to B&W while the focus assist functions (peaking and magnification) are activated. You can have the screen and output from the MON. terminals switch to B&W when only the peaking is activated, when only the magnification is activated or when both are activated. [Magn. Add. Disp.] [Peaking], [Edge Mon.], [Off] Displays peaking or the edge monitor when magnification is enabled. [3D Rec Mode] [On], [Off] When using another C500 or C500 PL camera to shoot 3D, this function compensates for the video and audio signals output from the 3G-SDI terminals and MON. terminals not being synchronized. Inverts the recorded image horizontally and/or vertically. This also inverts the image [Scan Reverse Rec] [Both], [Vertical], [Horizontal], [Off] output from the 3G-SDI terminals, MON. terminals, HD/SD SDI terminal and HDMI OUT terminal. [Character Rec] [On], [Off] When this function is set to [On], all of the onscreen displays will be recorded on the CF card exactly as they appear on the screen. [C START/STOP] [On], [Off] Selects whether the START/STOP button will be active or locked too when the Q switch is set to C (key lock) (A 53).
-
 1
1 -
2
-
3
-
4
-
5
-
6
-
7
-
8
-
9
-
10
-
11
-
12
-
13
-
14
-
15
-
16
-
17
-
18
-
19
-
20
-
21
-
22
-
23
-
24
-
25
-
26
-
27
-
28
-
29
-
30
-
31
-
32
-
33
-
34
-
35
-
36
-
37
-
38
-
39
-
40
-
41
-
42
-
43
-
44
-
45
-
46
-
47
-
48
-
49
-
50
-
51
-
52
-
53
-
54
-
55
-
56
-
57
-
58
-
59
-
60
-
61
-
62
-
63
-
64
-
65
-
66
-
67
-
68
-
69
-
70
-
71
-
72
-
73
-
74
-
75
-
76
-
77
-
78
-
79
-
80
-
81
-
82
-
83
-
84
-
85
-
86
-
87
-
88
-
89
-
90
-
91
-
92
-
93
-
94
-
95
-
96
-
97
-
98
-
99
-
100
-
101
-
102
-
103
-
104
-
105
-
106
-
107
-
108
-
109
-
110
-
111
-
112
-
113
-
114
-
115
-
116
-
117
-
 118
118 -
 119
119 -
 120
120 -
 121
121 -
 122
122 -
 123
123 -
 124
124 -
 125
125 -
 126
126 -
 127
127 -
 128
128 -
129
-
130
-
131
-
132
-
133
-
134
-
135
-
136
-
137
-
138
-
139
-
140
-
141
-
142
-
143
-
144
-
145
-
146
-
147
-
148
-
149
-
150
-
151
-
152
-
153
-
154
-
155
-
156
-
157
-
158
-
159
-
160
-
161
-
162
-
163
-
164
-
165
-
166
-
167
-
168
-
169
-
170
-
171
-
172
-
173
-
174
-
175
-
176
-
177
-
178
-
179
-
180
-
181
-
182
-
183
-
184
-
185
-
186
-
187
-
188
-
189
-
190
-
191
-
192
-
193
-
194
-
195
-
196
-
197
-
198
-
199
-
200
-
201
-
202
-
203
-
204
-
205
-
206
-
207
-
208
-
209
-
210
-
211
-
212
 |
 |