Canon EOS C500 Instruction Manual - Page 37
Using the LCD Panel, About the LCD and viewfinder screens - specification
 |
View all Canon EOS C500 manuals
Add to My Manuals
Save this manual to your list of manuals |
Page 37 highlights
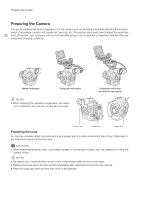
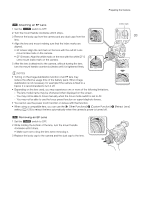
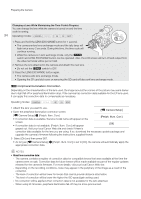
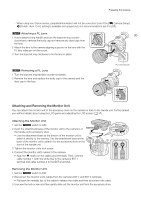
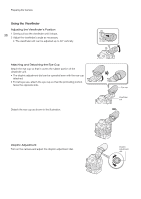
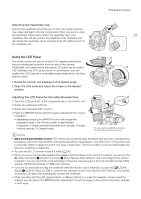
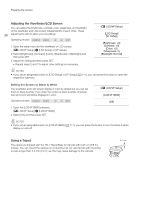
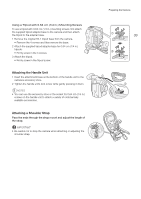
Preparing the Camera Attaching the Viewfinder Cap Pointing the viewfinder lens at the sun or other strong light sources may cause damage to internal components. When you are not using the viewfinder, make sure to attach the viewfinder cap to the 37 viewfinder. This will also protect the viewfinder from scratches and dirt. Attach the viewfinder cap by inserting it into the rubber portion of the viewfinder unit. Using the LCD Panel The whole monitor unit can be rotated 270º sideways allowing for easy monitoring and operation from the side of the camera. Additionally, the independently articulated LCD panel can be rotated 180º sideways and 270º up and down. In combination, you can position the LCD panel at a comfortable angle whatever the shooting style you need. 1 Rotate the monitor unit sideways to the desired angle. 2 Open the LCD panel and adjust the screen to the desired position. Adjusting the LCD Panel for Shoulder Mounted Use 1 Open the LCD panel 90º until it is perpendicular to the monitor unit. 2 Rotate the LCD panel 180º left. 3 Rotate the LCD panel 180º forward. 4 Press the MIRROR button until the image is displayed in the correct orientation. • Repeatedly pressing the MIRROR button will change the displayed image in the following order: Image inverted horizontally ´ Image inverted horizontally and vertically ´ Image inverted vertically ´ Original image. You can use the viewfinder and watch the LCD screen at the same time NOTES • About the LCD and viewfinder screens: The screens are produced using extremely high-precision manufacturing techniques, with more than 99.99% of the pixels operating to specification. Less than 0.01% of the pixels may occasionally misfire or appear as black, red, blue or green dots. This has no effect on the recorded image and does not constitute a malfunction. • You can set the LCD screen to black & white (A 38). • When you use a commercially available lens adapter and the image on the screen is inverted, you can use the [w Other Functions] > [Custom Function] > [Scan Reverse Rec] setting to return the image to the correct orientation. You can record this corrected image or have the camera output it from the 3G-SDI terminal, MON. terminal, HD/SD SD terminalI or HDMI OUT terminal. • If you are not interested in using the viewfinder while the monitor unit is attached, you can set [£ LCD/VF Setup] > [LCD/VF Simul.] to [Off] to conserve the camera's power. Even when [LCD/VF Simul.] is set to [Off], closing the LCD panel will automatically activate the viewfinder. • While recording with the LCD panel rotated in a different direction or angle (for example, facing toward the subject), you can press the MIRROR button repeatedly to invert the image on the screen horizontally, vertically or both ways.
-
 1
1 -
2
-
3
-
4
-
5
-
6
-
7
-
8
-
9
-
10
-
11
-
12
-
13
-
14
-
15
-
16
-
17
-
18
-
19
-
20
-
21
-
22
-
23
-
24
-
25
-
26
-
27
-
28
-
29
-
30
-
31
-
 32
32 -
 33
33 -
 34
34 -
 35
35 -
 36
36 -
 37
37 -
 38
38 -
 39
39 -
 40
40 -
 41
41 -
 42
42 -
43
-
44
-
45
-
46
-
47
-
48
-
49
-
50
-
51
-
52
-
53
-
54
-
55
-
56
-
57
-
58
-
59
-
60
-
61
-
62
-
63
-
64
-
65
-
66
-
67
-
68
-
69
-
70
-
71
-
72
-
73
-
74
-
75
-
76
-
77
-
78
-
79
-
80
-
81
-
82
-
83
-
84
-
85
-
86
-
87
-
88
-
89
-
90
-
91
-
92
-
93
-
94
-
95
-
96
-
97
-
98
-
99
-
100
-
101
-
102
-
103
-
104
-
105
-
106
-
107
-
108
-
109
-
110
-
111
-
112
-
113
-
114
-
115
-
116
-
117
-
118
-
119
-
120
-
121
-
122
-
123
-
124
-
125
-
126
-
127
-
128
-
129
-
130
-
131
-
132
-
133
-
134
-
135
-
136
-
137
-
138
-
139
-
140
-
141
-
142
-
143
-
144
-
145
-
146
-
147
-
148
-
149
-
150
-
151
-
152
-
153
-
154
-
155
-
156
-
157
-
158
-
159
-
160
-
161
-
162
-
163
-
164
-
165
-
166
-
167
-
168
-
169
-
170
-
171
-
172
-
173
-
174
-
175
-
176
-
177
-
178
-
179
-
180
-
181
-
182
-
183
-
184
-
185
-
186
-
187
-
188
-
189
-
190
-
191
-
192
-
193
-
194
-
195
-
196
-
197
-
198
-
199
-
200
-
201
-
202
-
203
-
204
-
205
-
206
-
207
-
208
-
209
-
210
-
211
-
212
 |
 |
