Canon PowerShot A40 Software Starter Guide DC SD Ver.8 - Page 103
How to Convert RAW Images with the Plug-in Module
 |
View all Canon PowerShot A40 manuals
Add to My Manuals
Save this manual to your list of manuals |
Page 103 highlights
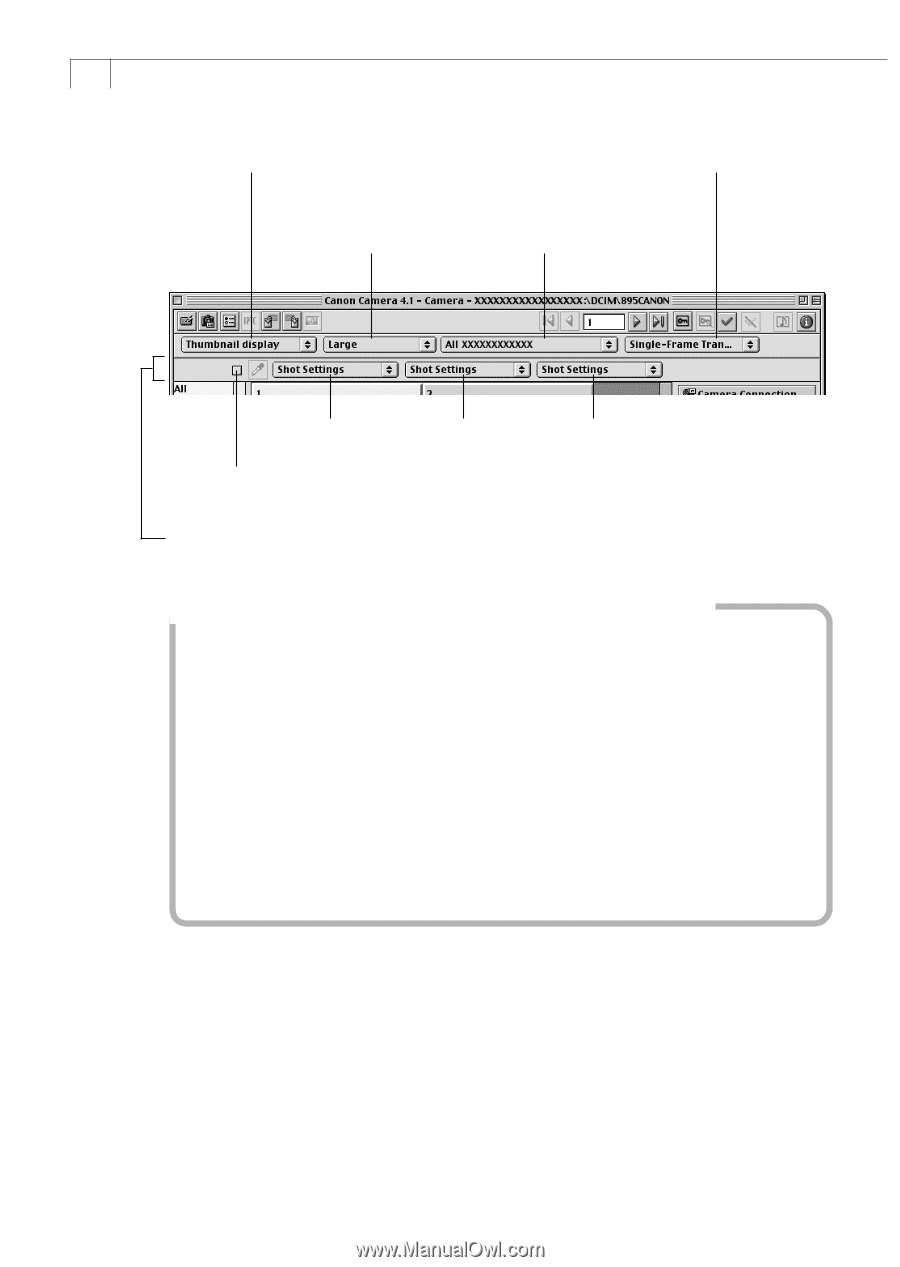
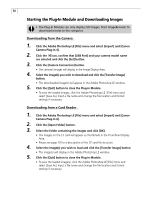
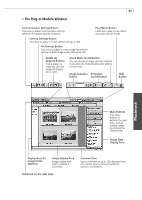
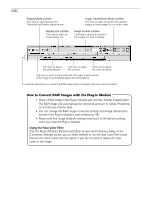
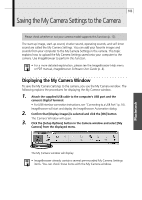
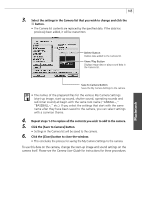
100 Display Mode List Box Click here to select between the Thumbnail and Preview display modes. Display Size List Box Click here to select an image display size. Image Transmission Mode List Box Click here to select to transmit the selected images as single images or as an index sheet. Image Format List Box Click here to select the format of the images you wish to display. Click here to adjust the white balance. Click here to adjust the contrast. Click here to adjust the color saturation. Click here to insert a check mark and then select a white portion of the image to automatically adjust the white balance. Sets the parameters for converting RAW images (may not appear with some camera models). How to Convert RAW Images with the Plug-in Module 1. Select a RAW image in the Plug-In Module and click the [Transfer Image] button. The RAW image will automatically be converted and sent to Adobe Photoshop LE as 8-bits-per-channel data. • You can change the RAW image conversion settings and image transmission format in the Plug-in Module's main window (p. 99). • Please note that image attribute settings revert back to the default settings when you close the Plug-In Module. Using the False Color Filter Click the Plug-in Module's [Preferences] button to open the Preferences dialog. In the [Conversion Settings] section, you can select whether or not the False Color Filter is used. Remove the check mark from this option if you do not need to reduce the false colors in the image.
-
 1
1 -
2
-
3
-
4
-
5
-
6
-
7
-
8
-
9
-
10
-
11
-
12
-
13
-
14
-
15
-
16
-
17
-
18
-
19
-
20
-
21
-
22
-
23
-
24
-
25
-
26
-
27
-
28
-
29
-
30
-
31
-
32
-
33
-
34
-
35
-
36
-
37
-
38
-
39
-
40
-
41
-
42
-
43
-
44
-
45
-
46
-
47
-
48
-
49
-
50
-
51
-
52
-
53
-
54
-
55
-
56
-
57
-
58
-
59
-
60
-
61
-
62
-
63
-
64
-
65
-
66
-
67
-
68
-
69
-
70
-
71
-
72
-
73
-
74
-
75
-
76
-
77
-
78
-
79
-
80
-
81
-
82
-
83
-
84
-
85
-
86
-
87
-
88
-
89
-
90
-
91
-
92
-
93
-
94
-
95
-
96
-
97
-
 98
98 -
 99
99 -
 100
100 -
 101
101 -
 102
102 -
 103
103 -
 104
104 -
 105
105 -
 106
106 -
 107
107 -
 108
108 -
109
-
110
-
111
-
112
-
113
-
114
-
115
-
116
-
117
 |
 |