Canon PowerShot A40 Software Starter Guide DC SD Ver.8 - Page 67
Loading from a Card Reader - driver windows 7 64 bit
 |
View all Canon PowerShot A40 manuals
Add to My Manuals
Save this manual to your list of manuals |
Page 67 highlights
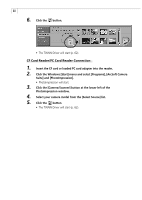
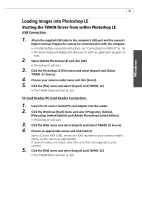
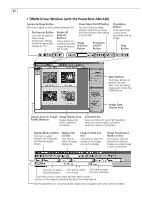
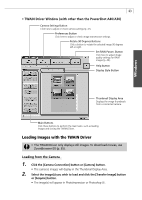
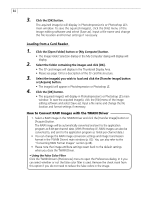
64 3. Click the [OK] button. The aquired image(s) will display in PhotoImpression's or Photoshop LE's main window. To save the aquired image(s), click the [File] menu of the image editing software and select [Save as]. Input a file name and change the file location and format settings if necessary. Loading from a Card Reader 1. Click the [Open Folder] button or [My Computer] button. • The Image Folder Selection dialog or the My Computer dialog will display will display. 2. Select the folder containing the images and click [OK]. • The CF card images will display in the Thumbnail Display Area. • Please see page 19 for a description of the CF card file structure. 3. Select the image(s) you wish to load and click the [Transfer Image] button or [Acquire] button. • The image(s) will appear in PhotoImpression or Photoshop LE. 4. Click the [OK] button. • The acquired image(s) will display in PhotoImpression's or Photoshop LE's main window. To save the acquired image(s), click the [File] menu of the image editing software and select [Save as]. Input a file name and change the file location and format settings if necessary. How to Convert RAW Images with the TWAIN Driver 1. Select a RAW image in the TWAIN Driver and click the [Transfer Image] button or [Acquire] button. The RAW image will be automatically converted and sent to the application program as 8-bit-per-channel data. (With Photoshop LE, RAW images can also be converted to, and sent to the application program as 16-bit-per-channel data.) • You can change the RAW image conversion settings and image transmission format in the TWAIN Driver's main window (p. 62). You can also refer to the "Converting RAW Format Images" section (p.48). • Please note that image attribute settings revert back to the default settings when you close the TWAIN Driver. • Using the False Color Filter Click the TWAIN Driver's [Preferences] menu to open the Preferences dialog. In it you can select whether or not the false color filter is used. Remove the check mark from this option if you do not need to reduce the false colors in the image.
-
 1
1 -
2
-
3
-
4
-
5
-
6
-
7
-
8
-
9
-
10
-
11
-
12
-
13
-
14
-
15
-
16
-
17
-
18
-
19
-
20
-
21
-
22
-
23
-
24
-
25
-
26
-
27
-
28
-
29
-
30
-
31
-
32
-
33
-
34
-
35
-
36
-
37
-
38
-
39
-
40
-
41
-
42
-
43
-
44
-
45
-
46
-
47
-
48
-
49
-
50
-
51
-
52
-
53
-
54
-
55
-
56
-
57
-
58
-
59
-
60
-
61
-
 62
62 -
 63
63 -
 64
64 -
 65
65 -
 66
66 -
 67
67 -
 68
68 -
 69
69 -
 70
70 -
 71
71 -
 72
72 -
73
-
74
-
75
-
76
-
77
-
78
-
79
-
80
-
81
-
82
-
83
-
84
-
85
-
86
-
87
-
88
-
89
-
90
-
91
-
92
-
93
-
94
-
95
-
96
-
97
-
98
-
99
-
100
-
101
-
102
-
103
-
104
-
105
-
106
-
107
-
108
-
109
-
110
-
111
-
112
-
113
-
114
-
115
-
116
-
117
 |
 |