Canon PowerShot A40 Software Starter Guide DC SD Ver.8 - Page 98
Changing the Save Location and Other Preferences
 |
View all Canon PowerShot A40 manuals
Add to My Manuals
Save this manual to your list of manuals |
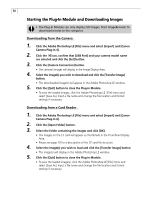
Page 98 highlights
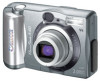
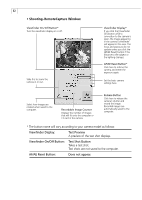
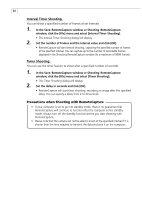
95 Changing the Save Location and Other Preferences You can change where and how image files are saved. 1. In the Save-RemoteCapture window or Shooting-RemoteCapture window, click the [File] menu and select [Preferences]. The Preferences dialog will display. 2. Select the way images are saved and the folder to which they are saved and click [OK]. • Preferences Dialog Click an option to determine whether images are saved to the camera's CF card as well as the computer. If you select [Computer only], you can do without a CF card in the camera or continue to record images after the CF card is full. Input a root name here. If you input "Capture", for example, the first image will be named [Capture_00001.jpg] and successive images will automatically be assigned a name one digit higher than the last. Select a folder for saving images. How to Display the Subject in the Camera's LCD Monitor (Not supported by some camera models) You can view the subject you are shooting in the camera's LCD monitor. 1. In the Shooting-RemoteCapture window, click the [File] menu and select [Camera Display Settings]. The Camera Settings dialog will display. 2. Select [Camera's LCD monitor] and click [OK]. 3. In the Shooting window, click the [Viewfinder On] button. If you select [Video Out Terminal] instead, you can view the subject on a TV monitor. Please see the Camera User Guide to learn how to connect to a TV. Printing an Index of the Thumbnail Images If you select images in the Thumbnail View area of Save-RemoteCapture window, you can print them in an index like a contact sheet. 1. Select the images, click the [File] menu and select [Print Index]. The file name and shooting date are printed along with each image in the index, providing a convenient record and means of checking your images. Macintosh
-
 1
1 -
2
-
3
-
4
-
5
-
6
-
7
-
8
-
9
-
10
-
11
-
12
-
13
-
14
-
15
-
16
-
17
-
18
-
19
-
20
-
21
-
22
-
23
-
24
-
25
-
26
-
27
-
28
-
29
-
30
-
31
-
32
-
33
-
34
-
35
-
36
-
37
-
38
-
39
-
40
-
41
-
42
-
43
-
44
-
45
-
46
-
47
-
48
-
49
-
50
-
51
-
52
-
53
-
54
-
55
-
56
-
57
-
58
-
59
-
60
-
61
-
62
-
63
-
64
-
65
-
66
-
67
-
68
-
69
-
70
-
71
-
72
-
73
-
74
-
75
-
76
-
77
-
78
-
79
-
80
-
81
-
82
-
83
-
84
-
85
-
86
-
87
-
88
-
89
-
90
-
91
-
92
-
 93
93 -
 94
94 -
 95
95 -
 96
96 -
 97
97 -
 98
98 -
 99
99 -
 100
100 -
 101
101 -
 102
102 -
 103
103 -
104
-
105
-
106
-
107
-
108
-
109
-
110
-
111
-
112
-
113
-
114
-
115
-
116
-
117
 |
 |