Canon PowerShot A40 Software Starter Guide DC SD Ver.8 - Page 91
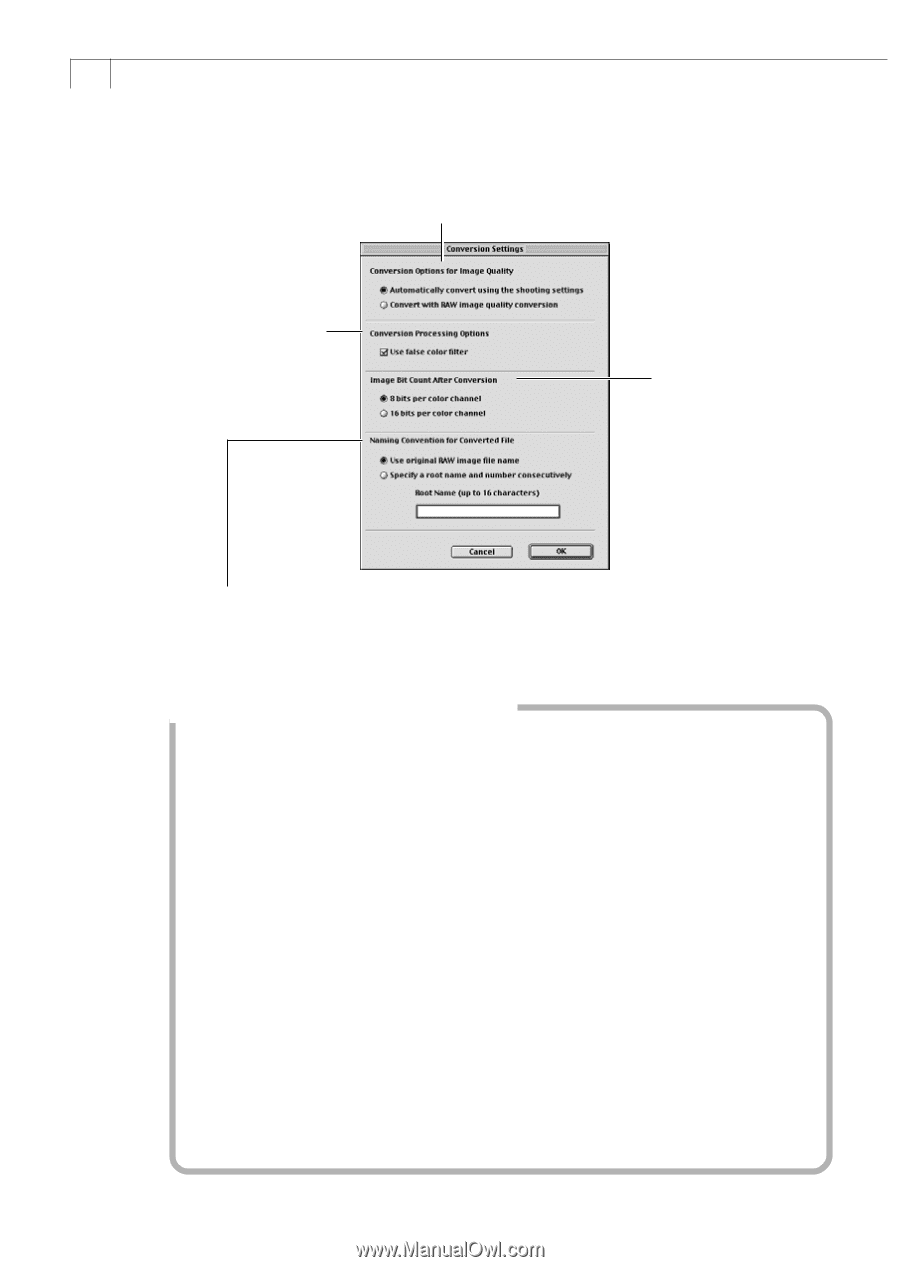
Change the option in the [Image Bit Count After Conversion]
 |
View all Canon PowerShot A40 manuals
Add to My Manuals
Save this manual to your list of manuals |
Page 91 highlights
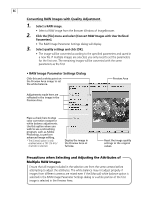
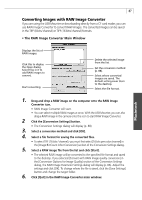
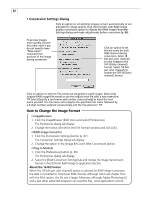
88 • Conversion Settings Dialog Click an option to set whether images convert automatically or are adjusted for image quality. Click the [Convert with RAW image quality conversion] option to display the RAW Image Parameter Settings dialog and make adjustments before conversion (p. 86). To process images more quickly, remove this check mark if you do not need to have "false colors" removed from portions of the image during conversion. Click an option to set the bit count for each RGB channel during conversion. Select [8 bits per color channel] to save images in the TIFF (8 bits / channel) format. Select [16 bits per color channel] to enable the TIFF (16 bits / channel) format. Click an option to set how file names are assigned to saved images. Select [Use original RAW image file name] to use the original root file with a new extension: TIF. Select [Specify a root name and number consecutively] to input the root name yourself. The file name will comprise the specified root name followed by a 5-digit number assigned consecutively and the file extension: TIF. How to Change the Image Format • ImageBrowser 1. Click the ImageBrowser [Edit] menu and select [Preferences]. The Preferences dialog will display. 2. Change the format selected in the [File Format] window and click [OK]. • RAW Image Converter 1. Click the [Conversion Settings] button (p. 87). The Conversion Settings dialog will display. 2. Change the option in the [Image Bit Count After Conversion] section. • Plug-In Module 1. Click the [Preferences] button (p. 99). The Preferences dialog will display. 2. Select the [RAW Conversion Settings] tab and change the image transmission format in the [Transmit RAW image to application] section. About the 16-Bit Format When the [16 bits per color channel] option is selected for RAW image conversion, the data is converted to 16 bits per RGB channel. Although colors are sharper than with the 8-bit option, the file size is larger. Moreover, although Adobe Photoshop LE and a few other advanced programs can read the files, some applications cannot.
-
 1
1 -
2
-
3
-
4
-
5
-
6
-
7
-
8
-
9
-
10
-
11
-
12
-
13
-
14
-
15
-
16
-
17
-
18
-
19
-
20
-
21
-
22
-
23
-
24
-
25
-
26
-
27
-
28
-
29
-
30
-
31
-
32
-
33
-
34
-
35
-
36
-
37
-
38
-
39
-
40
-
41
-
42
-
43
-
44
-
45
-
46
-
47
-
48
-
49
-
50
-
51
-
52
-
53
-
54
-
55
-
56
-
57
-
58
-
59
-
60
-
61
-
62
-
63
-
64
-
65
-
66
-
67
-
68
-
69
-
70
-
71
-
72
-
73
-
74
-
75
-
76
-
77
-
78
-
79
-
80
-
81
-
82
-
83
-
84
-
85
-
 86
86 -
 87
87 -
 88
88 -
 89
89 -
 90
90 -
 91
91 -
 92
92 -
 93
93 -
 94
94 -
 95
95 -
 96
96 -
97
-
98
-
99
-
100
-
101
-
102
-
103
-
104
-
105
-
106
-
107
-
108
-
109
-
110
-
111
-
112
-
113
-
114
-
115
-
116
-
117
 |
 |