Canon PowerShot A40 Software Starter Guide DC SD Ver.8 - Page 53
Converting Images with RAW Image Converter
 |
View all Canon PowerShot A40 manuals
Add to My Manuals
Save this manual to your list of manuals |
Page 53 highlights
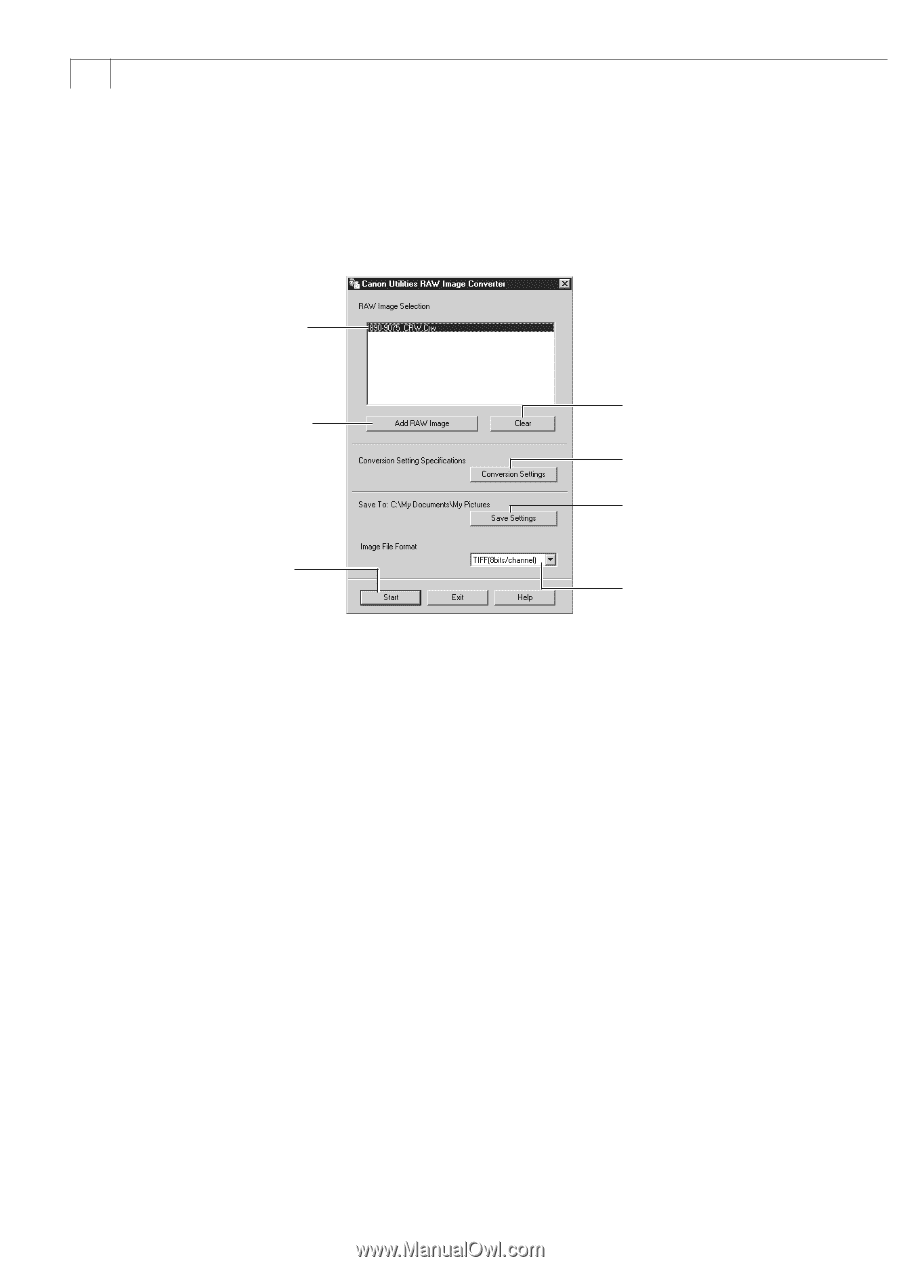
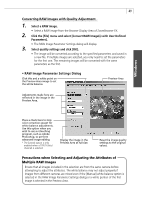
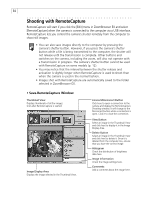
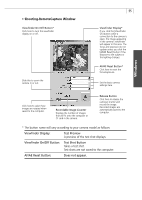
50 Converting Images with RAW Image Converter If you are using the WIA Driver or downloading directly from a CF card reader, you can use RAW Image Converter to convert RAW images. The converted images can be saved in the TIFF (8 bits/channel), TIFF (16 bits/channel), or Windows BMP formats. • The RAW Image Converter Main Window Displays the list of RAW images. Click this to display the Open dialog. Select files in it to add RAW images to convert. Start converting. Delete the selected image from the list. Set the conversion method (p. 51). Select where converted images are saved. The default setting saves them to the desktop. Select the file format. 1. Double-click a RAW image on the computer. • RAW Image Converter will start. • You can select multiple RAW images at once. With the WIA Driver, you can also select a RAW image from the camera, right-click the mouse and select [Convert] to start RAW Image Converter. 2. Click the [Conversion Settings] button. • The Conversion Settings dialog will display (p. 51). 3. Select a conversion method and click [OK]. 4. Select a file format for saving the converted files in the [Image File Format] section. • Select either the TIFF (8 bits/channel) or BMP format. To select TIFF (16 bits/ channel), you must first select [16 bits per color channel] in the [Image Bit Count After Conversion] section of the Conversion Settings dialog. 5. Select a RAW image file from the list and click [Start]. • The selected RAW image will be converted to the specified file format and saved to the desktop. If you selected [Convert with RAW image quality conversion] in the [Conversion Options for Image Quality] section of the Conversion Settings dialog, the RAW Image Parameter Settings dialog will display (p. 49). Adjust the settings and click [OK]. To change where the file is saved, click the [Save Settings] button and change the target folder. 6. Click [Exit] in the RAW Image Converter main window.
-
 1
1 -
2
-
3
-
4
-
5
-
6
-
7
-
8
-
9
-
10
-
11
-
12
-
13
-
14
-
15
-
16
-
17
-
18
-
19
-
20
-
21
-
22
-
23
-
24
-
25
-
26
-
27
-
28
-
29
-
30
-
31
-
32
-
33
-
34
-
35
-
36
-
37
-
38
-
39
-
40
-
41
-
42
-
43
-
44
-
45
-
46
-
47
-
 48
48 -
 49
49 -
 50
50 -
 51
51 -
 52
52 -
 53
53 -
 54
54 -
 55
55 -
 56
56 -
 57
57 -
 58
58 -
59
-
60
-
61
-
62
-
63
-
64
-
65
-
66
-
67
-
68
-
69
-
70
-
71
-
72
-
73
-
74
-
75
-
76
-
77
-
78
-
79
-
80
-
81
-
82
-
83
-
84
-
85
-
86
-
87
-
88
-
89
-
90
-
91
-
92
-
93
-
94
-
95
-
96
-
97
-
98
-
99
-
100
-
101
-
102
-
103
-
104
-
105
-
106
-
107
-
108
-
109
-
110
-
111
-
112
-
113
-
114
-
115
-
116
-
117
 |
 |